Web.config redirects with rewrite rules - https, www, and more
Rewrite rules are a powerful feature in IIS. Common tasks like redirecting www to non-www (or the other way around), implementing canonical URLs, redirecting to HTTPS, and similar tasks are documented right there in your Web.config file. In this post, you will learn about the syntax of rewrite rules and how to implement the mentioned common tasks, and much more.

When needing to redirect one URL to another, a lot of different options exist. Some tasks can be implemented in the DNS. Others are done through reverse proxies like Nginx and Squid. Sometimes you just want to redirect a single URL and you can choose to modify the HTTP response from within an MVC controller.
A much more generic solution is IIS rewrite rules. With rules, you can create a common set of rules and make IIS enforce these over multiple URLs and even across applications.
Rewrite rules can be either global (in the applicationHost.config file) or local (in the web.config file). There are several ways to add both global and local rules. IIS Manager has built-in support for creating rules, but it is my impression most people don't have IIS installed locally. Rules have been the source of lots of frustration on StackOverflow, which is why using IIS Manager for creating your first rule can be a good choice.
Creating a new rule
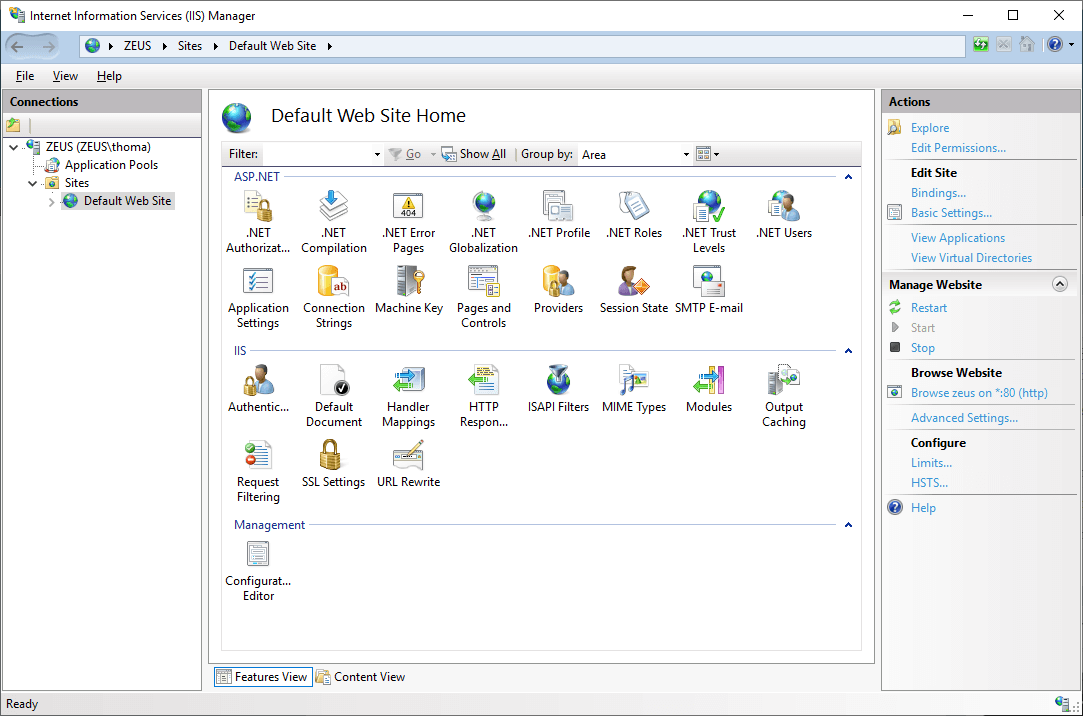
To create a new rule, launch IIS Manager, and click a website:

See the URL Rewrite icon below the IIS section? If not, make sure to download and install the URL Rewrite extension: https://www.iis.net/downloads/microsoft/url-rewrite.
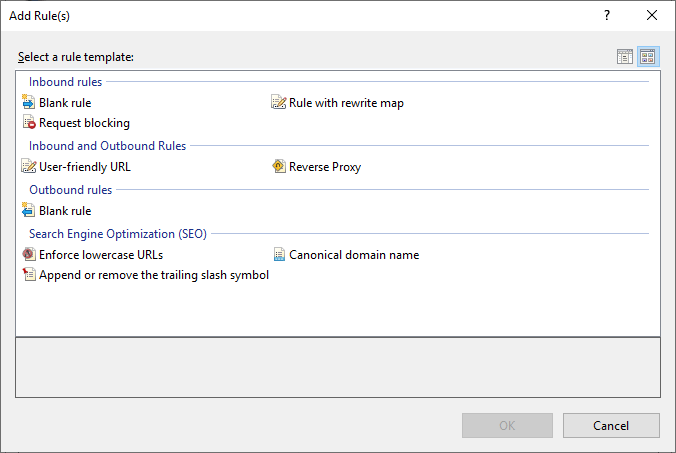
Double-click the URL Rewrite icon and click the Add Rule(s)... link from the Actions menu:

There are a wide range of different templates to choose from. As a first-time rule developer, getting a bit of assistance is a nice little feature of the IIS Manager. I'm not saying you shouldn't learn the underlying syntax (you need to), but looking at pre-generated examples is a good starting point.
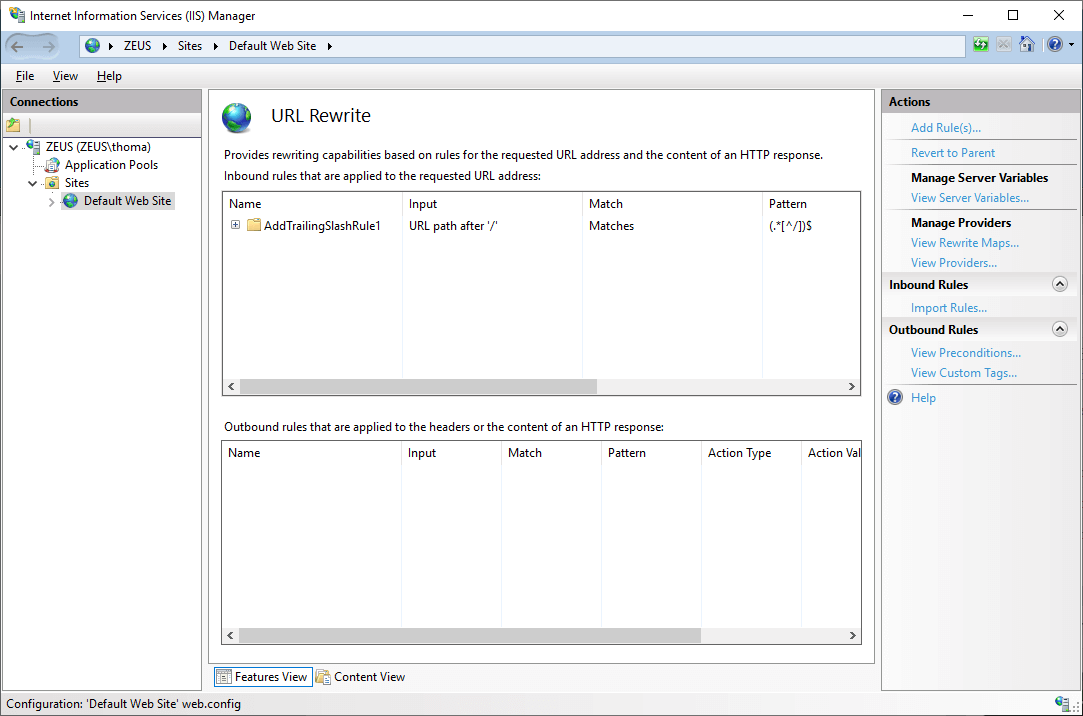
Select the Append or remove the trailing slash symbol template and click the OK button. In the following step, keep the Appended if it does not exist selection and click OK. A new inbound rule is created:

Requesting the website without a trailing slash (/) will automatically append the slash using the newly created rule.
Since the rule was created directly on the website, the new rule is added to the web.config file of the website. You hopefully understand why this approach shouldn't be used in your production environment. Every piece of configuration should be in either source control or deployment software like Octopus Deploy or Azure DevOps. For playing around with rules, the UI approach is excellent, though.
Let's take a look at the generated code inside the web.config file:
<?xml version="1.0" encoding="UTF-8"?>
<configuration>
    <system.webServer>
        <rewrite>
            <rules>
                <rule name="AddTrailingSlashRule1" stopProcessing="true">
                    <match url="(.*[^/])$" />
                    <conditions>
                        <add input="{REQUEST_FILENAME}" matchType="IsDirectory" negate="true" />
                        <add input="{REQUEST_FILENAME}" matchType="IsFile" negate="true" />
                    </conditions>
                    <action type="Redirect" url="{R:1}/" />
                </rule>
            </rules>
        </rewrite>
    </system.webServer>
</configuration>
At first glance, rewrite rules can be a challenge to read. If you feel this way, I understand you. Configuring software in deeply nested XML has never been my favorite either. Let's go through the markup one element at a time.
Inbound and outbound rules
All rules must be added to the <rewrite> element inside <system.webServer>. There are two types of rules available: inbound rules (defined in the <rules> element) and outbound rules (defined in the <outboundRules> element). The rewrite rule is added as an inbound rule in the example above. Inbound rules are executed against the incoming request. Examples of these rules are: adding a trailing slash (yes, the previous example), rewriting the request to a different URL, and blocking incoming requests based on headers. Outbound rules are executed against the response of an HTTP request. Examples of outbound rules are: adding a response header and modifying the response body.
Both inbound and outbound rules are defined in a <rule> element. In the example above, a new rule named AddTrailingSlashRule1 is added. The name of each rule is left for you to decide, as long as you give each rule a unique name. Also, take notice of the stopProcessing attribute specified on the rule. If set to true, IIS will stop executing additional rules if the condition specified inside the rule matches the current request. You mostly want to specify false in this attribute, unless you are redirecting the entire request to another URL.
Match, action, and conditions
All rules have a pattern, an action, and an optional set of conditions. The example above has all three.
The pattern is implemented in the <match> element and tells the rewrite extension which URLs to execute the rule for. Patterns are written using regular expressions in the url attribute. Regular expressions is an extremely complicated language, which deserves a very long blog post on its own. I write regular expressions by using Google to find examples of how people already wrote examples of regular expressions looking like what I would like to achieve in each case.
The <action> element tells IIS what to do about requests matching the pattern. All actions need a type attribute to tell IIS how to move forward. type can have one of the following values:
None: do nothing.Rewrite: rewrite the request to another URL.Redirect: redirect the request to another URL.CustomResponse: return a custom response to the client.AbortRequest: drop the HTTP connection for the request.
In the example above, the action used a Redirect type, meaning the web server will return an HTTP redirect to the client. You can specify if you want to use a permanent or temporary redirect using the redirectType attribute.
I don't want to list every possible element and value inside this post since the official MSDN documentation is quite good. Visual Studio also provides decent IntelliSense for rewrite rules. Browse through the examples last in this post to get an overview of what is possible with rewrite rules.
Common rules
This is a collection of common rules that we are either using on elmah.io or that I have used in the past.
Redirect to HTTPS
<rule name="RedirectToHTTPS" stopProcessing="true">
  <match url="(.*)" />
  <conditions>
    <add input="{HTTPS}" pattern="off" ignoreCase="true" />
  </conditions>
  <action type="Redirect" url="https://{SERVER_NAME}/{R:1}" redirectType="Permanent" />
</rule>
Redirect www to non-www
<rule name="RedirectWwwToNonWww" stopProcessing="false">
  <match url="(.*)" />
  <conditions logicalGrouping="MatchAll" trackAllCaptures="false">
    <add input="{HTTP_HOST}" pattern="^(www\.)(.*)$" />
  </conditions>
  <action type="Redirect" url="https://{C:2}{REQUEST_URI}" redirectType="Permanent" />
</rule>
Redirect non-www to www
<rule name="RedirectNonWwwToWww" stopProcessing="true">
  <match url="(.*)" />
  <conditions>
    <add input="{HTTP_HOST}" pattern="^domain.com$" />
  </conditions>
  <action type="Redirect" url="http://www.domain.com/{R:0}" redirectType="Permanent" />
</rule>
Reverse proxy
In this example, I'm using rewrite rules to serve a blog hosted on GitHub but through a custom domain name. By using the Rewrite action type, the URL stays the same, even though the content is served from elmahio.github.io.
<rule name="ReverseProxy" stopProcessing="true">
  <match url="(.*)" />
  <conditions logicalGrouping="MatchAll">
    <add input="{REQUEST_URI}" negate="true" pattern="^(.*)/.well-known/(.*)$"/>
  </conditions>
  <action type="Rewrite" url="http://elmahio.github.io/blog/{R:1}" />
</rule>
Rewrite all but elmah.axd
<rule name="RewriteAllButElmahAxd" stopProcessing="true">
  <match url="(.*)" />
  <conditions>
    <add input="{REQUEST_FILENAME}" matchType="IsDirectory" negate="true" />
    <add input="{REQUEST_FILENAME}" matchType="IsFile" negate="true" />
    <add input="{URL}" negate="true" pattern="\elmah.axd$" />
  </conditions>
  <action type="Rewrite" url="http://elmahio.github.io/blog/{R:1}" />
</rule>
Add trailing slash
<rule name="AddTrailingSlash" stopProcessing="true">
  <match url="(.*[^/])$" />
  <conditions>
    <add input="{REQUEST_FILENAME}" matchType="IsDirectory" negate="true" />
    <add input="{REQUEST_FILENAME}" matchType="IsFile" negate="true" />
  </conditions>
  <action type="Redirect" url="{R:1}/" redirectType="Permanent" />
</rule>
Remove trailing slash
<rule name="RemoveTrailingSlash" stopProcessing="true">
  <match url="(.*[^/])$" />
  <conditions>
    <add input="{REQUEST_FILENAME}" matchType="IsDirectory" negate="true" />
    <add input="{REQUEST_FILENAME}" matchType="IsFile" negate="true" />
  </conditions>
  <action type="Redirect" url="{R:1}" redirectType="Permanent" />
</rule>
Lowercase all URLs
<rule name="LowercaseAllUrls" stopProcessing="true">
  <match url=".*[A-Z].*" ignoreCase="false" />
  <action type="Redirect" url="{ToLower:{R:0}}" />
</rule>
Redirect to another domain
<rule name="RedirectToNewDomain" stopProcessing="true">
  <match url="(.*)" />
  <conditions>
    <add input="{HTTP_HOST}" pattern="^old-domain\.com$" />
  </conditions>
  <action type="Redirect" url="https://new-domain.com/{R:1}" redirectType="Permanent" />
</rule>
Custom maintenance response
If you are allowed downtime for maintenance on your site, using a rewrite rule to return a custom error response to the user might be an option.
<rule name="CustomErrorResponse" stopProcessing="true">
  <match url="(.*)" />
  <action type="CustomResponse" statusCode="503" statusReason="Down for maintenance" />
</rule>
Never rewrite elmah.axd
If you have ELMAH, the open-source library, installed on your site you have a local URL named /elmah.axd to help browse your error log. In some cases, you may have rewrite rules configured, the messes with ELMAH and therefore shouldn't be run on ELMAH. You can use the negate feature of rewrite rules to keep our specific URLs or patterns:
<rule name="CustomErrorResponse" stopProcessing="true">
  <match url="(.*)" />
  <conditions>
    <add input="{URL}" negate="true" pattern="\elmah.axd$" />
  </conditions>
  <action type="CustomResponse" statusCode="503" statusReason="Down for maintenance" />
</rule>
Validating web.config and monitor errors
Rewrite rules can be hard to test. Being XML and in some cases modifications that you want running on production only, forces most of your test to happen manually in a browser. There are a couple of tools available to help you write and test rewrite rules. As already mentioned, Visual Studio has decent IntelliSense for rules. I always recommend people to validate the finished Web.config file using this Web.config Validator. If you are writing rewrite rules as part of a Web.config transformation file, also make sure to test the transformed file using the Web.config Transformation Tester. You can copy the transformed result and validating it with the already mentioned validator.
When it comes to monitoring errors, I will recommend you implement a good error monitoring process in your production environment. For obvious reasons, I want to highlight elmah.io as the best solution for monitoring problems with your Web.config file. But there are other options out there that will get you almost as far. At least pick a solution that will notify you through email, Slack, Teams, or similar, to avoid having to look through log files on your webserver.
elmah.io: Error logging and Uptime Monitoring for your web apps
This blog post is brought to you by elmah.io. elmah.io is error logging, uptime monitoring, deployment tracking, and service heartbeats for your .NET and JavaScript applications. Stop relying on your users to notify you when something is wrong or dig through hundreds of megabytes of log files spread across servers. With elmah.io, we store all of your log messages, notify you through popular channels like email, Slack, and Microsoft Teams, and help you fix errors fast.
See how we can help you monitor your website for crashes Monitor your website
