
Rendering dynamic content in Blazor Wasm using DynamicComponent
Sometimes we need to load different types of components dynamically. This is especially needed in scenarios where we cannot define a general structure e.g. in a blog with different types of content intermixed. Previously, we needed a big switch statement to check for different types and explicitly write out each of the components that we could potentially render. This created tight coupling between the page that renders the components and the components themselves. In this article, we will see how to use the new DynamicComponent from .NET 6 to render dynamic content.

Prerequisites
This feature was first introduced in .NET 6 preview 2 so to use this feature you need to install this version of .NET 6 or newer. It can be downloaded following this link: Download .NET 6
For the best developer experience, you also need the newest version of Visual Studio.
Rendering list of components
We will work on rendering some different components from a list. The DynamicComponent tag needs a Type parameter and a Parameters parameter which it will parse onwards to a component of the specified type. We define a list that contains Tuple's with these two parameters and iterate over this list in a foreach loop.
<div class="container">
    @foreach (var component in components)
    {
        <DynamicComponent Type=@component.type Parameters=@component.parameters />
    }
</div>

@code {
    protected List<(Type type, Dictionary<string, object> parameters)> components { get; set; }
}
The type for Parameters has to be Dictionary<string, object>. It has to match so that each Key in the dictionary fits a public property marked with [Parameter] in the specified Component.
An example could be the following Component which we have defined with the filename ParagrahpComponent.razor:
<div class="col" >
    <p>
        @Text
    </p>
</div>

@code {
    [Parameter]
    public string Text { get; set; }
}
For this, a fitting dictionary could be:
new Dictionary<string, object>() { { "Text", "This is some text for a paragraph" } }
And then the Type would be something like
MyProject.Shared.ParagrahpComponent
Loading content from appsettings.json
Next, we want to load some content from somewhere and for this to be inserted in our dictionary. We could set up a database and fetch data from it through an API. But for now, we are just going to load data from the appsettings.json configuration file. We first have to add the appsettings.json file to the wwwroot/ folder. And in it we have to define some structure which we will parse later.
{
    "content": [
        {
            "type": "Paragraph",
            "parameters": {
                "Text": "Lorem ipsum dolor sit amet, consectetur adipiscing elit, sed do eiusmod tempor incididunt ut labore et dolore magna aliqua. Ut enim ad minim veniam, quis nostrud exercitation ullamco laboris nisi ut aliquip ex ea commodo consequat."
            }
        }
    ]
}
We can reference the configuration by injecting IConfiguration at the top of our razor page.
@inject IConfiguration Configuration
And then we can construct or list of (Type, Parameters) tuples.
protected override void OnInitialized()
{
    components = Configuration
        .GetSection("content")
        .GetChildren()
        .Select(component =>
            (
                type: Type.GetType($"MyProject.Shared.{component.GetValue<string>("type")}Component"),
                parameters: component
                    .GetSection("parameters")
                    .GetChildren()
                    .ToDictionary(p => p.Key, p => p.Get<object>())
            )
        )
        .ToList();
}
We first fetch the "content" section. Then we iterate over all the defined components. First, we get the type, and here we need to convert the name of the component to the actual type class. We get the "type" field using c.GetValue<string>("type") and then convert that string to the needed type using the GetType method which takes a string.
Next for the parameters, we need to iterate over all the Key-Value pairs in the parameters section. We need to iterate all the parameters to explicitly get each of the values as an object.
More Components
For now, we only have a Paragraph component, so let's create some more components that we might see useful in different contexts.
Title Component
To start off let's create something similar to the Paragraph. A Title! We create a razor component called TitleComponent.razor.
<div class="col">
    <h1>
        @Text
    </h1>
    <hr />
</div>

@code {
    [Parameter]
    public string Text { get; set; }
}
Then we can add this component to the start of our content in appsettings.json.
{
    "content": [
        {
            "type": "Title",
            "parameters": {
                "Text": "This is my Title"
            }
        },
        // Our other components
    ]
}
Let's see what it looks like.
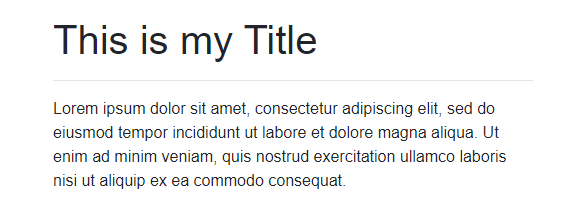
Image Component
Next, let's add an image Component called ImageComponent.razor
<div class="col">
    <img src="@Src" alt="@Alt" style="width: 100%;" />
</div>

@code {
    [Parameter]
    public string Src { get; set; }

    [Parameter]
    public string Alt { get; set; }
}
It will display the image in full width, nice for a cover image, and get the alt text from the configuration as well. It is easy for us to create more components and the most important part is that we have had no need to edit our main page to render the new components as well.
Html Component
Sometimes we might need some special content for which we want to render any markup. For this, we can use the MarkupString type which can render raw HTML in a razor page. We can't use a MarkupString directly for our parameter because it is derived from the object class so we will cast our string to it instead.
<div class="col" >
    <p>
        @(new MarkupString(Text))
    </p>
</div>

@code {
    [Parameter]
    public string Text { get; set; }
}
Then we can render something like this:

Code Component
If this is for some sort of tech site or blog we might also want to show some code like just above. For this, we will use highlight.js to make a Code Component. We first need to add references to the script and stylesheet files for highlight.js. I added it to the project using LibraryManager and then I referenced them in the head section of the index.html file like so:
<link href="lib/styles/dracula.min.css" rel="stylesheet" />
<script src="lib/highlight.min.js"></script>
In order to activate the highlight.js library we still need to invoke a JS function after the code has been rendered. We inject the IJSRuntime directly in the Component. We call the Component CodeComponent.razor.
@inject IJSRuntime JSRuntime

<div class="col">
    <pre><code class="@Language" style="border-radius:5px;">
        @Code
    </code></pre>
</div>

@code {
    [Parameter]
    public string Code { get; set; }

    [Parameter]
    public string Language { get; set; }

    protected override async Task OnAfterRenderAsync(bool firstRender)
    {
        if (firstRender)
        {
            await JSRuntime.InvokeVoidAsync("hljs.highlightAll");
        }
    }
}
We invoke the function after the first time we have rendered the the markup. We use the InvokeVoidAsync method because the hljs.highlightAll() function doesn't return anything. We also added so that the Language of the Code can be defined dynamically. With this we can render content like this dynamically.

Twitter Component
The last component that we are going to create is a Twitter Card Component. This will use the Twitter JS library which can create cards for a specific StatusID. We first add a reference to the library in our index.html page.
<script async src="https://platform.twitter.com/widgets.js" charset="utf-8"></script>
And then we use it in our component.
@inject IJSRuntime JSRuntime

<div class="col" @ref=Card>
    @Alt
</div>

@code {
    [Parameter]
    public string StatusID { get; set; }

    [Parameter]
    public string Alt { get; set; }

    protected ElementReference Card { get; set; }

    protected override async Task OnAfterRenderAsync(bool firstRender)
    {
        if (firstRender)
        {
            await JSRuntime.InvokeVoidAsync("twttr.widgets.createTweet", StatusID, Card).AsTask().ContinueWith(_ => { Alt = ""; StateHasChanged(); });
        }
    }
}
We inject the IJSRuntime at the top of the component. Then on the first render we invoke the twttr.widgets.createTweet function with the StatusID and a reference to the div that we want to render the card in. We convert the invocation to a Task and then state that we want to set the Alt value to the empty string afterward. This way the Alt value will be displayed until the card has loaded.
Finally, we can put it all together and get a result like this.
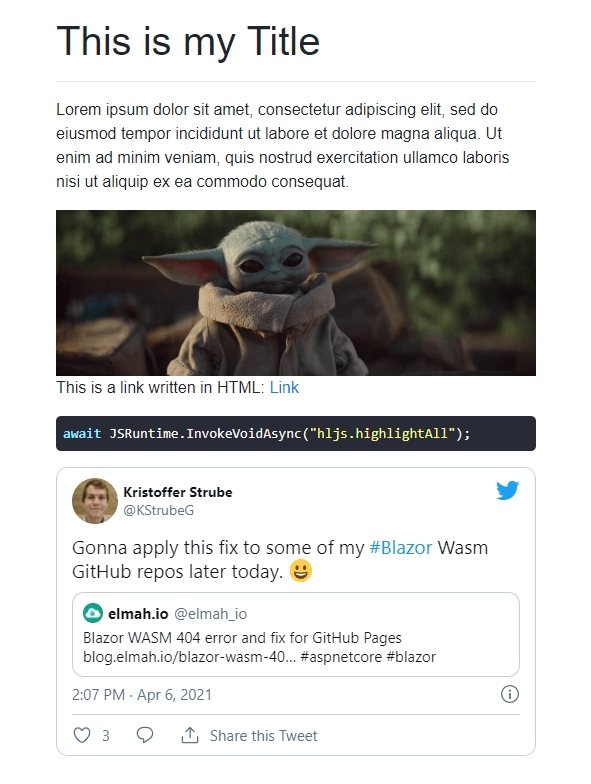
Defined from this JSON.
{
    "content": [
        {
            "type": "Title",
            "parameters": {
                "Text": "This is my Title"
            }
        },
        {
            "type": "Paragraph",
            "parameters": {
                "Text": "Lorem ipsum dolor sit amet, consectetur adipiscing elit, sed do eiusmod tempor incididunt ut labore et dolore magna aliqua. Ut enim ad minim veniam, quis nostrud exercitation ullamco laboris nisi ut aliquip ex ea commodo consequat."
            }
        },
        {
            "type": "Image",
            "parameters": {
                "Src": "grogu.jpg",
                "Alt": "Baby Yoda"
            }
        },
        {
            "type": "Html",
            "parameters": {
                "Text": "This is a link written in HTML: <a href=\"https://blog.elmah.io\">Link</a>"
            }
        },
        {
            "type": "Code",
            "parameters": {
                "Code": "await JSRuntime.InvokeVoidAsync(\"hljs.highlightAll\");",
                "Language": "csharp"
            }
        },
        {
            "type": "Twitter",
            "parameters": {
                "StatusID": "1379405469035462660",
                "Alt": "Loading Twitter Post ..."
            }
        }
    ]
}
Conclusion
Now we have shown how to use the DynamicComponent from .NET 6 to render any component dynamically. We have seen how we can parse content from appsettings.json to fit the types that the DynamicComponent requires. In the end, we have seen a big variety of components that we can load dynamically like images, code blocks, and a Twitter card.
elmah.io: Error logging and Uptime Monitoring for your web apps
This blog post is brought to you by elmah.io. elmah.io is error logging, uptime monitoring, deployment tracking, and service heartbeats for your .NET and JavaScript applications. Stop relying on your users to notify you when something is wrong or dig through hundreds of megabytes of log files spread across servers. With elmah.io, we store all of your log messages, notify you through popular channels like email, Slack, and Microsoft Teams, and help you fix errors fast.

See how we can help you monitor your website for crashes Monitor your website