NLog Tutorial - The essential guide for logging from C#
When NLog originally came out, I was hooked. Such a step up from the world of log4net. Then Serilog came out and I lost track of the progress on NLog. For years I even considered it dead. Boy was I wrong. NLog has developed impressively over the years and offers all of the modern features available in similar logging frameworks like Serilog and Microsoft.Extensions.Logging. In this post, I'll tell you everything there is to know about NLog.
Let's start with the basics. NLog is a logging framework for .NET. Ok, you probably already knew that. Much like log4net and Serilog, NLog lets you log messages to a range of data stores (called targets). Everything from the console to SQL Server, document databases, and elmah.io is supported and there are almost 100 of them. Also, NLog offers great flexibility when it comes to formatting messages and including additional information on each message.
Logging
NLog provides a great API for logging messages to one or more targets. If you are already familiar with similar logging frameworks, you will quickly be up and running logging with NLog. Let's dig into the details.
Log levels
All log messages have a severity called "Level". The following log levels are supported:
- Fatal
- Error
- Warn
- Info
- Debug
- Trace
Understanding log levels and putting the right level on each message is very important. Log levels are used to mark the severity of each message as well as other features in NLog like log filtering. Consider the scenario where you are logging both to a local file and elmah.io. You may want to log everything to the file but only Warn and up to elmah.io. Putting the right log level on each message is essential for this to work properly.
Logging messages
Logging messages with NLog is easy. To log, you need a reference to a Logger from something called LogManager:
Logger log = LogManager.GetCurrentClassLogger();
Creating a new logger using the GetCurrentClassLogger method is the easiest way to obtain a logger for the current context. There are other ways to get a new logger and dependency injection is also available with NLog. I may write something about this later if you guys are interested.
With the Logger instance in hand, you can start logging messages:
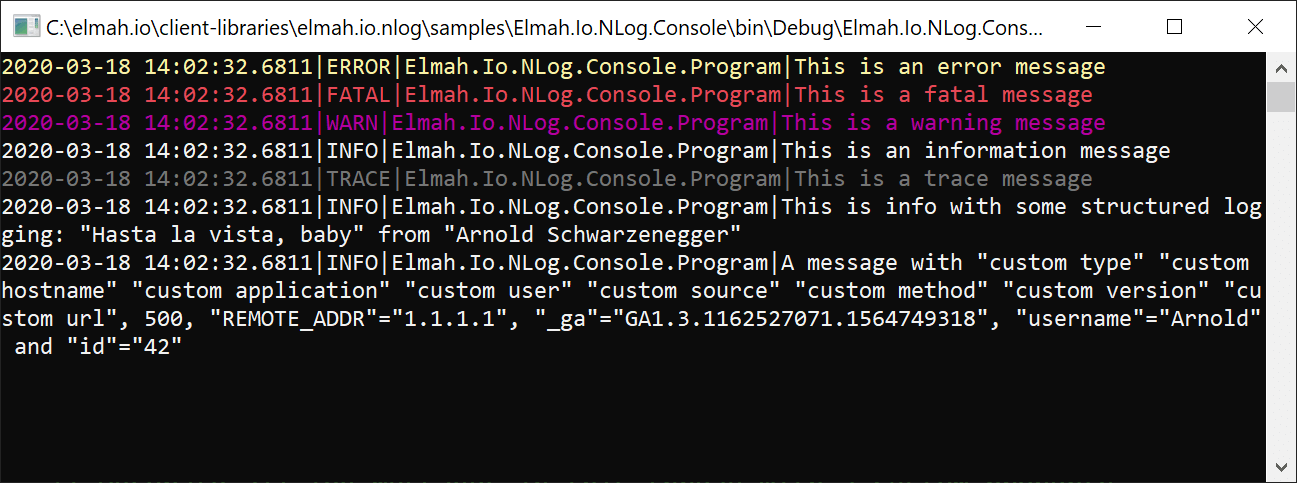
log.Debug("This is a debug message");
log.Error(new Exception(), "This is an error message");
log.Fatal("This is a fatal message");
As you already figured out, each log level has its own logging method. There is a range of different overloads accepting exceptions and other parameters. If you want greater control of what is getting logged, you can use a special overload accepting a LogEventInfo object:
var msg = new LogEventInfo(LogLevel.Info, "", "This is a message");
msg.Properties.Add("User", "Ray Donovan");
log.Info(msg);
If you are more a fluent kind of guy or gal, there's a great fluent API available too:
logger
    .Info()
    .Message("This is a message")
    .Property("User", "Ray Donovan")
    .Write();
Structured logging
NLog supports semantic/structured logging known from similar frameworks like Serilog and Microsoft.Extensions.Logging. With structured logging, you no longer log just simple text messages. Structured properties can be embedded directly as part of the message logged to the target (or through adding key/value pairs to Properties as shown in the previous section).
To understand structured logging, let's look at the example including a user from previous. If you want to embed the username as part of the log message, you could do something like this:
log.Info(string.Format("This is a message from {0}", "Mickey Donovan"));
This will output the text This is a message from Mickey Donovan in the configured targets. For simple text files, this is probably just fine. But when storing errors in a database or cloud service, you may want to search for log messages containing a specific user's name. Full-text search is available in some databases and products, but it would be even easier if the target could persist both the full log message as well as the properties used to generate the message.
This is where structured logging comes into play. Let's re-write the example from before to utilize NLog structured logging:
log.Info("This is a message from {User}", "Mickey Donovan");
Notice the {User} property embedded in the log message? NLog will automatically format the string when generating the full log message, producing the same string as before. But by giving the property a name (`User`), we also tell NLog that this is a structured property. Depending on how the configured target is implemented, this can be used for various purposes. Like searching:
SELECT *
FROM logmessages
WHERE user = 'Mickey Donovan'
Improved searching is probably why most people use structured logging. But there is a range of new possibilities when storing log messages as structured data. Logging metrics as part of log messages can be used to produce advanced dashboards when using something like Elasticsearch/Kibana. Consider a log message produced on every HTTP request to a website:
log.Info("Request to {Url} took {ElapsedMs}", "/login", 42);
With these data in a modern data store, you can create a dashboard showing the average response times either overall or grouped by URL. I'll show you an example of how to do this later in this article, but let's just agree on one thing so far: structured logging is pretty darn cool!
Context
Sometimes (ok often) it makes sense to write additional properties as part of a log message, without including it in the log messages or as structured properties (also goes into the message when rendered). NLog provides a range of different context classes to do so. In this section, I'll introduce you to the various context types, how to use them, and when to use which one.
Context types available in NLog are generally dictionaries and stacks, keeping additional properties. The context can be either global for the entire application lifespan or scoped for something shorter living like a thread. Context properties can be used to include contextual information to each log message. As I will show you later in this tutorial, the context can be accessed from both NLog targets as well as log message rendering using Layouts.
Global Diagnostics Context (GDC)
This context is implemented in the GlobalDiagnosticsContext class and represents a dictionary spanning the entire lifetime of your application. This context is great for including global properties to all log messages. A global property could be the name of the application, the version number, or other common information that you want access to on all log messages.
Adding properties to the global context can be done in your startup/initialization code like this:
GlobalDiagnosticsContext.Set("Application", "My cool app");
GlobalDiagnosticsContext.Set("Version", "1.0.42");
In the example, I set the Application and Version properties to some hard-coded values. These could have been fetched from a config file, the database, or third.
Mapped Diagnostics Logical Context (MDLC)
MappedDiagnosticsLogicalContexthas been deprecated in NLog 5 and should be replaced withScopeContext.
MappedDiagnosticsLogicalContext works much like GlobalDiagnosticsContext. It's a dictionary of property keys and values. But, unlike GlobalDiagnosticsContext where properties are global, MappedDiagnosticsLogicalContext lets you add thread-local properties. This means that the added properties will be available inside the current thread only. This works great for something like including HTTP contextual properties per web request (each web request launch a new thread) or other threaded applications.
To add properties through the MappedDiagnosticsLogicalContext class, call the Set method as in the previous example:
MappedDiagnosticsLogicalContext.Set("User", "some@user.com");
MappedDiagnosticsLogicalContext.Set("Url", "/about");
In this example I set two properties that could be thread-specific: User and Url.
While browsing the NLog documentation or googling blog posts, you may find examples using a class named MappedDiagnosticsContext. This is the old, now obsolete, way of adding thread-local properties with NLog. New code should be based on the MappedDiagnosticsLogicalContext class. If you are using NLog 5, both MappedDiagnosticsContext and MappedDiagnosticsLogicalContext should be replaced with ScopeContext.
Nested Diagnostics Logical Context (NDLC)
The NestedDiagnosticsLogicalContext class works a bit different than the context classes we have already looked at. It's a stack where you can push and pop one or more objects. This can be used for a range of different scenarios, like pushing a user's navigational journey throughout an application and logging this as part of a potential error.
Objects are added and removed using the Push and Pop methods known from the Stack class available in C#:
NestedDiagnosticsLogicalContext.Push("Something");
NestedDiagnosticsLocicalContext.Push("Something else");
// ...
NestedDiagnosticsLocicalContext.Pop();
// ...
NestedDiagnosticsLocicalContext.Pop();
In this example we push two strings on the context, run some code, pop one of the strings, run some more code, and finally pop the last string. In the Layout renderers section, I will show you how to use NestedDiagnosticsLogicalContext in your log messages and targets.
Pushing and popping can be done with C#'s using statement as well:
using (NestedDiagnosticsLogicalContext.Push("Something"))
{
    // ...
}
ScopeContext
The ScopeContext was added in NLog 5 as a replacement for MappedDiagnosticsContext and MappedDiagnosticLogicalContext. All diagnostics properties should now be based on ScopeContext rather than using the old contexts:
using (log.PushScopeProperty("User", "some@user.com"))
{
    // ...
}
Layouts and Layout renderers
In the Logging messages section, we saw how to log both simple and structured text messages. The rendered text message will typically be part of a larger context when written to a text file, database, remote logger, etc. Let's look at an example that most developers have seen IRL. A log statement like this:
log.Info("A log message");
Ends up in a text file looking like this when configuring the file target with NLog:
2020-03-16 12:34:05.9414|INFO|Elmah.Io.NLog.Console.Program|A log message
So, why does the outputted line contain more information than the logged text message? Say hello to NLog layouts. Layouts are formatters for NLog log messages. Most targets include the following default if not overwritten in config:
${longdate}|${level:uppercase=true}|${logger}|${message}
As you can see a Layout consists of text and one or more macro-like strings (like ${message}) called layout renderers. Layout renderers aren't something that I have met a lot of people digging into and that's a bit of a shame. Layout renderers is a very strong feature of NLog and can be used for a range of possibilities.
Layout is something that can be changed on all targets. In the Configuration section, I'll show you how to update the layout. Before we start looking at the configuration, let's go through a couple of the most common layout renderers part of NLog.
Common layout renderers
We have already seen a bunch of common renderers as part of the default layout available in NLog. Let's go through them one by one as well as look at other commonly used renderers.
${longdate} - The date and time of the logged message in the format yyyy-MM-dd HH:mm:ss.ffff. NLog provides a range of other date and time-related renderers like ${date}, ${shortdate}, ${ticks}, and ${time}.
${level} - The log level on the message.
${logger} - The name of the logger logging the message.
${message} - The formatted log message.
${stacktrace} - The stack trace if the log message contains an exception.
${gdc} - Remember GlobalDiagnosticsContext? Properties set through the global diagnostics context class can be accessed by the ${gdc} renderer by naming the property to render:
${gdc:item=Application}
${mdlc} - Like the global context, properties from MappedDiagnosticsLogicalContext can be renderer using the ${mdlc} renderer:
${mdlc:item=User}
${ndlc} - The NestedDiagnosticsLogicalContext stack can be accessed in layouts too by using the ${ndlc} renderer. Since stack items are simply strings or objects (rather than a dictionary of key values available in the other contexts), you reference one or more frames to render:
${ndlc:topFrames=3}
For more layout renderers check out NLog's documentation. There are more than 100 available 🙌
Web layout renderers
I wanted to put a few words on a special category of layout renders specific to ASP.NET and ASP.NET Core web applications. In case you are logging messages from a web application, including the current URL and/or status code in all log messages, can help debug logged errors. Here's a list of commonly used renderers for web applications. Like the core renderers, there are more available on NLog's documentation site.
${aspnet-request-url} - Render the URL of the current request.
${aspnet-request-contenttype} - Render the Content-Type of the current request.
${aspnet-response-statuscode} - Render the HTTP status code of the response.
${aspnet-user-identity} - Render username on the current request. If you are using something like ASP.NET Core Identity, the currently logged in user will be rendered using this layout renderer.
To use web layout renderers you need to install one of two special NuGet packages the nice people of NLog did. For ASP.NET, MVC, and Web API you need to install the NLog.Web package in your project and extend your web.config file with the following markup:
<system.webServer>
  <modules runAllManagedModulesForAllRequests="true">
    <add name="NLog" type="NLog.Web.NLogHttpModule, NLog.Web" />
  </modules>
</system.webServer>
For ASP.NET Core you need to install the NLog.Web.AspNetCore package.
Configuration
NLog provides a palette of different ways of configuring what to log where. In this section, I'll show you the most commonly used ways of configuring NLog.
NLog.config and app/web.config
Configuring NLog through XML in either a dedicated NLog.config file or embedded in the app.config or web.config file is what I see most people doing. It's probably because of historical reasons since that is the "API" that has been available with NLog since day 1.
Let's take a look at a simple config file:
<?xml version="1.0" encoding="utf-8" ?>
<nlog
  xmlns="http://www.nlog-project.org/schemas/NLog.xsd"
  xmlns:xsi="http://www.w3.org/2001/XMLSchema-instance">

  <targets>
    <target
      xsi:type="Console"
      name="console"
      layout="${longdate}|${level:uppercase=true}|${logger}|${message}" />
  </targets>
  <rules>
    <logger name="*" minlevel="Debug" writeTo="console" />
  </rules>
</nlog>
The configuration above shows the most simple example where NLog is told to log everything from Debug and up to the console. Notice how the console target is declared beneath the targets element and then references through rules. Rules are the glue that connects log levels with targets.
Configuration in appsettings.json
.NET Core prefer configuration in JSON over XML. You can keep your NLog.config file if you'd like, but there's also the option to configure NLog in the appsettings.json file.
To configure NLog in appsettings.json start by installing the NLog.Extensions.Logging NuGet package:
Install-Package NLog.Extensions.Logging
That package contains an NLog provider for Microsoft.Extensions.Logging which you can use if you'd like. It also contains the possibility of configuring NLog in JSON. To add NLog configuration, include the following in the appsettings.json file:
{
  "NLog": {
    "targets": {
      "console": {
        "type": "Console"
      }
    },
    "rules": [
      {
        "logger": "*",
        "minLevel": "Debug",
        "writeTo": "console"
      }
    ]
  }
}
If you haven't already, make sure that your .NET Core application loads the configuration:
var config = new ConfigurationBuilder()
    .AddJsonFile("appsettings.json", optional: true, reloadOnChange: true)
    .Build();
Finally, tell NLog how to load the configuration:
LogManager.Configuration = new NLogLoggingConfiguration(config.GetSection("NLog"));
NLog now loads everything from appsettings.json instead of NLog.config.
Configuration in C#
If you're not into configuration in XML, NLog offers configuration through C# as well. To replicate the setup from the previous example, you can use the following code:
using NLog;
using NLog.Config;
using NLog.Targets;

...

var config = new LoggingConfiguration();
var consoleTarget = new ConsoleTarget
{
    Name = "console",
    Layout = "${longdate}|${level:uppercase=true}|${logger}|${message}",
};
config.AddRule(LogLevel.Debug, LogLevel.Fatal, consoleTarget, "*");
LogManager.Configuration = config;
NLog doesn't provide a fluent configuration API as known from ASP.NET Core and Serilog. NLog 4.7 comes with something new, but I have yet to look into the possibilities. As soon as it is officially launched, I'll update this post with an example.
Configuration for common targets
There's a range of targets that are used throughout most applications. In this section, I have collected XML examples that you can copy and paste directly into your project to start logging with NLog.
ColoredConsole
While there's a normal Console target available in NLog, I always use the ColoredConsole target. Logging to the console shouldn't be used in production for obvious reasons. For development, having colors inside the console means more than one should think.
Here's the config:
<?xml version="1.0" encoding="utf-8" ?>
<nlog xmlns="http://www.nlog-project.org/schemas/NLog.xsd"
      xmlns:xsi="http://www.w3.org/2001/XMLSchema-instance">

  <targets>
    <target xsi:type="ColoredConsole" name="console" />
  </targets>

  <rules>
    <logger name="*" minlevel="Trace" writeTo="console" />
  </rules>
</nlog>
and here's the output in the console:
File
Logging to a file is a little better than logging to the console. For simple applications and to keep the logs locally, this can be sufficient. I always recommend to add file rolling based on a date, sequence number, or similar, to avoid huge log files. The following configuration produces a log file per day:
<?xml version="1.0" encoding="utf-8" ?>
<nlog xmlns="http://www.nlog-project.org/schemas/NLog.xsd"
      xmlns:xsi="http://www.w3.org/2001/XMLSchema-instance">

  <targets>
    <target xsi:type="File"
            name="file"
            fileName="log.txt"
            archiveFileName="log.{#}.txt"
            archiveNumbering="Date"
            archiveEvery="Day"
            archiveDateFormat="yyyyMMdd" />
  </targets>

  <rules>
    <logger name="*" minlevel="Trace" writeTo="file" />
  </rules>
</nlog>
SQL Server
We have reached a target that may suit the need for a production log: SQL Server. NLog provides a Database target that can be used for all of the databases supported by the SQL client in .NET. For this example, I have created a database on a local SQL Server named nlog. In that database I have created the following (highly simplified table):
CREATE TABLE [dbo].[logs](
	[id] [int] IDENTITY(1,1) NOT NULL,
	[datetime] [datetime] NOT NULL,
	[message] [nvarchar](256) NOT NULL,
	[lvl] [nchar](10) NOT NULL,
 CONSTRAINT [PK_logs] PRIMARY KEY CLUSTERED
(
	[id] ASC
)WITH (PAD_INDEX = OFF, STATISTICS_NORECOMPUTE = OFF, IGNORE_DUP_KEY = OFF, ALLOW_ROW_LOCKS = ON, ALLOW_PAGE_LOCKS = ON) ON [PRIMARY]
) ON [PRIMARY]
To tell NLog to create log messages in SQL Server, you can use the following config:
<?xml version="1.0" encoding="utf-8" ?>
<nlog xmlns="http://www.nlog-project.org/schemas/NLog.xsd"
      xmlns:xsi="http://www.w3.org/2001/XMLSchema-instance">

  <targets>
    <target xsi:type="Database"
            name="database"
            dbProvider="System.Data.SqlClient"
            connectionString="data source=.;Initial Catalog=nlog;Integrated Security=True;"
            commandText="INSERT INTO [logs](datetime,message,lvl) VALUES (getutcdate(),@msg,@level)">
      <parameter name="@msg" layout="${message}" />
      <parameter name="@level" layout="${level}" />
    </target>
  </targets>

  <rules>
    <logger name="*" minlevel="Trace" writeTo="database" />
  </rules>
</nlog>
Elasticsearch
NLog has great support for logging to Elasticsearch using the third-party library NLog.Targets.ElasticSearch. To log to Elasticsearch start by installing the NuGet package:
Install-Package NLog.Targets.ElasticSearch
Then add the following config to NLog.config:
<?xml version="1.0" encoding="utf-8" ?>
<nlog xmlns="http://www.nlog-project.org/schemas/NLog.xsd"
      xmlns:xsi="http://www.w3.org/2001/XMLSchema-instance">

  <extensions>
    <add assembly="NLog.Targets.ElasticSearch"/>
  </extensions>

  <targets>
    <target xsi:type="BufferingWrapper" name="elastic">
      <target xsi:type="ElasticSearch" />
    </target>
  </targets>

  <rules>
    <logger name="*" minlevel="Trace" writeTo="elastic" />
  </rules>
</nlog>
NLog now logs everything to a rolling index named logstash-yyyy.MM.dd:

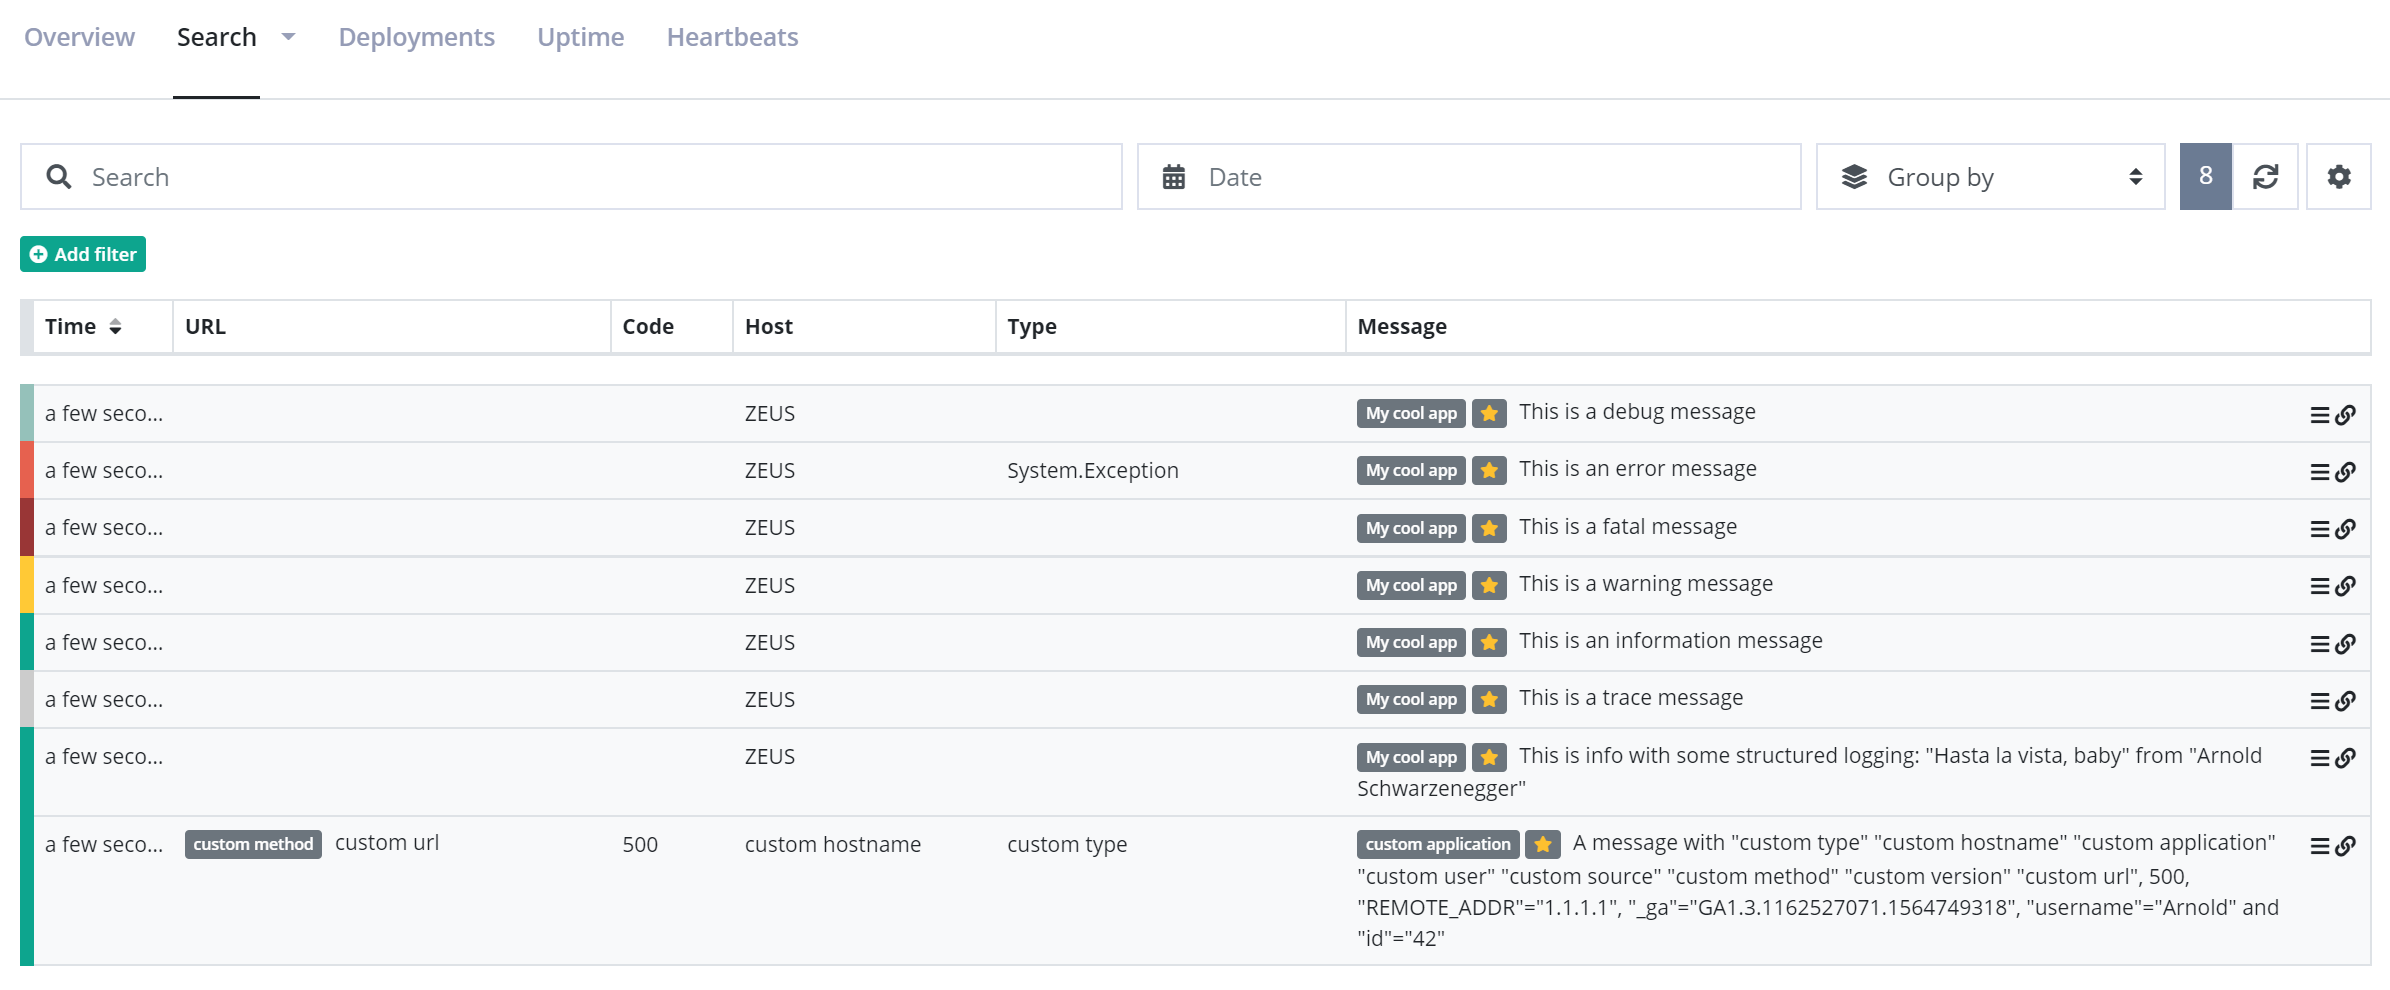
elmah.io
elmah.io also comes with a target for NLog. This guide assumes that you have already signed up for elmah.io and created a new log. Start by installing the following NuGet package:
Install-Package Elmah.Io.NLog
Then add the config as shown here:
<?xml version="1.0" encoding="utf-8" ?>
<nlog xmlns="http://www.nlog-project.org/schemas/NLog.xsd"
      xmlns:xsi="http://www.w3.org/2001/XMLSchema-instance">

  <extensions>
    <add assembly="Elmah.Io.NLog" />
  </extensions>

  <targets>
    <target name="elmahio" xsi:type="elmah.io" apiKey="API_KEY" logId="LOG_ID" />
  </targets>

  <rules>
    <logger name="*" minlevel="Trace" writeTo="elmahio" />
  </rules>
</nlog>
Replace API_KEY and LOG_ID with the keys available through the elmah.io UI.
When running the application, log messages are now persisted in elmah.io:
Internal logging
Sometimes you may see unexpected errors when trying to log through NLog. An example could be a configured target that doesn't receive any log messages. One way to debug problems like these is to enable NLog's internal logging. Internal logging outputs detailed information about what goes inside the engine room of NLog. In addition, a lot of the targets available for NLog log messages to the internal logger too, like if any exception occurs while writing log messages.
Internal logging can be enabled by adding the internalLogFile and internalLogLevel attributes to the nlog element in the configuration file:
<nlog internalLogFile="c:\temp\nlog-internal.log" internalLogLevel="Trace">
The code above will write all Trace messages or higher to a file named c:\temp\nlog-internal.log. Inspect this file for any problems happening inside NLog. Internal logging can be easily disabled without removing the attributes:
<nlog internalLogFile="c:\temp\nlog-internal.log" internalLogLevel="Off">
NLog vs ELMAH
I often see people asking about the difference between logging frameworks like NLog and ELMAH (the open-source project, not elmah.io). The two tools have a small overlap but cover two different needs.
NLog is a logging framework to log messages to one or more targets, as we've seen in this post. NLog has the concept of log levels and can log to a range of different destinations. Log messages are (typically) short text strings, that end up in a file or database. Custom properties can be attached to each log message and used in various ways like when serializing the log message or storing additional data in a database.
ELMAH is an error logging product for ASP, WebForms, MVC, and Web API projects. ELMAH automatically logs all uncaught exceptions happening on the enclosing website, alongside a range of HTTP contextual information like the server variables on the time of the error happening. ELMAH doesn't support custom properties very well and doesn't have the concept of log levels (everything is an error).
That's a wrap
I hope that you learned something new. This isn't meant as a static guide, though. If you feel like some areas could benefit from more explanation or others are completely missing, don't hesitate to reach out.
But wait, there's more
Ever find yourself struggling to remember all those possibilities and syntaxes available in NLog? Download our NLog Cheat Sheet to get a helping hand.
elmah.io: Error logging and Uptime Monitoring for your web apps
This blog post is brought to you by elmah.io. elmah.io is error logging, uptime monitoring, deployment tracking, and service heartbeats for your .NET and JavaScript applications. Stop relying on your users to notify you when something is wrong or dig through hundreds of megabytes of log files spread across servers. With elmah.io, we store all of your log messages, notify you through popular channels like email, Slack, and Microsoft Teams, and help you fix errors fast.

See how we can help you monitor your website for crashes Monitor your website