
How to secure ASP.NET Core with OAuth and JSON Web Tokens
OAuth 2.0 is an authorization standard, that you probably already used somehow. When a service needs information from your GitHub or Google account, you authorize that using OAuth before they can get the data. To secure your API with OAuth there are a couple of options already like Identity Server 4, OpenIddict, and ASOS. But these packages all either require you to use a relational database like MSSQL, set up additional web applications and/or offer too many options which can make it confusing and hard to learn. In this article, I will show how you can use JSON Web Tokens (JWT) to implement the OAuth 2.0 Authorization Code flow directly with ASP.NET Core while keeping your choice of persistent storage open.

The Authorization Code flow
There are a lot of different flows under OAuth 2.0 that can be used in different scenarios. The goal of all the flows is to get an access token, though. The access token is what can be used to query an API to get the information requested access to. The most used flow in modern applications for both mobile and web is the Authorization Code flow. A lot of the other flows handle all communication with the authorization server internally and does not expose the user to the other service. The way the Authorization Code flow exposes the user to the Authorization server is through the browser. It's important to use HTTPS for this standard since there is a lot of communication between the different actors with arguments that should not be known to potential eavesdroppers. The following figure shows the flow.
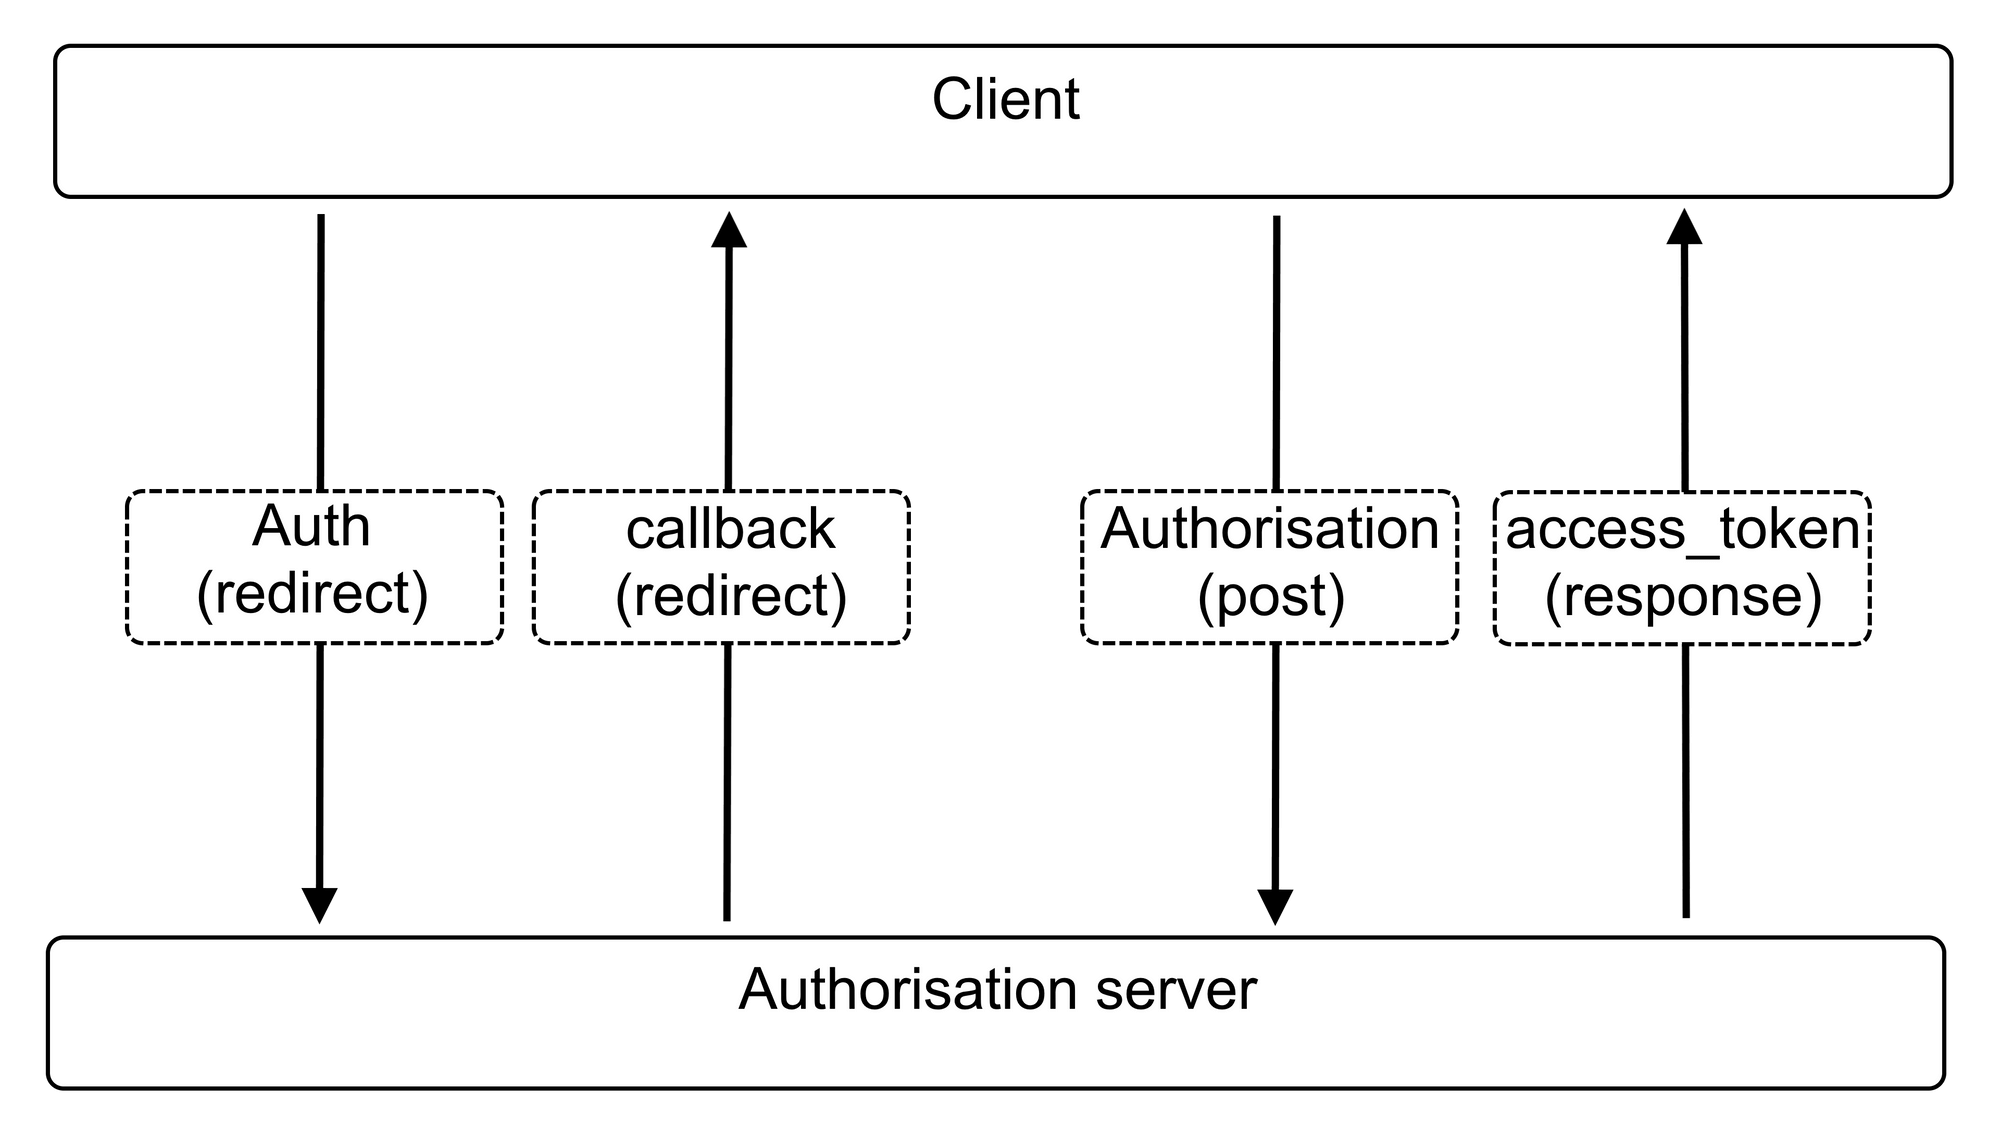
Authorization code request and response
First, the client is redirected to the website of the authorization server. Here the user must first authenticate themselves which can be done using cookie authentication when using ASP.NET Cone as explained in this post: Cookie authentication with social providers in ASP.NET Core. In the redirect, the client must attach some arguments: response_type which must be "code" since we use the Authorization Code flow. client_id specifying the client since only registered clients should be allowed to use the Authorization server. redirect_uri specify the URI that the server should redirect back to once the access is authorized. state is a random string that is used to identify the flow. The client must also authenticate itself which can either be done using HTTP Basic Authentication or by using the extra argument client_secret which contains a secret password known to the client.
The action that receives these parameters could look like this.
[Authorize]
public async Task<IActionResult> authorize(string response_type, string client_id, string redirect_uri, string redirect_uri, string state)
{
    // Check if code is correct and if client credentials are correct.
    if (response_type != "code")
    {
        return Redirect(redirect_uri + "?error=unsupported_response_type");
    }

    if (!clientValidator.Valid(client_id, client_secret))
    {
        return Redirect(redirect_uri + "?error=access_denied");
    }

    // Generate authorization code and save it together with userId and recirect_uri
    string code = Guid.NewGuid().ToString();
    string user = User.Claims.First(c => c.Type.equals == ClaimTypes.Name);
    codeAndUserStorage.Save(code, user);
    codeAndURIStorage.Save(code, redirect_uri);

    // Return view
    ViewBag.redirect_uri = redirect_uri;
    ViewBag.code = authCode;
    ViewBag.state = state;
    return View();
}
The action has an [Authorize] attribute on it because we need to be logged in, to know which user we want to authorize. When using cookie authentication, ASP.NET Core will automatically redirect the user to the login page to ensure that they get logged in before getting to authorize. We validate that the code response_type is "code" and respond with an error if it is not. We also check that the client_id and client_secret are valid. These credentials could be stored in a table in your database, as a file in Azure Blob storage, or if you know that your clients rarely change (or for tests) as a hardcoded dictionary.
Then the authorization code is generated and the user's Name is fetched. If you use cookie authentication then the Name will be stored somewhere in Claims specific to your implementation. The user's Name and the redirect_uri are saved in a place where it can be fetched using the code later. This could again be saved in a table in your database or using some other persistent storage like Azure Blob storage. The code should be available for a couple of minutes only and is normally consumed within seconds. Lastly, the variables that are needed for the response are added to the ViewBag and the View is returned. A simple view could be implemented like this:
<h2>Do you want to give the application that you were redirected from access to your account?</h2>
<a href="@ViewBag.redirect_uri?code=@ViewBag.code&state=@ViewBag.state">Authorize</a>
The user is redirected back to the client through this link and the client receives the authorization code and checks that the state is the same as they sent.
Access token request and response
Now that the client has the authorization code, it can request an access token by sending the code. This request also has to include the arguments: grant_type which needs to be set to "authorization_code". redirect_uri which has to be identical redirect_uri in the first request. client_id as in the previous request. And also, a client_secret if you choose this as your client authentication. The action that receives this could look like this:
[HttpPost]
public async Task<IActionResult> AccessToken([FromForm]string code, [FromForm]string grant_type, [FromForm]string redirect_uri, [FromForm]string client_id, [FromForm]string client_secret)
{
    // Check if code is correct and if client credentials are correct.
    if (grant_type != "authorization_code")
    {
        return Redirect(redirect_uri + "?error=unsupported_response_type");
    }

    if (!clientValidator.Valid(client_id, client_secret))
    {
        return Redirect(redirect_uri + "?error=access_denied");
    }

    // Extract the URI and user
    string previous_uri = codeAndURIStorage.Load(code);
    string user = codeAndUserStorage.Load(code);
    codeAndURIStorage.Delete(code);
    codeAndUserStorage.Delete(code);

    // Check if the new uir is the same as the previous and that the userId was found
    if (redirect_uri != previous_uri)
    {
        return BadRequest("'redirect_uri' was inconsistent.");
    }

    if (user == null)
    {
        return BadRequest("Couldn't find user associated with the given code.");
    }

    // Creates the signed JWT
    var symmetricSecurityKey = new SymmetricSecurityKey(Encoding.UTF8.GetBytes(Configuration["TokenOptions:Key"]))
    var tokenHandler = new JwtSecurityTokenHandler();
    var tokenDescriptor = new SecurityTokenDescriptor
    {
        Subject = new ClaimsIdentity(new Claim[]
        {
            new Claim(ClaimTypes.Name, user)
        }),
        Expires = DateTime.UtcNow.AddYears(2),
        Issuer = "MyWebsite.com",
        Audience = "MyWebsite.com",
        SigningCredentials = new SigningCredentials(symmetricSecurityKey, SecurityAlgorithms.HmacSha256Signature)
    };
    var token = tokenHandler.CreateToken(tokenDescriptor);
    var access_token = tokenHandler.WriteToken(token);

    // Returns the 'access_token' and the type in lower case
    return Ok(new { access_token, token_type="bearer" });
}
This action, differently from the previous action, takes its arguments through a post. This means that you have to extract each parameter using the attribute [FromForm]. An alternative would be to make a model for the post, but for this purpose, we took the simpler, but slightly more messy approach. First, in the body, the grant_type and client credentials are checked, similar to the start of our previous action. Then previous_uri and user are fetched from where they were stored just before. After this, they are deleted so that each authorization code can only be used once to create a valid access token. We then check that previous_uri is the same as redirect_uri which ensures that this code came from the same client. We also check is the user is not null meaning that the code was actually a real authorization code and that it had not been used before.
Now we've come to the part where we make the access token. Our access token is a JSON Web Token (JWT). A JWT is a standard for representing claims for resources within some scope, time, and audience. We set the Subject to a new ClaimsIdentity that contains the user in the field Name which will be used to identify which user this token is for once it is used. We set it to expire in 2 years which is a long time, but we will get back to this later. We set the Issuer and Audience to the same website since we will create and consume the token in the same application in this example. We set the SigningCredentials using a symmetric security key since this application is the only one that will need to make and validate the tokens. We retrieve this symmetric security key from Configuration which is always automatically injected into all controllers. Configuration can reference your appsettings.json file or even better your User Secrets as explained in our article ASP.NET Core (not that secret) User Secrets Explained.
Finally, the token is created and serialized as a string. When the token is created it uses the whole content of the JWT together with the SigningCredentials to make a signature. This makes it so that no person can modify the token. Everyone can read it, but only we can make them and check if their signature is correct. If your way of identifying your users should not be visible to everyone with a token, you could look into using a JWE instead, which encrypts the content of the token. Finally, we return the access_token to the client and specify that it is a bearer token by setting the token_type to "bearer". This means that everyone with this token can use it without using any other cryptographic key or identification.
Consuming the access_token in your API
Now we need to find some way of checking if the access_token is valid and extract its content so that we can use it. Luckily, .NET makes this easy for us. In Startup.cs after you've added authentication you add the following:
var symmetricSecurityKey = new SymmetricSecurityKey(Encoding.UTF8.GetBytes(Configuration["TokenOptions:Key"]));

services.AddAuthentication(options =>
    {
        options.DefaultScheme = CookieAuthenticationDefaults.AuthenticationScheme;
    })
    // here the cookie authentication option and other authentication providers will are added.
    .AddJwtBearer(options =>
    {
        options.SaveToken = true;
        options.TokenValidationParameters = new TokenValidationParameters()
        {
            ValidIssuer = "MyWebsite.com",
            ValidAudience = "MyWebsite.com",
            IssuerSigningKey = symmetricSecurityKey
        };
    });

services.AddAuthorization(options =>
    options.AddPolicy("ValidAccessToken", policy =>
    {
        policy.AuthenticationSchemes.Add(JwtBearerDefaults.AuthenticationScheme);
        policy.RequireAuthenticatedUser();
    }));
We first create the symmetric security key similar to how we did it previously. We then add JWT Bearer as an authentication option in the same place that cookie authentication is added. We first set the SaveToken to true so that the claims will be available through User.Claims. The options for the token validation are like the fields we used when we created the token, except we only use the ones relevant to the signature and the token's validity.
Next, we add an authorization policy for the application that specifies that it needs a JWT Bearer token for actions/controllers that use this policy. In the startup, we also need to add that the application uses authentication and authorization if it did not already do so:
app.UseAuthentication();
app.UseAuthorization();
Now, you simply add the policy in an attribute to the action that you wish to validate using the JWT as shown here:
[Authorize(Policy = "ValidAccessToken")]
public async Task<IActionResult> Me()
{
    var user = User.Identity.Name;

    var firstName = database.load(user).FirstName

    return Ok(new { user=user, firstName=firstName });
}
This action is rather simple, but it shows the basic idea. You can use the action as any other action, but you also have access to the content of the JWT. It is common that an authorization server also has an endpoint that identifies the user who made the token like this Me action. The access token can be passed to your application now by adding a field to the header of the request to your application called Authorization which has the content "Bearer <access_token>" (The word Bearer followed by a space and then your access token).
Possible improvements
When we constructed the access token, we made a notice about the expiration time of the token. We set it to 2 years which is quite a long time, but in some cases, you want a long-lived token. It is recommended that the access token is short-lived in the documentation for the OAuth 2.0 standard. A way that this can be achieved while still not having to re-authorize every hour is to use a refresh token. A refresh token could simply be a long random string. It works in a way where you can use a refresh token together with an expired access token to get a new access token. The refresh token would then be generated at the same time as the first access token and saved in some persistent storage with a connection to the user. When the refresh token is handed in, the user can be checked from the invalidated access token and the refresh token can be compared to the one in persistent storage for that specific user and be removed so that it cannot be used twice. It is important that the refresh token is stored safely and that it is never transported without TLS or exposed in a URI or in the browser since this opens up for possible attacks. It makes the access token safer to use since the application's safety wouldn't be compromised if an adversary got an access token, but it also makes it so that you have to save one more thing in persistent storage.
Another possible improvement is to define scope when requesting the authorization code. A scope is a domain of your application and can narrow down what you give access to like "read-email" or "make-posts". Scopes are like Claims in Identity and can be added with ease to the JWT tokens. It is a good idea to define a scope if you have many clients that use your application differently so that all access tokens do not have the same access.
There are a lot of ways to attack OAuth, why the different security standards are continuously being updated. This is a rather simple approach to making an OAuth 2.0 server that uses Authorization Code flow. So, there will probably be some mistakes and there could be made more considerations towards limiting the generation of different tokens and codes and general monitoring to avoid abuse.
Conclusion
I have enhanced an application so that it can work as an authorization server according to the standard OAuth 2.0's Authorization code flow. Then I showed how you can consume the access token that is received from the authorization server. In the end, I discussed why it can be a good idea to use a refresh token and other improvements that are recommended or optional for the flow. If you are working with JWT, also make sure to check out our free JWT Decoder.
elmah.io: Error logging and Uptime Monitoring for your web apps
This blog post is brought to you by elmah.io. elmah.io is error logging, uptime monitoring, deployment tracking, and service heartbeats for your .NET and JavaScript applications. Stop relying on your users to notify you when something is wrong or dig through hundreds of megabytes of log files spread across servers. With elmah.io, we store all of your log messages, notify you through popular channels like email, Slack, and Microsoft Teams, and help you fix errors fast.

See how we can help you monitor your website for crashes Monitor your website