
Building AI features in .NET with Microsoft.Extensions.AI
Artificial Intelligence (AI) is arguably the most discussed topic in 2026. Seminars, meetings, summits, blogs, YouTube, everywhere, people are discussing AI. AI is not just a forward-thinking team's vision, but it is a necessity in many businesses. It can be a breakthrough for your company and product! Today, I am going to explain how to use the Microsoft.Extensions.AI NuGet package to integrate AI services in .NET applications.
What is Microsoft.Extensions.AI?
Microsoft.Extensions.AI is a set of libraries providing a unified layer of C# abstractions for seamless integration with various AI services. It offers a standardized set of APIs and conventions for integrating AI regardless of the provider. You can use it for various purposes, such as building features like chatbots, text generation, and conversational interfaces.
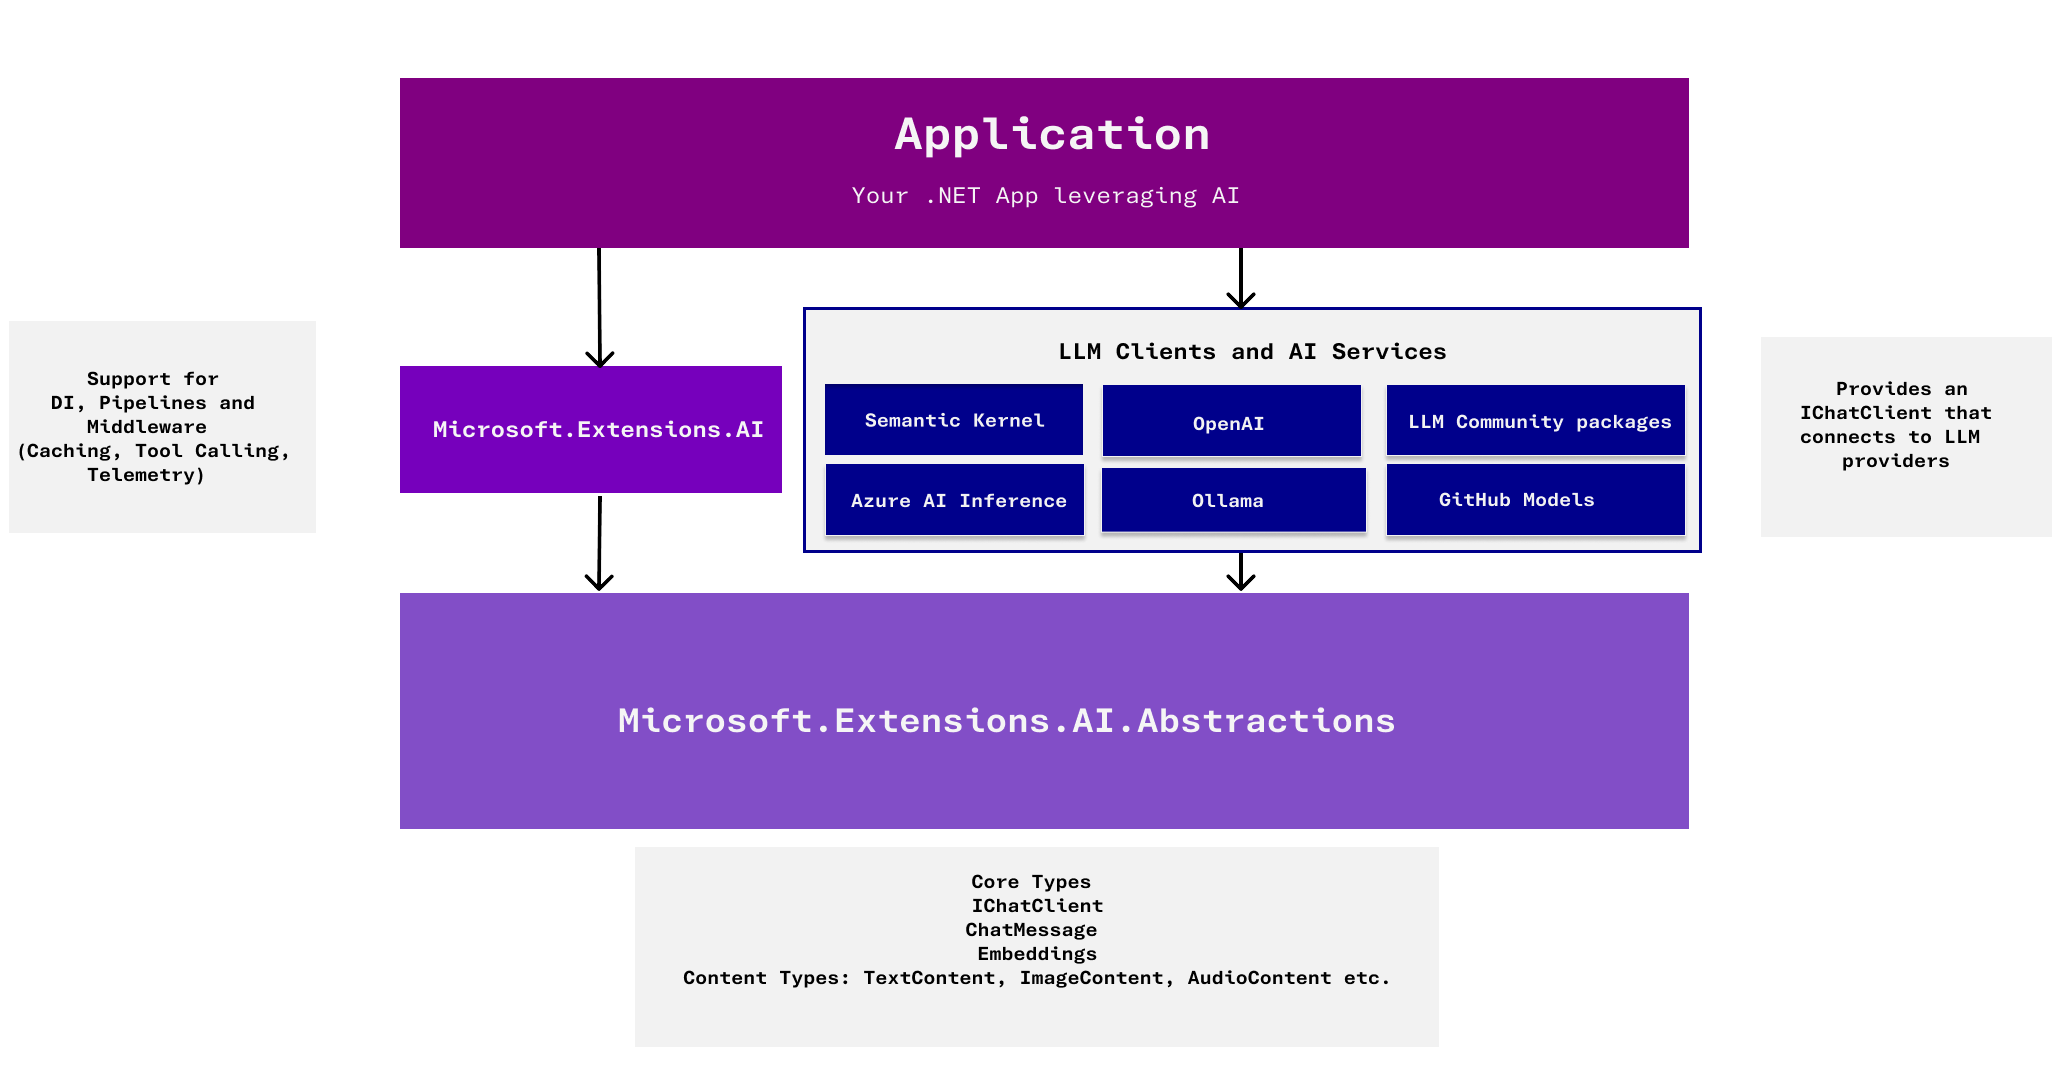
Consider the component architecture of Microsoft.Extensions.AI to understand it deeply.
Starting an AI chat feature with Microsoft.Extensions.AI
To start our journey, I will build a console application to implement an AI-enabled chat feature.
Step 1: Create the project
dotnet new console -n AIFeatureModel
cd AIFeatureModel
Step 2: Add required packages
For AI integration, we need the following packages:
dotnet add package Microsoft.Extensions.AI
dotnet add package OpenAI
dotnet add package Microsoft.Extensions.AI.OpenAI
Microsoft.Extensions.AI provides IChatClient, ChatMessage, ChatRole, and the common AI abstraction. OpenAI containsOpenAI.Chat.ChatClient and ApiKeyCredential support through its dependencies. Microsoft.Extensions.AI.OpenAI has the AsIChatClient() adapter that connects the OpenAI SDK to Microsoft.Extensions.AI.
For the demo, I will save the API key and model configurations in appsettings.json, so we will need the following packages as well:
dotnet add package Microsoft.Extensions.Configuration
dotnet add package Microsoft.Extensions.Configuration.Json
Step 3: Select a model and get an API key
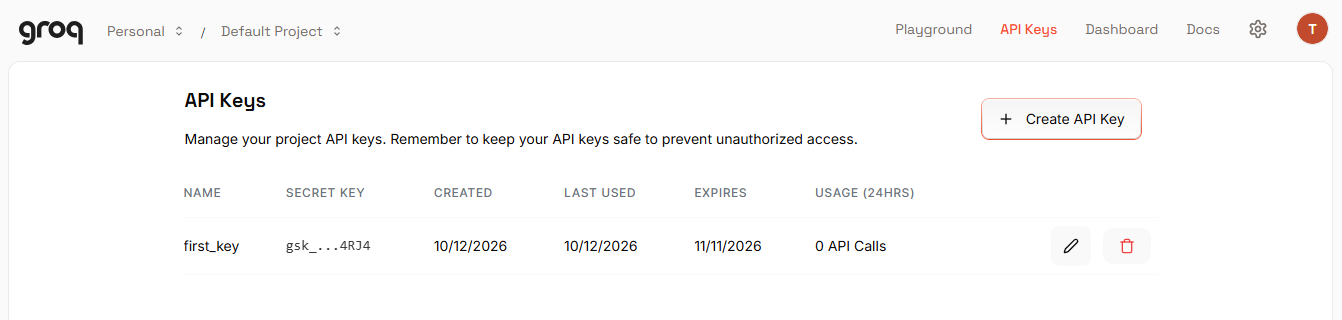
I am using Groq for demo purposes. It is OpenAI-compatible and fast enough for streaming. When signed up, start by creating a new API key:

The key is created and shown on the dashboard:
Step 4: Configure the model in our app
{
  "AI": {
    "Model": "openai/gpt-oss-120b",
    "Endpoint": "https://api.groq.com/openai/v1",
    "API_KEY": "MY_API_KEY"
  }
}
As a console application does not copy the appsettings.json file to the output directory, we have to add the following in the csproj file:
<ItemGroup>
    <None Update="appsettings.json">
        <CopyToOutputDirectory>PreserveNewest</CopyToOutputDirectory>
    </None>
</ItemGroup>
Step 5: Write AI chat code
I kept it straightforward with minimal formatting to show the prompt and its response. My Program.cs looks like this:
using Microsoft.Extensions.AI;
using Microsoft.Extensions.Configuration;
using OpenAI.Chat;
using System.ClientModel;
using ChatMessage = Microsoft.Extensions.AI.ChatMessage;
using ChatRole = Microsoft.Extensions.AI.ChatRole;

var configuration = new ConfigurationBuilder()
    .AddJsonFile("appsettings.json", optional: false)
    .Build();

var apiKey = configuration["AI:API_KEY"]
    ?? throw new InvalidOperationException("API key is missing.");

var model = configuration["AI:Model"] ?? string.Empty;
var endpoint = configuration["AI:Endpoint"]
    ?? string.Empty;

IChatClient chatClient = new ChatClient(
    model,
    new ApiKeyCredential(apiKey),
    new OpenAI.OpenAIClientOptions
    {
        Endpoint = new Uri(endpoint)
    })
    .AsIChatClient();

Console.WriteLine($"Connected client configured for {model}.");

var chatHistory = new List<ChatMessage>();

Console.WriteLine("Type 'exit' to quit.\n");

while (true)
{
    Console.ForegroundColor = ConsoleColor.White;
    Console.Write("You: ");

    string? userInput = Console.ReadLine();

    if (string.IsNullOrWhiteSpace(userInput))
        continue;

    if (userInput.Equals("exit", StringComparison.OrdinalIgnoreCase))
        break;

    chatHistory.Add(new ChatMessage(ChatRole.User, userInput));

    Console.ForegroundColor = ConsoleColor.Green;
    Console.Write("Assistant: ");

    var assistantResponse = new System.Text.StringBuilder();

    try
    {
        await foreach (
            var response in chatClient.GetStreamingResponseAsync(chatHistory))
        {
            Console.Write(response.Text);
            assistantResponse.Append(response.Text);
        }

        Console.WriteLine();

        chatHistory.Add(
            new ChatMessage(ChatRole.Assistant, assistantResponse.ToString()));
    }
    catch (Exception ex)
    {
        Console.ForegroundColor = ConsoleColor.Red;
        Console.WriteLine($"\nError: {ex.Message}");

        // Remove the user message if the request failed.
        chatHistory.RemoveAt(chatHistory.Count - 1);
    }
}

Console.ResetColor();
I get the apiKey, model and endpoint from configuration in the first part. IChatClient connects our application to the model provider. While ChatClient creates a client for sending chat requests with the configuration settings we got in the prior part. The OpenAIClientOptions handles OpenAI SDK configuration and AsIChatClient() adapts the SDK client to the Microsoft.Extensions.AI interface. The benefit of IChatClient is that you can often switch providers without rewriting your conversation-handling logic.
Input and response are in a continuous loop, with minimal formatting to distinguish user input from the assistant's answer. I am maintaining an in-memory chat history for this example, but this can be persisted as well.
GetStreamingResponseAsync(chatHistory) sends the conversation and returns an asynchronous stream of response updates. The awaited foreach loop processes each update as it arrives without waiting for the entire answer. assistantResponse.Append() saves the same text for conversation history.
Step 6: Run the project
dotnet runOur console is ready to test now.
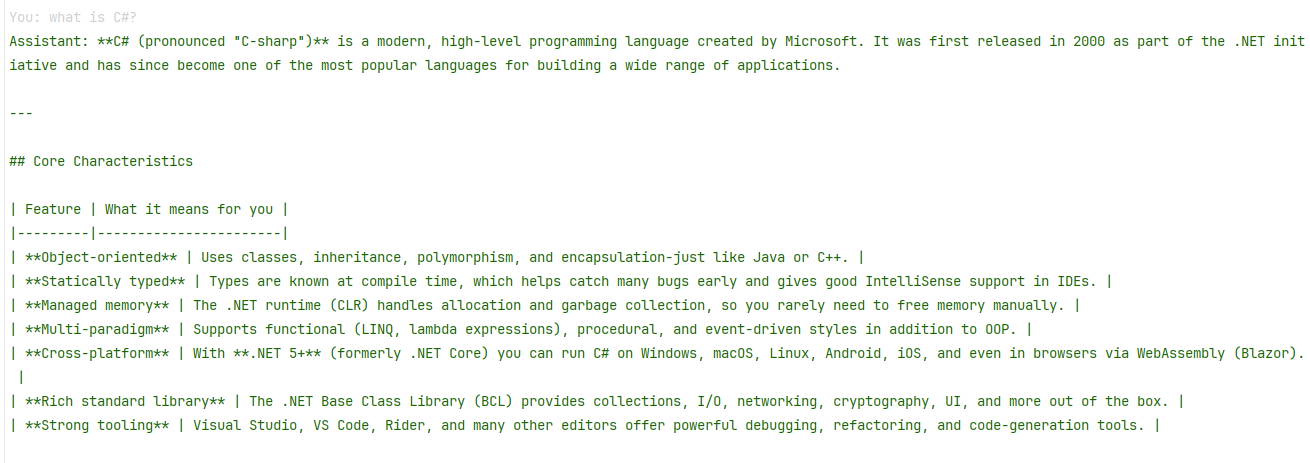
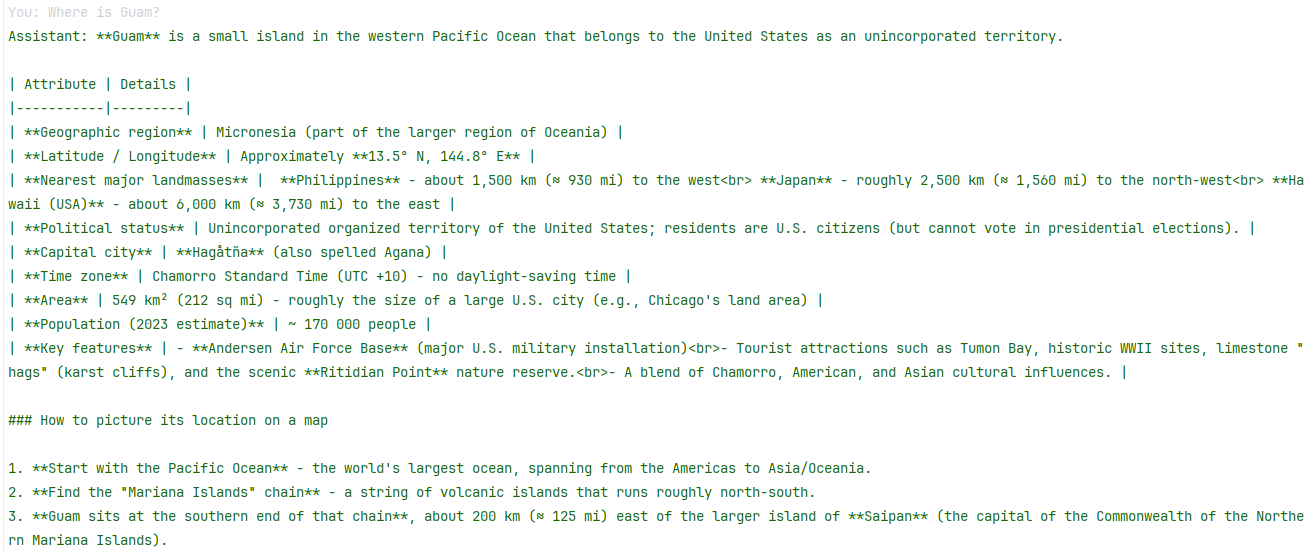
Actually, the response is longer than that, but I pasted up to here. Check another prompt.
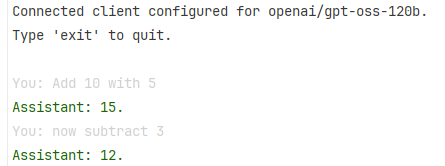
Another interesting model behavior is keeping the context of the conversation, which you can see in:
Structured output with models response
Until now, we have covered responses that define something based on the prompt. Let's extend this with an analysis part that results in a structured response.
Step 7: Add models
First, an enum for the sentiments:
namespace AIFeatureModel.Models;

public enum Sentiment
{
    Positive = 1,
    Neutral = 2,
    Negative = 3
}
Now, the output record:
namespace AIFeatureModel.Models;

public record ReviewAnalysis(
    Sentiment Sentiment,
    string Summary,
    string[] Keywords);
Step 8: Incorporate analyze prompt in Program.cs
if (userInput.StartsWith("/analyze ", StringComparison.OrdinalIgnoreCase))
{
    var text = userInput["/analyze ".Length..];

    try
    {
        var result = await chatClient.GetResponseAsync<ReviewAnalysis>(
            $"Analyze this customer review: {text}");

        if (result.TryGetResult(out var analysis))
        {
            Console.ForegroundColor = ConsoleColor.Cyan;
            Console.WriteLine($"Sentiment: {analysis.Sentiment}");
            Console.WriteLine($"Summary:   {analysis.Summary}");
            Console.WriteLine($"Keywords:  {string.Join(", ", analysis.Keywords)}");
        }
    }
    catch (Exception ex)
    {
        Console.ForegroundColor = ConsoleColor.Red;
        Console.WriteLine($"\nError: {ex.Message}");
    }

    continue;
}
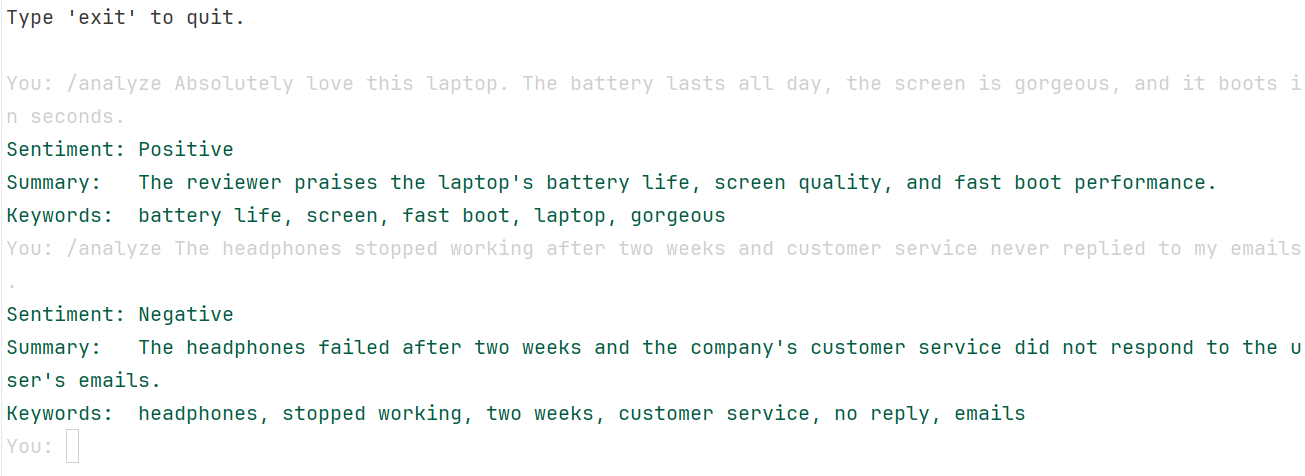
I added the above if block right after the exit check and before chatHistory.Add(...). Simply, if the user input starts with an /analyze command, the program uses GetResponseAsync<ReviewAnalysis>() to request a structured analysis from the AI model. If successful, it displays the sentiment, summary, and keywords in the console:
Handle rate limits
In practice, rate-limit user input to distribute the model's resources fairly and prevent abuse. For the production-grade application, you should implement it based on tenants and users. For our free-tier model demo, the model limit is hit after a few requests, so we need to catch limit-exceeded errors separately and show a friendly message. So, I will handle the limit-exceeded message when the model exhausts its subscription requests.
Step 9: Add exception for 429 status
catch (ClientResultException ex) when (ex.Status == 429)
{
    Console.ForegroundColor = ConsoleColor.Yellow;
    Console.WriteLine("\nRate limit reached. Please wait a moment and try again.");

    // Remove the user message so history stays consistent.
    chatHistory.RemoveAt(chatHistory.Count - 1);
}
catch (Exception ex)
{
    Console.ForegroundColor = ConsoleColor.Red;
    Console.WriteLine($"\nError: {ex.Message}");

    chatHistory.RemoveAt(chatHistory.Count - 1);
}
Conclusion
Building AI-enabled features is critical in the ever-growing AI world. To do so, I shared a basic tutorial on how to develop an AI feature in a .NET application. We've built a basic AI chatbot in .NET using the Microsoft.Extensions.AI NuGet package, covering model configuration, API authentication, conversation history, and streaming responses. Although the example runs in a console application, you can apply the same core concepts to AI-powered features in web applications, APIs, and other .NET projects. Saving the API keys in appsettings.json is fine for the demo, but for production systems, use a secure vault like Azure Key Vault or environment variables. Locally, you can create User Secrets if you prefer that.
The key takeaway is that IChatClient provides a common interface for interacting with AI models, helping keep application code more flexible and maintainable. From here, you can extend it with tool calling, provider switching, and a streaming web API endpoint to support real-world application requirements.
elmah.io: Error logging and Uptime Monitoring for your web apps
This blog post is brought to you by elmah.io. elmah.io is error logging, uptime monitoring, deployment tracking, and service heartbeats for your .NET and JavaScript applications. Stop relying on your users to notify you when something is wrong or dig through hundreds of megabytes of log files spread across servers. With elmah.io, we store all of your log messages, notify you through popular channels like email, Slack, and Microsoft Teams, and help you fix errors fast.

See how we can help you monitor your website for crashes Monitor your website