
The ultimate guide to connection strings in web.config
Connection strings in web.config can be both powerful and challenging. The times were you would just remote desktop to production and change settings inside your ASP.NET web.config file is long gone. So, should you keep specifying connection strings using the connectionStrings element in web.config? Stay tuned to learn everything there is to learn about the subject.
Let me start this post by providing an example to make sure that everyone follows. Inside the web.config file (and app.config file too), there's a root element named connectionStrings. The element works a bit like appSettings where you can add one or more connection strings for your application to use on runtime. The configuration looks similar to this:
<?xml version='1.0' encoding='utf-8'?>
<configuration>
  <connectionStrings>
    <add name="myConnection" connectionString="server=localhost;database=mydatabase;" />
  </connectionStrings>
</configuration>
Fetching the connection string is done using the ConfigurationManager class:
string conn = ConfigurationManager.ConnectionStrings["myConnection"].ConnectionString;
At first glance, this looks like a more complicated version of ConfigurationManager.AppSettings and when used this way, it actually is. Clever things happen when database vendors or ORMs built-in support for the connectionStrings element. Like Entity Framework where connection string names can be referenced when creating the context:
public class DatabaseContext : DbContext
{
    public DatabaseContext() : base("myConnection")
    {
    }
}
Connection strings for popular databases
SQL Server
Since most questions I get about connection strings are related to SQL Server, let's start by looking at the possibilities there. The connection string will be identical no matter if you are connecting through Entity Framework, NHibernate, or using the raw SQL connection available in .NET.
The simplest SQL Server connection string looks like this:
<connectionStrings>
  <add
    name="sqlServer"
    providerName="System.Data.SqlClient"
    connectionString="Data Source=localhost;Initial Catalog=MyDatabase;Integrated Security=True;" />
</connectionStrings>
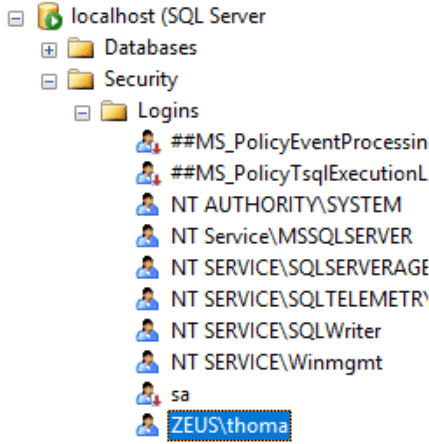
There are a couple of new things to notice. The providerName attribute tells users of the connection string which .NET Framework Data Provider to use when communicating with the database. The content of the connectionString attribute tells them which server to communicate with and the name of the database. The Integrated Security=True part will use the Windows user executing the program to log onto SQL Server (Windows Authentication using Integrated Security). To make sure the current user is authenticated, open Management Studio, expand the Security node, and verify that the current user is added:
Before we move on, I want to mention a couple of commonly used settings.
Connection Timeout
Being able to change the connection timeout through web.config can be very useful when deploying the same application on different environments. Luckily, this is achievable through a simple modification:
<connectionStrings>
  <add
    name="sqlServer"
    providerName="System.Data.SqlClient"
    connectionString="Data Source=localhost;Initial Catalog=MyDatabase;Integrated Security=True;Connection Timeout=60" />
</connectionStrings>
In the example, I've added Connection Timeout=60 to allow the SQL connection 60 seconds to connect to SQL Server (the default value is 15 seconds). Notice that this setting doesn't control command timeout, which is the time allowed for querying one or more tables. Command timeout is not accessible through web.config.
Username/password
<connectionStrings>
  <add
    name="sqlServer"
    providerName="System.Data.SqlClient"
    connectionString="Data Source=localhost;Initial Catalog=MyDatabase;User Id=user;Password=pwd;" />
</connectionStrings>
MySQL
Connecting to MySQL is as easy as SQL Server. After installing either the MySQL .NET Connector or the MySQL NuGet packages, there's a new provider available through config:
<connectionStrings>
  <add
    name="mySql"
    providerName="MySql.Data.MySqlClient"
    connectionString="Server=localhost;Database=MyDatabase;Uid=user;Pwd=pwd;" />
</connectionStrings>
There are a lot of options available through the connection string to MySQL. Here are a few of the ones I have used in the past.
Integrated security
<connectionStrings>
  <add
    name="mySql"
    providerName="MySql.Data.MySqlClient"
    connectionString="Server=localhost;Database=MyDatabase;IntegratedSecurity=yes;Uid=auth_windows;" />
</connectionStrings>
Connection pool size
<connectionStrings>
  <add
    name="mySql"
    providerName="MySql.Data.MySqlClient"
    connectionString="...;MinimumPoolSize=10;maximumpoolsize=50;" />
</connectionStrings>
Encryption
<connectionStrings>
  <add
    name="mySql"
    providerName="MySql.Data.MySqlClient"
    connectionString="...;SslMode=Required;" />
</connectionStrings>
Connection string encryption
In case you cannot use Integrated Security/Windows Authentication, you may have a username and password in clear text inside the web.config file. For obvious reasons, you really don't want that. If a hacker gets access to your web server, he/she now has access to your database as well. Encryption to the rescue.
Encrypting connection strings is pretty straightforward, using the aspnet_regiis tool part of the .NET framework. In most cases, you want encrypted settings on your staging and production environments only, why this step could be part of your deployment pipeline.
To encrypt the entire connectionStrings element, run the following command:
aspnet_regiis -pef "connectionStrings" "c:\path\to\the\folder\containing\webconfig"
The pef parameter tells aspnet_regiis to encrypt the content of the connectionStrings element only and the last parameter points out the folder containing the web.config file. Notice that the path should be to a folder and not the full path of the web.config file. Also, make sure to run cmd as Administrator.
If you have already deployed your application to IIS, you can encrypt it with a similar command:
aspnet_regiis -pe "connectionStrings" -app "/"
Both commands modify the web.config file to now contain encrypted values:
<connectionStrings configProtectionProvider="RsaProtectedConfigurationProvider">
  <EncryptedData Type="http://www.w3.org/2001/04/xmlenc#Element"
    xmlns="http://www.w3.org/2001/04/xmlenc#">
    <EncryptionMethod Algorithm="http://www.w3.org/2001/04/xmlenc#tripledes-cbc" />
    <KeyInfo xmlns="http://www.w3.org/2000/09/xmldsig#">
      <EncryptedKey xmlns="http://www.w3.org/2001/04/xmlenc#">
        <EncryptionMethod Algorithm="http://www.w3.org/2001/04/xmlenc#rsa-1_5" />
        <KeyInfo xmlns="http://www.w3.org/2000/09/xmldsig#">
          <KeyName>Rsa Key</KeyName>
        </KeyInfo>
        <CipherData>
          <CipherValue>A long cipher value</CipherValue>
        </CipherData>
      </EncryptedKey>
    </KeyInfo>
    <CipherData>
      <CipherValue>Another cipher value</CipherValue>
    </CipherData>
  </EncryptedData>
</connectionStrings>
There's no need to change any C# code to make encrypted connection strings work. ConfigurationManager automatically decrypts connection strings from web.config.
Encrypted data can even be converted back to their original values by using the decryption command:
aspnet_regiis -pdf "connectionStrings" "c:\path\to\the\folder\containing\webconfig"
I know, pdf looks totally weird in this context, but it is short for provider decrypt file or something like that :)
Replace config with Web.config transformations
You probably don't use the same database for local development and running your production environment. Being able to change a connection string depending on which environment your code is currently running, can be done in a number of ways. Cloud providers like Azure already have built-in support for overriding a connection string through app service configuration. But for someone not running on Azure, replacing connection strings can be done using Web.config Transformations.
To use another connection string when your code is running in release configuration, create or open the file named Web.Release.Config and paste the following configuration:
<?xml version="1.0"?>
<configuration xmlns:xdt="http://schemas.microsoft.com/XML-Document-Transform">
  <connectionStrings>
    <add
       name="myConnection"
       connectionString="server=myprodserver;database=mydatabase;"
       xdt:Transform="SetAttributes"
       xdt:Locator="Match(name)"/>
  </connectionStrings>
</configuration>
When you deploy your website, the myConnection connection string will override the one already specified in the Web.config file. This is automatically done by Web.config Transformations and the xdt:Transform and xdt:Locator attributes. For more information and examples of Web.config Transformations, check out the following post: Web.config transformations - The definitive syntax guide. Also, make sure to validate your Web.Release.Config file with the Web.config Transformation Tester tool.
Specify connection strings in another file
In some cases, you may want to extract the connection strings from the web.config file itself. Maybe each developer has their own connection string or you want to override the connection string on a production environment without using Web.config Transformations. Parts of the content in the web.config file can be split into separate files using the configSource attribute:
<?xml version="1.0"?>
<configuration>
  <connectionStrings configSource="connections.config" />
</configuration>
Rather than specifying each connection string in the connectionStrings element, we reference another XML file named connections.config (the name and extension are optional here). The content of the connections.config file should look familiar:
<?xml version="1.0" encoding="utf-8" ?>
<connectionStrings>
  <add name="myConnection" connectionString="server=localhost;database=mydatabase;" />
</connectionStrings>
ASP.NET will automatically put together a web.config file based on the root file as well as any referenced files.
Validating and error monitoring
Writing and testing connection strings mostly require you to launch your project and test the connection through a working site in the browser. Visual Studio has IntelliSense for the overall XML structure but not the content within the attributes. I always recommend people to use the Web.config Validator to validate that the XML part is correct. If you are replacing production-specific connection strings with Web.config transformations, make sure to validate your transformation with the Web.config Transformation Tester tool.
As for monitoring for errors, I recommend you implement a good error monitoring solution on your website running in production. As the founder of elmah.io, I want to recommend you to use that. But there are similar solutions out there that will get you almost as far. Just promise me not to log errors in log files that no one will ever look through. Getting error notifications through emails, Slack, Teams, or similar should be essential for all .NET web developers.
elmah.io: Error logging and Uptime Monitoring for your web apps
This blog post is brought to you by elmah.io. elmah.io is error logging, uptime monitoring, deployment tracking, and service heartbeats for your .NET and JavaScript applications. Stop relying on your users to notify you when something is wrong or dig through hundreds of megabytes of log files spread across servers. With elmah.io, we store all of your log messages, notify you through popular channels like email, Slack, and Microsoft Teams, and help you fix errors fast.

See how we can help you monitor your website for crashes Monitor your website