
Paid subscriptions with ASP.NET Core and Stripe Billing
Stripe is a platform that makes it possible to make online payments in many different ways. One potential use case is a monthly or yearly subscription for a service on your platform. Since SCA was enforced in September 2019 in Europe, Stripe has made a lot of changes to their API's and frontend solutions, so that they can handle 2 part authentications like 3D Secure. In this article, we will take a look at how you can make recurring transactions for a subscription using Stripe.
Front end options
As it is right now Stripe has two solutions for filling in card information. We will go over the two options, compare, and finally choose a solution.
Checkout
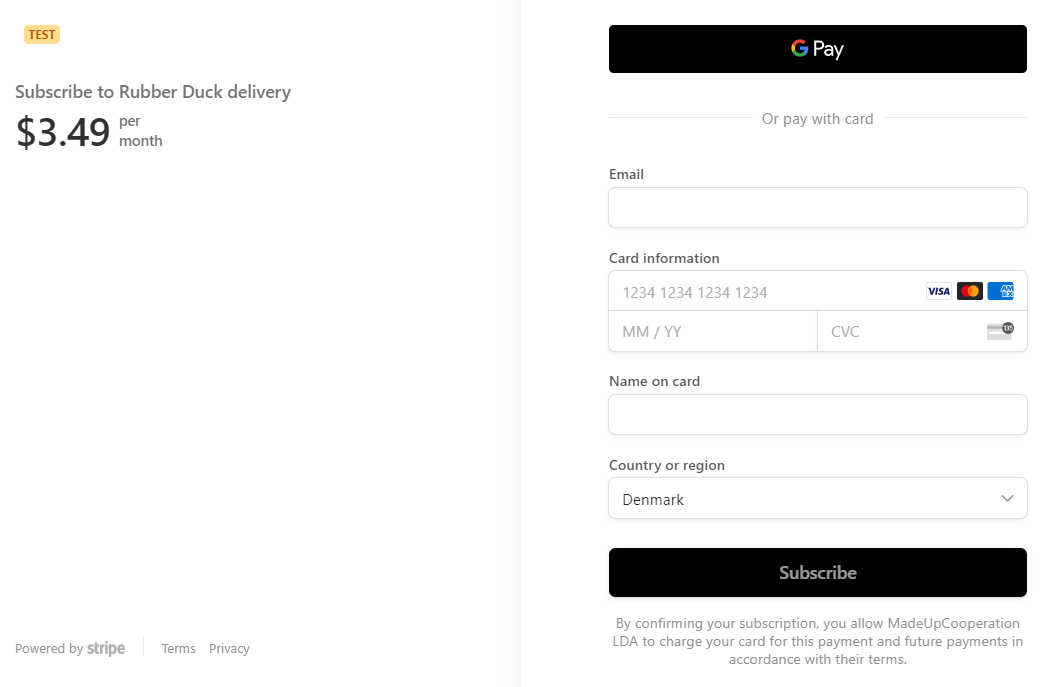
Checkout is the simplest solution for accepting payments of any type. The best thing about it is that it handles the possible 2 part authentication for you. It can do so because this solution redirects the user to another site. This was previously an embedded solution as well but has been changed to make 2 part authentication easier. It's a very direct way to solve this problem, but the user will probably realize that they are suddenly on another website, which will break the immersion of your platform. But sometimes the most simple solution is the best for a small project. We described how to use the old version of Checkout in our other article Accepting payments with Stripe and ASP.NET Core. The final product will look like the image below and can be customized somewhat with a logo and description of plans.
Stripe.js
Stripe.js is the most bare-bone solution that makes it possible for you to make the most customization. One of the big pros for choosing this solution is that it is embedded in your website, meaning that you can place it wherever it fits in the flow of your site. The downside to it being embedded is that it does not handle 2 part authentication immediately. The most basic front end you can make will look something like the next picture. But would need another view afterwards for making the 2 part authentication.

Front end choice
Both solutions are good for different use cases. So let's think of a specific case. We want to sell one product/service but have different plans that differ only in how often you pay. Either once each month or once each year. You can serve different plans in the same view with Checkout, but they need to have the same subscription interval. So we are left with one option which is Stripe.js with the extra benefit that it is embedded.
Frond end
We now make a simple front end using Stripe.js in which the user can submit their card information, their email and which subscription plan they want.
<form asp-controller="Payment" asp-action="Subscribe" method="post" id="payment-form" style="width:100%;">
    <div class="container">
        <div class="form-row">
            <label for="card-element">
                Credit or debit card
            </label>
            <div id="card-element" style="width:100%;">
                <!-- A Stripe Element will be inserted here. -->
            </div>

            <!-- Used to display form errors. -->
            <div id="card-errors" role="alert"></div>
        </div>
        <div class="form-row">
            <label for="email">
                Email
            </label>
            <div style="width:100%;">
                <input name="email" id="email" />
            </div>
        </div>
        <div class="form-row">
            <label for="plan">
                Plan
            </label>
            <div style="width:100%;">
                <input type="radio" name="plan" id="planMonthly" value="Monthly" /><label for="planMonthly">Monthly</label><br />
                <input type="radio" name="plan" id="planYearly" value="Yearly" /><label for="planYearly">Yearly</label>
            </div>
        </div>
        <button>Make Subscription</button>
    </div>
</form>

<script src="https://js.stripe.com/v3/"></script>

<script>
    // Create a Stripe client and use the Viewbag to get your Stripe API key.
    var stripe = Stripe('@ViewBag.stripeKey');

    // Create an instance of Elements.
    var elements = stripe.elements();

    // Custom styling can be passed to options when creating an Element.
    // (Note that this demo uses a wider set of styles than the guide below.)
    var style = {
    base: {
        color: '#32325d',
        fontFamily: '"Helvetica Neue", Helvetica, sans-serif',
        fontSmoothing: 'antialiased',
        fontSize: '16px',
        '::placeholder': {
        color: '#aab7c4'
        }
    },
    invalid: {
        color: '#fa755a',
        iconColor: '#fa755a'
    }
    };

    // Create an instance of the card Element.
    var card = elements.create('card', {style: style});

    // Add an instance of the card Element into the `card-element` <div>.
    card.mount('#card-element');

    // Handle real-time validation errors from the card Element.
    card.addEventListener('change', function(event) {
    var displayError = document.getElementById('card-errors');
    if (event.error) {
        displayError.textContent = event.error.message;
    } else {
        displayError.textContent = '';
    }
    });

    // Handle form submission.
    var form = document.getElementById('payment-form');
    form.addEventListener('submit', function(event) {
    event.preventDefault();

    stripe.createToken(card).then(function(result) {
        if (result.error) {
        // Inform the user if there was an error.
        var errorElement = document.getElementById('card-errors');
        errorElement.textContent = result.error.message;
        } else {
        // Send the token to your server.
        stripeTokenHandler(result.token);
        }
    });
    });

    // Submit the form with the token ID.
    function stripeTokenHandler(token) {
        // Insert the token ID into the form so it gets submitted to the server
        var form = document.getElementById('payment-form');
        var hiddenInput = document.createElement('input');
        hiddenInput.setAttribute('type', 'hidden');
        hiddenInput.setAttribute('name', 'stripeToken');
        hiddenInput.setAttribute('value', token.id);
        form.appendChild(hiddenInput);

        // Submit the form
        form.submit();
    }
</script>
This gives us a simple frontend that looks like this.
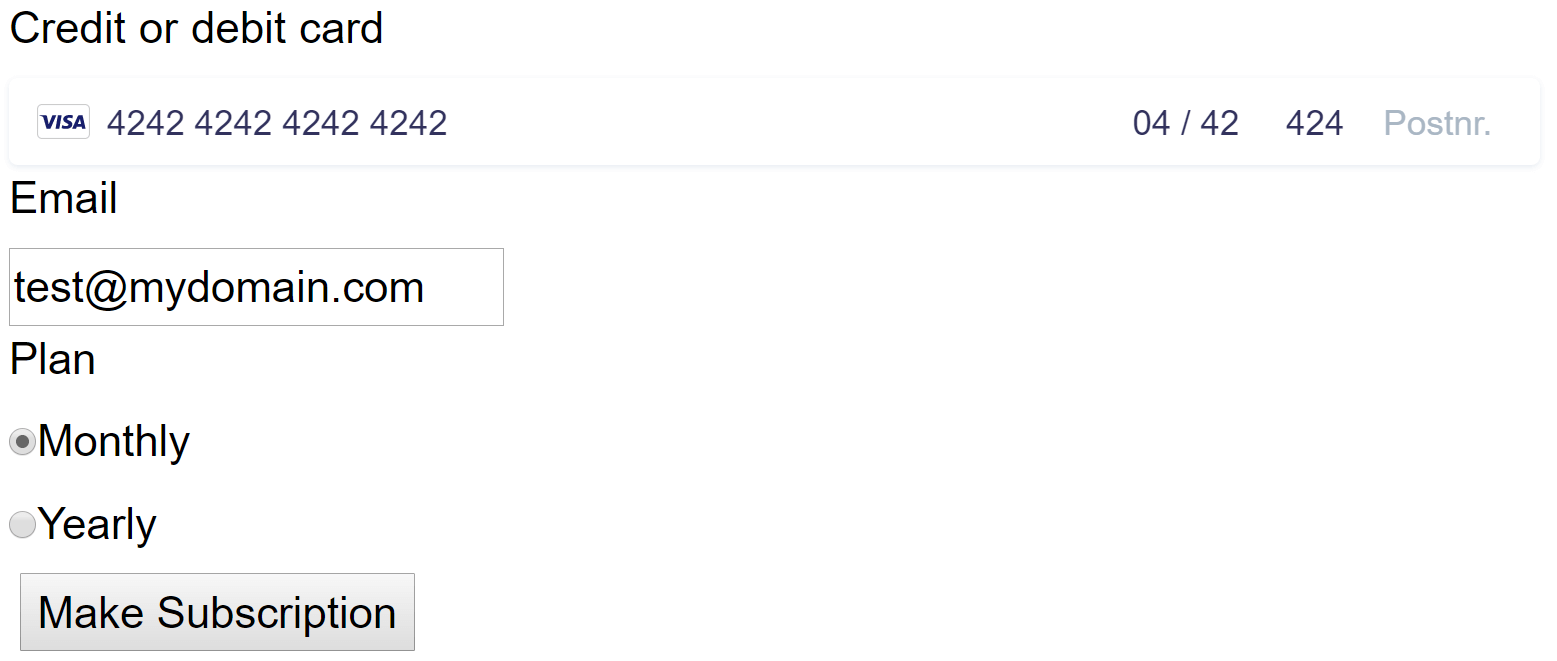
If you want more configuration of the styling, take a look at Stripe's documentation of stripe.js. We use the Viewbag to fetch the API key. This could be assigned in the Action serving the View as showed in the next code-snippet. We also used the asp attributes in the form-tag to reference the controller and action and to make an AntiForgeryToken. We will use this when handling the submission to ensure that there hasn't been tampered with the form body. We also added some radio buttons so that the user can choose their subscription plan.
namespace StripeTestProject.Controllers
{
    public class PaymentController : Controller
    {
        private readonly IConfiguration _configuration;

        public PaymentController(IConfiguration configuration)
        {
            _configuration = configuration;
        }

        public IActionResult Subscribe()
        {
            ViewBag.stripeKey = _configuration["Stripe:publishable_key"];
            return View();
        }
    }
}
We get the API key by injecting .NET's configuration. This can be useful because you can change which key you use depending on what environment you are running your application in. This makes it easy to use your test key (example 'pk_test_xxxxxxxxxxxxxxx') for developing and staging through different appsettings.json files or by using .NET Core's User Secrets, which you can read more about in our article ASP.NET Core (not that secret) User Secrets Explained.
It's important that the Publishable key is used for the front end because the Secret key would allow anyone with it to make payments and transactions using your account. To get access to the API keys, make an account at the Stripe Register page. Once you've registered you can find your API keys in the menu of the dashboard under Developers > API keys.
Creating subscription on the backend
Now we just need to make an action for the post. The first thing we do is set the ApiKey for Stripe. On the server, we use the secret_key to make the transactions. Afterwards we make our customer, using the email and the stripeToken. The email ensures that we can contact them later and the token is the reference to the card information that was tokenized before submit. We set the source for our Customer as our token, which means that it will use the specified card in all future transactions for the customer.
namespace StripeTestProject.Controllers
{
    public class PaymentController : Controller
    {
        private readonly IConfiguration _configuration;

        public PaymentController(IConfiguration configuration)
        {
            _configuration = configuration;
            StripeConfiguration.ApiKey = _configuration["Stripe:secret_key"];
        }

        // Other actions

        [HttpPost]
        [ValidateAntiForgeryToken]
        public IActionResult Subscribe(string email, string plan, string stripeToken)
        {
            var customerOptions = new CustomerCreateOptions
            {
                Email = email,
                Source = stripeToken,
            };

            var customerService = new CustomerService();
            var customer = customerService.Create(customerOptions);

            return View("SubscribeResult");
        }
    }
}
After this, the customer is created as an entity in the stripe dashboard. It would also be a good idea to save the Id of the customer for future reference. We are now ready to make a subscription for the customer for a specific Plan on a specific Product. But first, we need to make these. They can be created programmatically using the API, but it's probably only necessary to do once, so let's do it in the Stripe dashboard. You can make a new product in the menu under Billing > Products by pressing the New button.
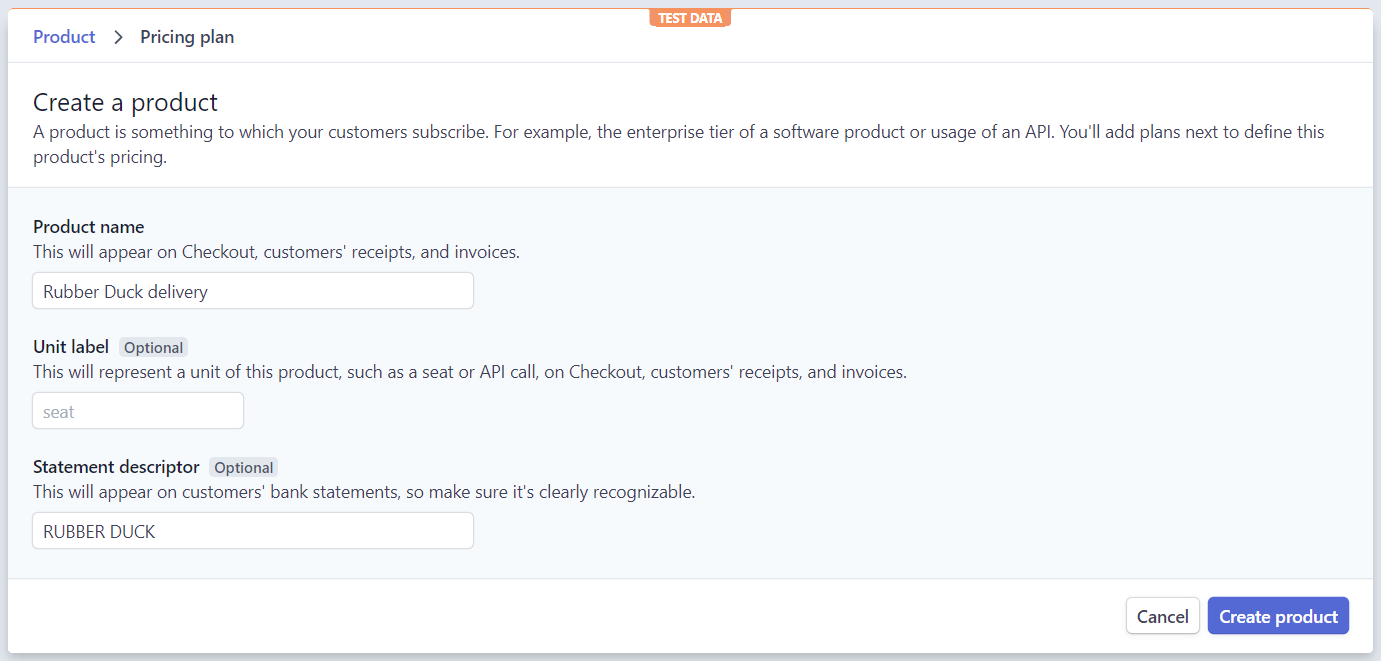
We have now created the product specifying what you get. You then get the option to make different plans for the product and their prices
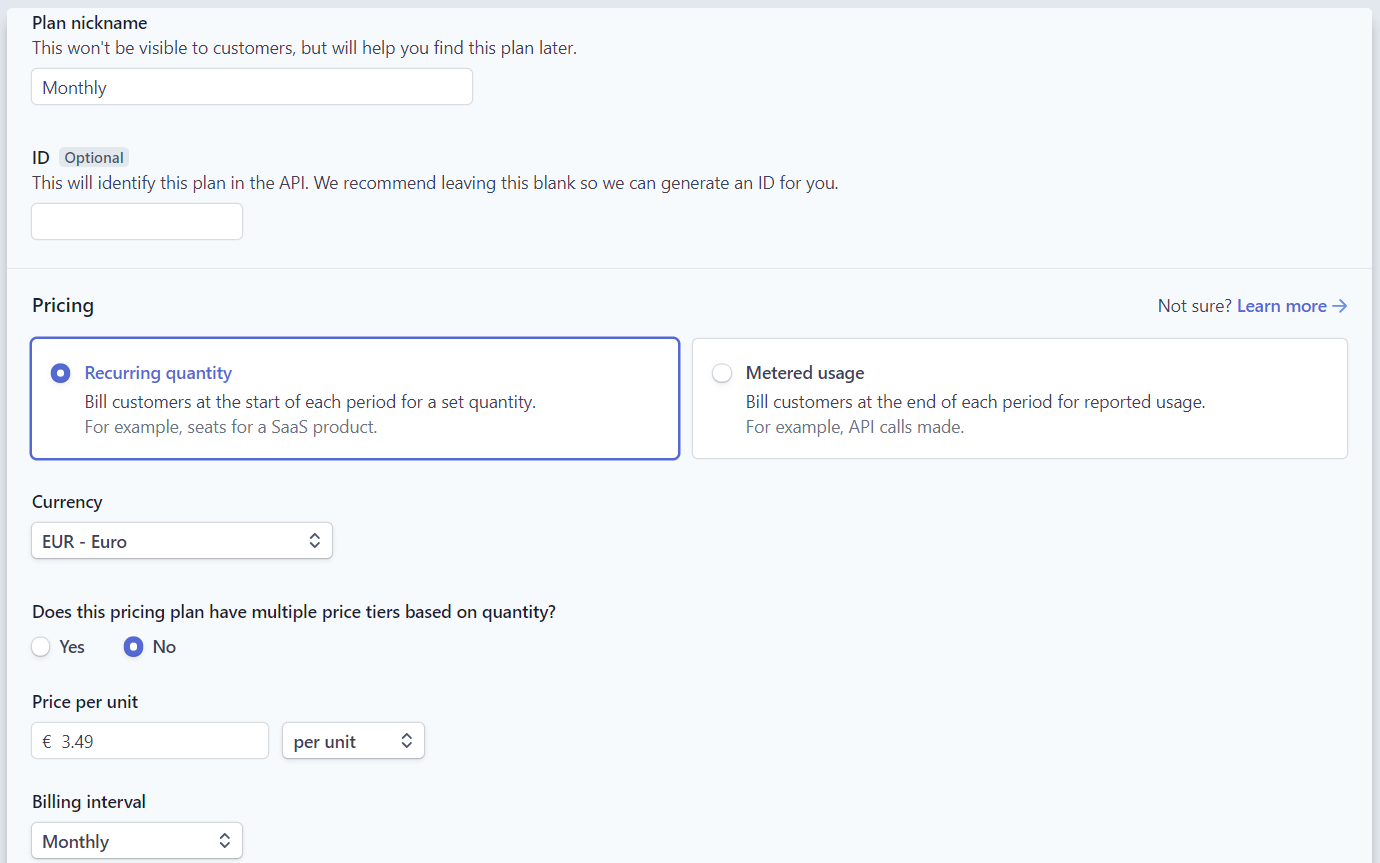
We create one for Monthly billing and one for Yearly billing. Now, we will be able to make the Subscription in our Subscribe action.
[HttpPost]
[ValidateAntiForgeryToken]
public ActionResult Subscribe(string email, string plan, string stripeToken)
{
    // Previous code in action

    var planId = _configuration["Stripe:monthly_plan"];
    if (plan == "Yearly") {
        planId = _configuration["Stripe:yearly_plan"];
    }

    var subscriptionOptions = new SubscriptionCreateOptions
    {
        Customer = customer.Id,
        Items = new List<SubscriptionItemOptions>
        {
            new SubscriptionItemOptions
            {
                Plan = planId
            },
        },
    };
    subscriptionOptions.AddExpand("latest_invoice.payment_intent");

    var subscriptionService = new SubscriptionService();
    var subscription = subscriptionService.Create(subscriptionOptions);

    ViewBag.stripeKey = _configuration["Stripe:publishable_key"];
    ViewBag.subscription = subscription.ToJson();

    return View("SubscribeResult");
}
Then the subscription is made and the subscription object tells us the status of the subscription. When we make the subscription we expand latest_invoice.payment_intent which ensures that this attribute is populated when it's used in later events. If the status of the payment_intent is requires_action that means that the card was either declined or needs 2 part authentication. We send the card back to the front end to check if it needs authentication. We make a new view called SubscribeResult with the following content.
<div id="result"></div>

<script src="https://js.stripe.com/v3/"></script>

<script>
    const subscription = @Html.Raw(ViewBag.subscription);
    const { latest_invoice } = subscription;
    const { payment_intent } = latest_invoice;

    var res = document.getElementById('result');

    if (payment_intent) {
        const { client_secret, status } = payment_intent;

        if (status === 'requires_action') {
            var stripe = Stripe('@ViewBag.stripeKey');

            stripe.confirmCardPayment(client_secret).then(function(result) {
                if (result.error) {
                    // Display error message in your UI.
                    // The card was declined (i.e. insufficient funds, card has expired, etc)
                    res.textContent = result.error.message;
                } else {
                    // Show a success message to your customer
                    res.textContent = "Your subscription was successfully authenticated"
                }
            });
        } else {
            // No additional information was needed
            // Show a success message to your customer
            res.textContent = "Your subscription was successfully setup"
        }
    }
</script>
The view checks if the card needs confirmation using the confirmCardPayment(client_secret) method and responds with messages corresponding to the outcome.
Making webhooks for subscription status
Then we are done with setting up the continuous billing, but how do we know that the payments are successful every period? For this, we will use Webhooks. Stripe has a system that enables you to get a notice every time a certain event happens. We are going to set up a webhook that gets hit when the payment either fails or succeeds. To do this we first need to go to the Stripe dashboard again. In the menu Developers > Webhooks you can press the Add endpoint button. Here you will be able to define the URL of your Webhook and which events to send to this Webhook.
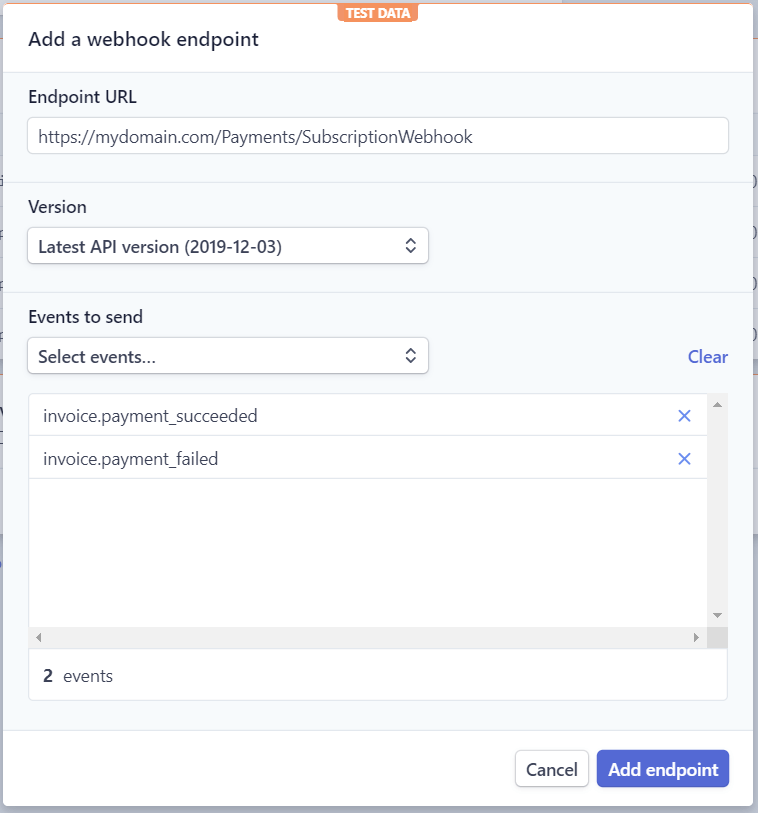
We make a single endpoint for both invoice.payment_succeeded and invoice.payment_failed.
Then we need to make the Webhook that will be hit by Stripe. We make an extra action in our Payment controller.
namespace StripeTestProject.Controllers
{
    public class PaymentController : Controller
    {
        // Previous actions and fields

        [HttpPost]
        public IActionResult SubscriptionWebhook()
        {
            string signingSecret = _configuration["Stripe:signing_secret"];

            var json = new StreamReader(HttpContext.Request.Body).ReadToEnd();

            try
            {

                var stripeEvent = EventUtility.ConstructEvent(json,
                    Request.Headers["Stripe-Signature"],
                    signingSecret,
                    throwOnApiVersionMismatch: true);

                if (stripeEvent == null) {
                    return BadRequest("Event was null");
                }

                switch (stripeEvent.Type)
                {
                    case "invoice.payment_succeeded":
                        // Do something with the event for when the payment goes through
                        Invoice successInvoice = (Invoice)stripeEvent.Data.Object;
                        return Ok();
                    case "invoice.payment_failed":
                        // Do something with the event for when the payment fails
                        Invoice failInvoice = (Invoice)stripeEvent.Data.Object;
                        return Ok();
                    default:
                        return BadRequest("Event was not valid type");
                }
            }
            catch (Exception e)
            {
                return BadRequest(e);
            }
        }
    }
}
We first get the Signing secret from our configuration, which we will need to construct the event. The Signing secret can be found in the Stripe dashboard under Developers > Webhooks, going to your endpoint, and reveal Signing secret.
Then we get the Body from the Request. We try to construct an event from the body using the Signing secret. We then ensure that an event was made and that it is of a valid type. We switch on the two types of events we have sent to the webhook and cast it to an invoice in both cases. Using this we can update our customer database and update the subscription. If the subscription fails then you probably want to notify your user that their card was declined and make them set up the subscription again. Attributes in the event that might be useful could be successInvoice.CustomerId for reference to the specific user, and the array successInvoice.Lines which contains information about the subscription and the plan.
Conclusion
Now, we have made a subscription service in a .NET Core project. We have a simple embedded front end for submitting card information. We can authenticate transactions that need 2 part authentication. And finally, we can react to events that happen throughout the subscription period. These are the bare bones for making a subscription functionality on your site. Other parts that could be worth exploring are which other events you can make webhooks for and integration with the stripe invoice system for when a subscription fails. If you have any feedback, feel free to reach out.
elmah.io: Error logging and Uptime Monitoring for your web apps
This blog post is brought to you by elmah.io. elmah.io is error logging, uptime monitoring, deployment tracking, and service heartbeats for your .NET and JavaScript applications. Stop relying on your users to notify you when something is wrong or dig through hundreds of megabytes of log files spread across servers. With elmah.io, we store all of your log messages, notify you through popular channels like email, Slack, and Microsoft Teams, and help you fix errors fast.

See how we can help you monitor your website for crashes Monitor your website