Logging and global error handling in .NET 7 WPF applications
While developing elmah.io support for WPF, I had the chance to look into WPF for the first time in many years. I couldn't stop myself from digging down into all sorts of details about how logging has evolved in WPF since I last wrote a WPF app. In this post, I'll share some of the findings I made in this rediscovering journey.
15 years ago, I worked as a consultant for a large Danish bank. I was part of a team developing a Windows application implemented in Windows Presentation Foundation (WPF) running on .NET 3.5 or similar. The technology choice was groundbreaking at the time when most other developers were coding in Winforms. Over the years, WPF has slowly slid out of my focus and TBH, I thought about WPF as a dying platform. Everything changed (at least in my head) back when Microsoft launched .NET Core 3 with support for WPF. WPF applications can now be developed on top of .NET 7 and feel very modern compared to what my expectations were.
To learn more about logging and global error handling in WPF, I'll start by creating a new application. If you are coding along, make sure to select the template WPF Application and not the one named WPF App in Visual Studio:
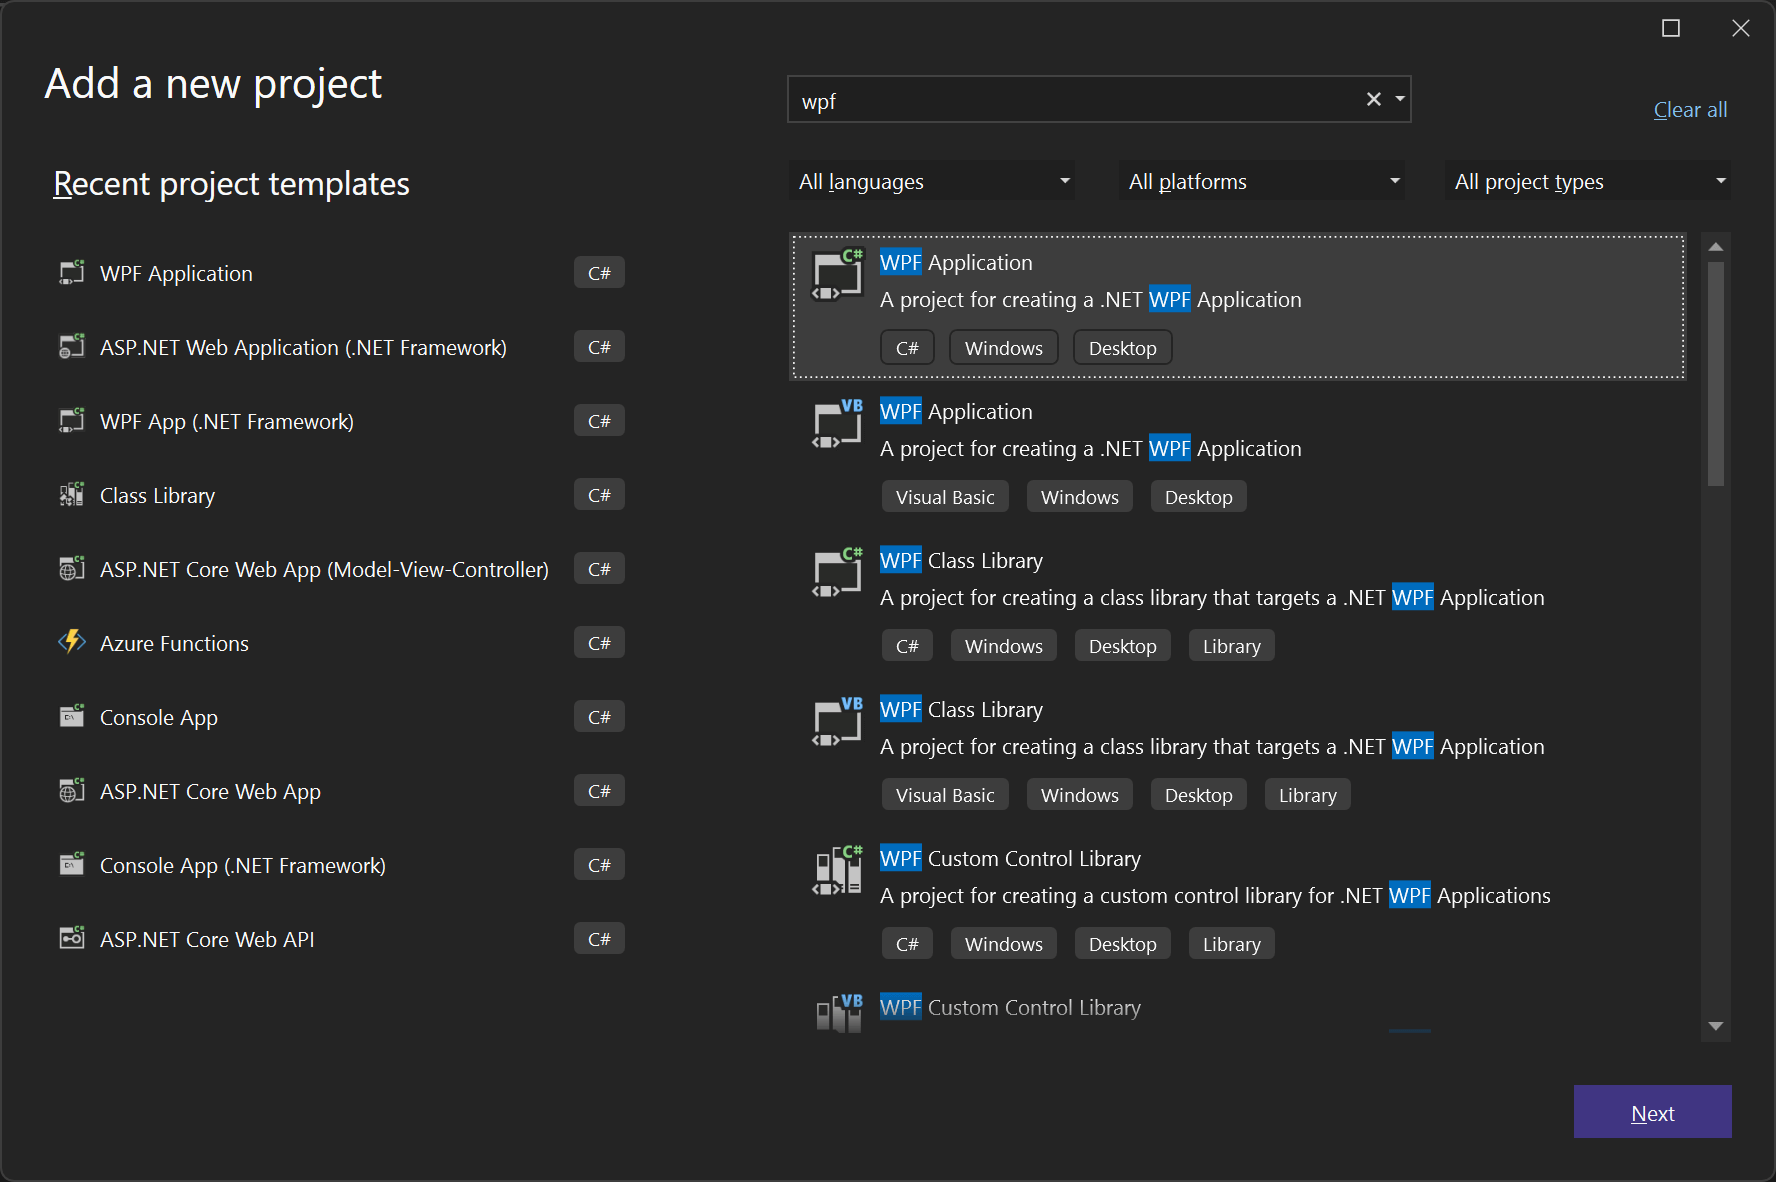
Give the application a name of select .NET 7.0 in the Framework field. This will create a new WPF application with a single window named MainWindow. To make it easier to set up logging, I'll switch the project to using the Microsoft.Extensions.Hosting package. This enables dependency injection and makes the overall experience of setting up feel more like a modern application similar to how it's done in ASP.NET Core:
dotnet add package Microsoft.Extensions.Hosting
Next, create a new file named Program.cs and include the following code:
public class Program
{
    [STAThread]
    public static void Main()
    {
        var host = Host.CreateDefaultBuilder()
            .ConfigureServices(services =>
            {
                services.AddSingleton<App>();
                services.AddSingleton<MainWindow>();
            })
            .Build();

        var app = host.Services.GetService<App>();
        app.Run();
    }
}
This will switch from the default way of setting up WPF applications to delegating the responsibility to the Host class. Notice how both the App and MainWindow classes are registered as singleton and how we then use the host to get an instance of App and call the Run method. This may seem like duplicate code, but the magic will start to appear in just a few seconds. Also, I have seen other people create the host inside the App class and then only register the window. This is perfectly valid, I just personally like having the Program.cs for initialization to correspond ASP.NET Core, console apps, etc.
Once the application is exited, the Run method will return. In a real application, you would want to allow the application to gracefully cleanup by calling the StopAsync method. For more details about the host lifetime, check out Host shutdown on Microsoft's documentation.
Remove the StartupUri attribute from the Application element in the App.xaml file. Instead, we'll create the main window ourselves when the app launches. Include the following code in the App.xaml.cs file:
public partial class App : Application
{
    private readonly MainWindow mainWindow;

    public App(MainWindow mainWindow)
    {
        this.mainWindow = mainWindow;
    }

    protected override void OnStartup(StartupEventArgs e)
    {
        mainWindow.Show();
        base.OnStartup(e);
    }
}
That's right. The app can now receive dependencies through its constructor. All left to do is to call the Show method to get the main window to show up.
Like the App class, we can now inject dependencies into the MainWindow class. We'll inject a ILoggerFactory to start logging from the main window:
public partial class MainWindow : Window
{
    private readonly ILogger<MainWindow> logger;

    public MainWindow(ILoggerFactory loggerFactory)
    {
        logger = loggerFactory.CreateLogger<MainWindow>();
        InitializeComponent();
    }
}
To test that logging work, let's output a log message when the main window is successfully shown:
protected override void OnContentRendered(EventArgs e)
{
    base.OnContentRendered(e);

    logger.LogInformation("MainWindow rendered");
}
To test this, launch the application and inspect the Output window inside Visual Studio:
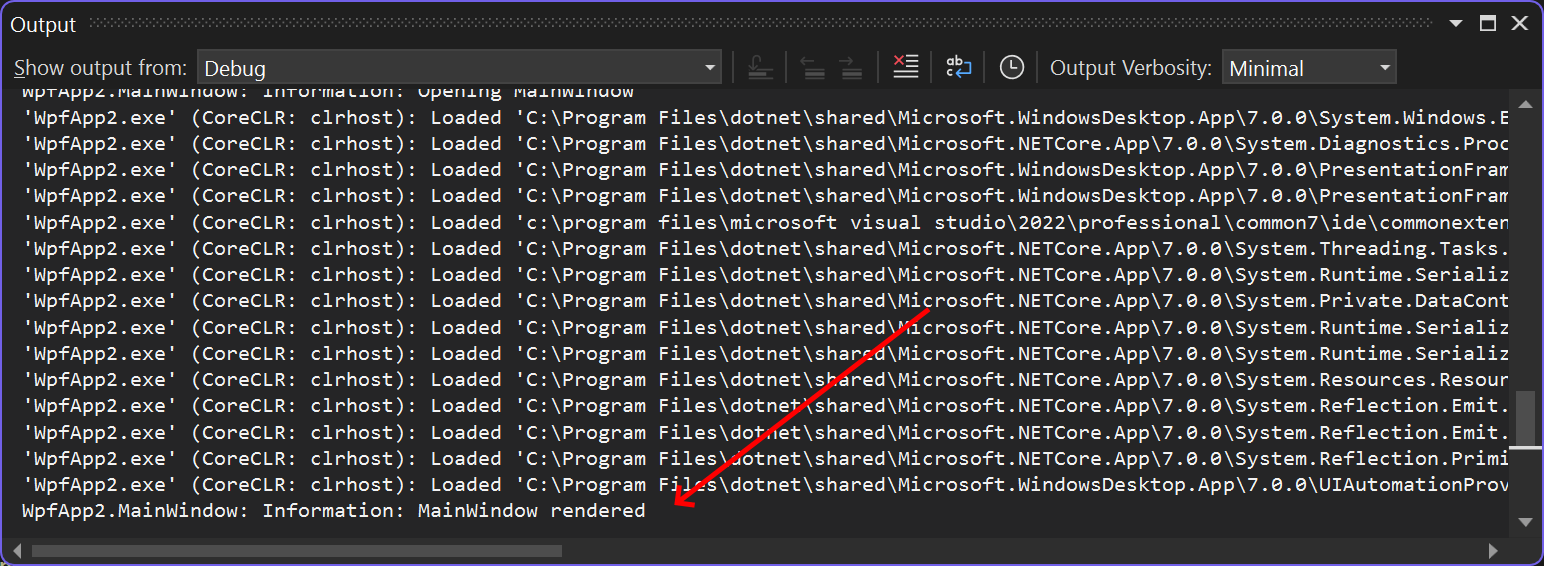
Yay! We have successfully added logging to our WPF application and IMO, the setup even looks like something seen in other project types. You may be wondering how logging works without any configuration. When calling the CreateDefaultBuilder method in the Program.cs file we automatically get log messages written to the output. Configuration can be set up just as we know it from ASP.NET Core:
var host = Host.CreateDefaultBuilder()
    .ConfigureLogging(logging =>
    {
        logging.AddEventLog();
        logging.SetMinimumLevel(LogLevel.Debug);
    })
    // ...
    .Build();
In this example, I set the minimum level to Debug and include the Windows Event Log as a logging output. The great thing about this solution is that all of the integrations with Microsoft.Extensions.Logging now works with WPF too. Like the Elmah.Io.Extensions.Logging package that we provide for elmah.io:
var host = Host.CreateDefaultBuilder()
    .ConfigureLogging(logging =>
    {
        logging.AddElmahIo(options =>
        {
            options.ApiKey = "API_KEY";
            options.LogId = new Guid("LOG_ID");
        });
    })
    // ...
    .Build();
We're on fire here. Let's try to do some more logging. To test this, I'll add two large ugly buttons to the main window:
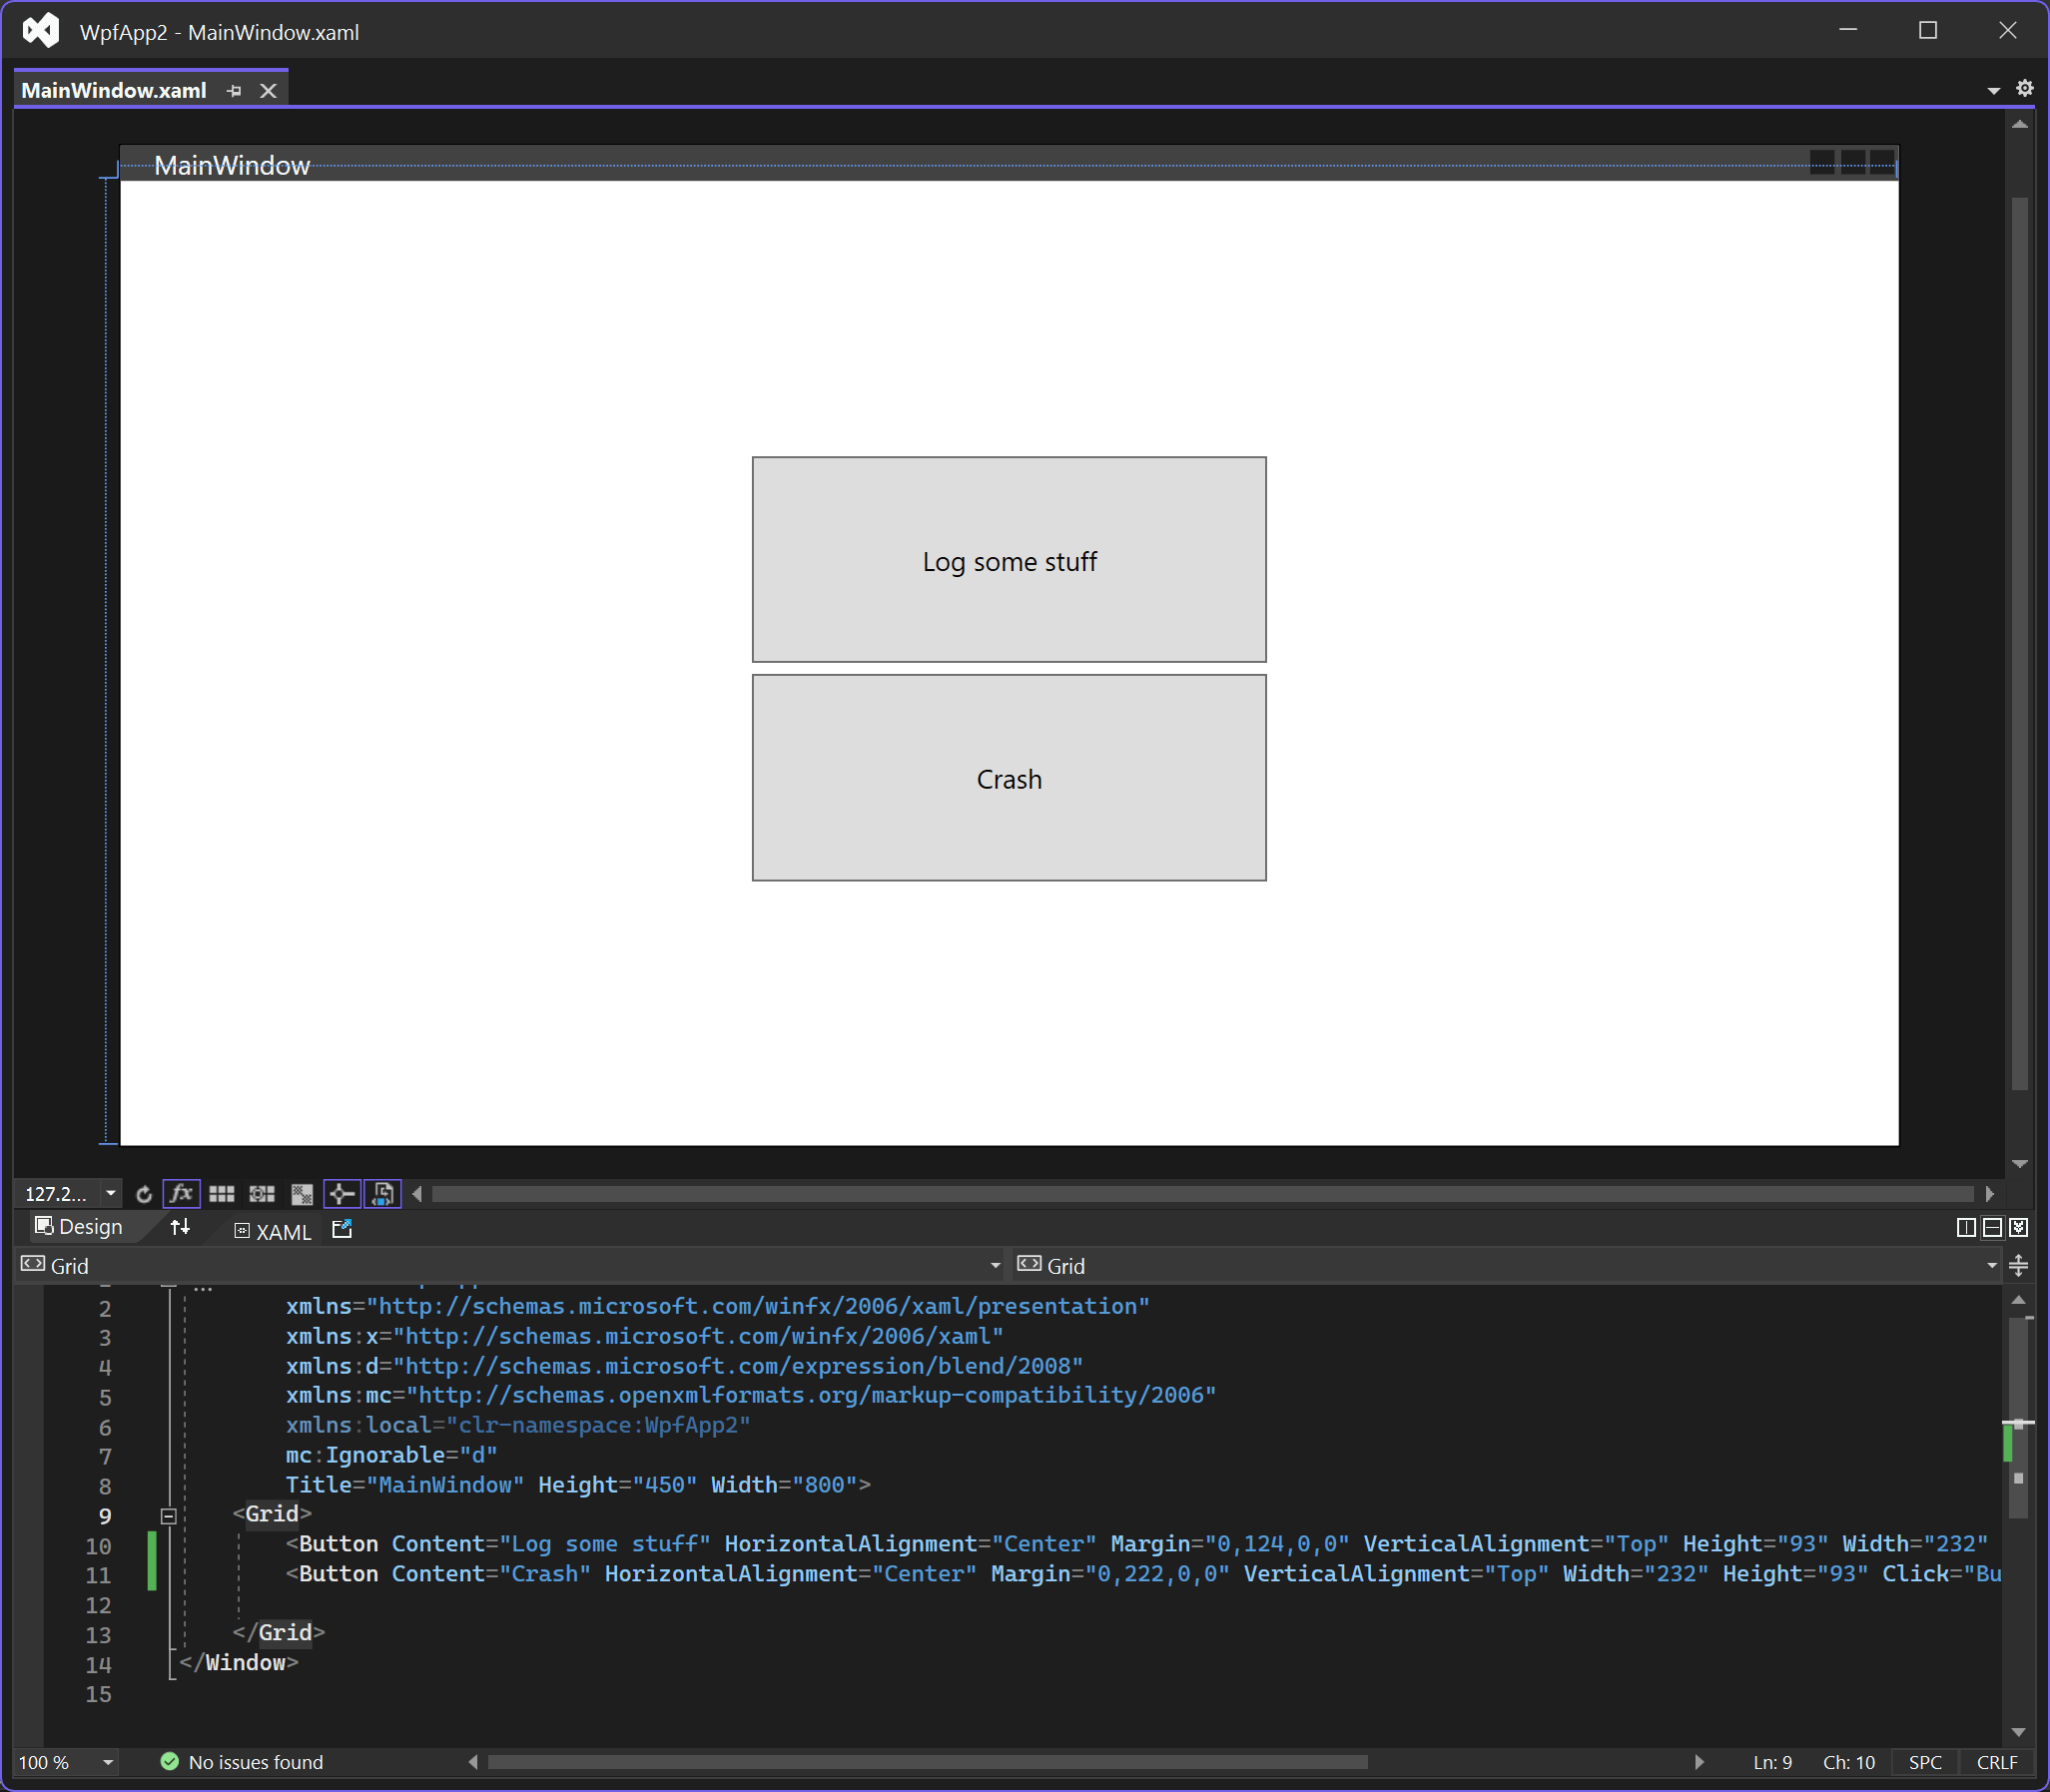
Double-click the Log some stuff button to get a click handler created. We'll log a warning in there:
private void Button_Click(object sender, RoutedEventArgs e)
{
    logger.LogWarning("Oh no, someone clicked the button");
}
When launching the application and clicking the button, we see the warning logged in both the Output window and in Windows Event Log:
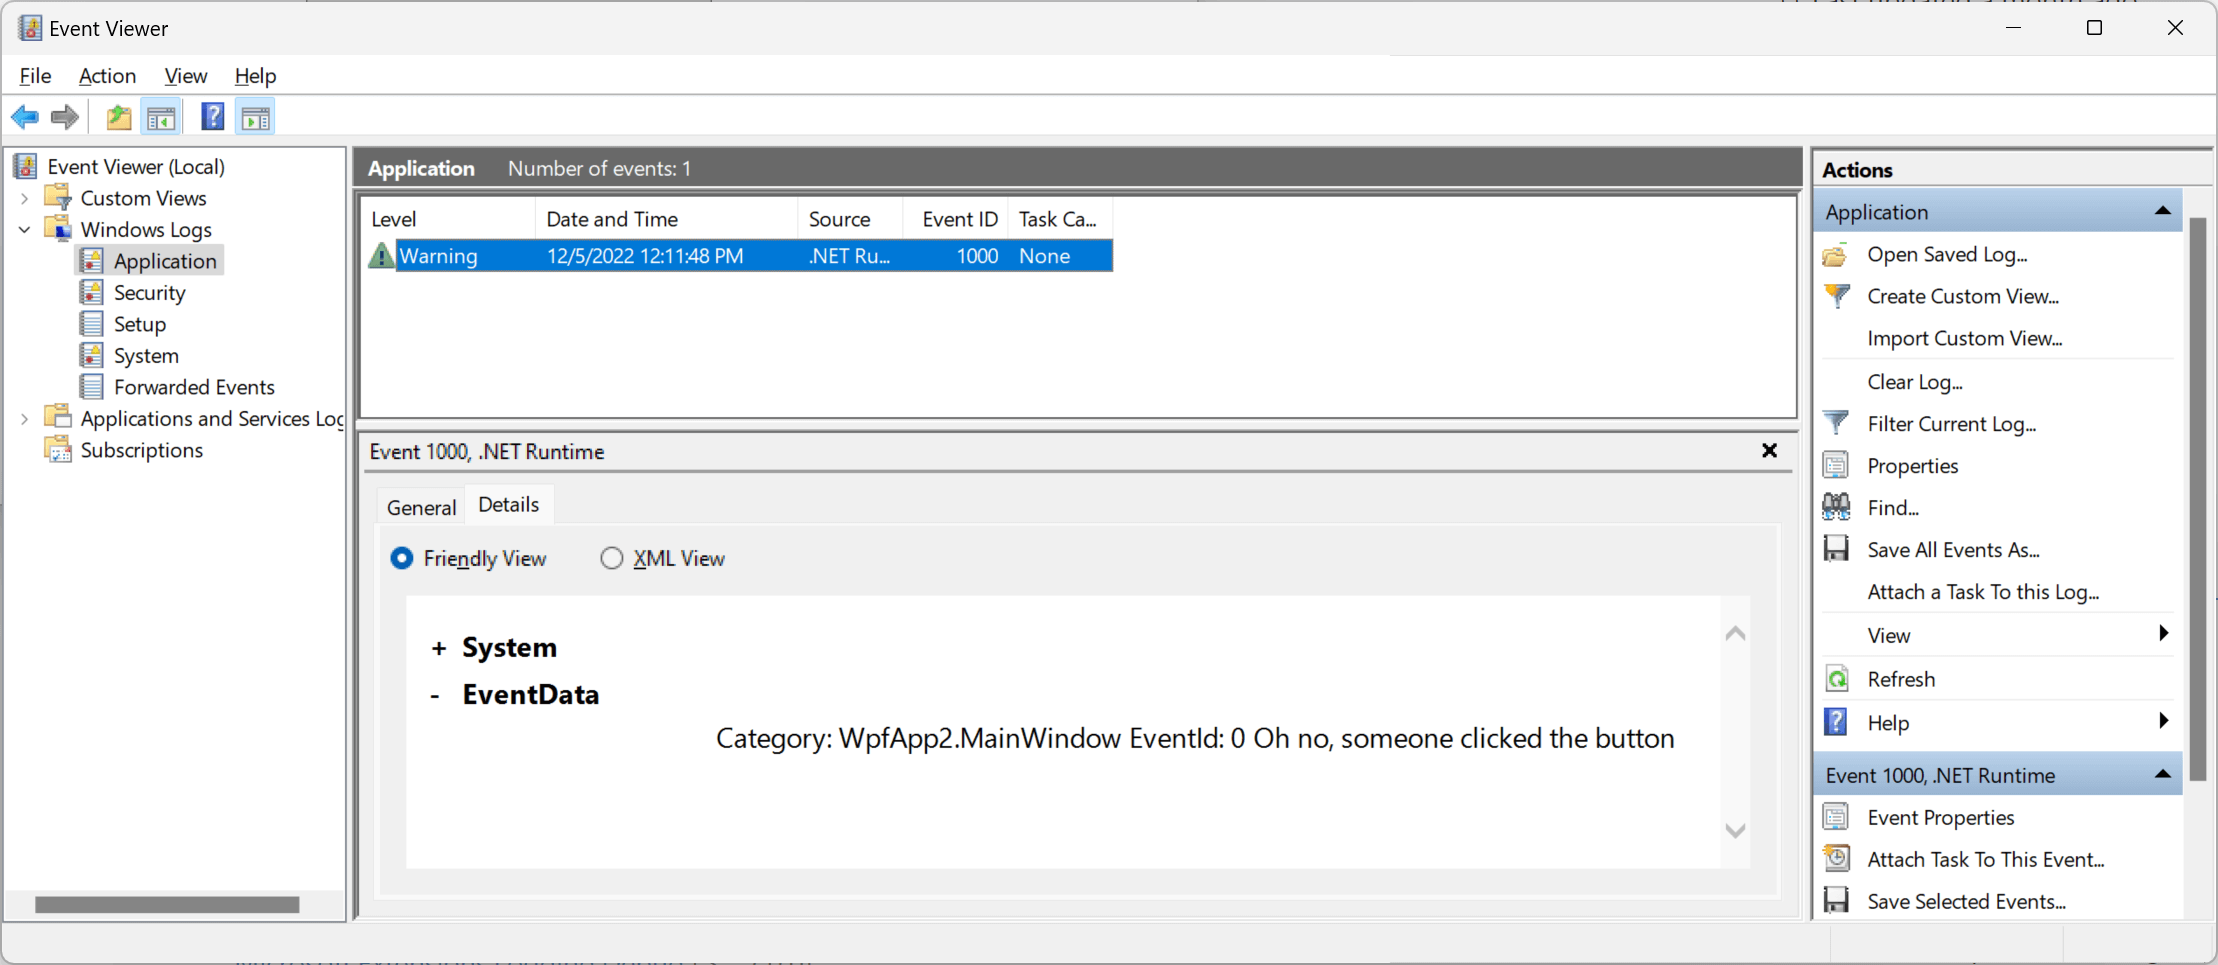
In the last part, I'll add some global error logging. Let's throw a nasty exception when someone clicks the second button. Double-click the Crash button and include the following code in the click handler:
private void Button_Click_1(object sender, RoutedEventArgs e)
{
    throw new ApplicationException("The app crashed");
}
In real code, you may want to spend a bit more time on naming methods than I do here 😂 But the main purpose is to crash the application. When running the application and clicking the Crash button, the application closes as expected. You may expect something to be logged automatically through Microsoft.Extensions.Logging like when used from ASP.NET Core. This is not the case here since Microsoft.Extensions.Logging isn't used from within the WPF core. At least not yet.
To help out a bit, let's add a global error handler to make sure crashes like this are logged before exiting the application. Add an event handler like this in the Main method in the Program.cs file:
AppDomain.CurrentDomain.UnhandledException += (sender, args) =>
{
    var loggerFactory = host.Services.GetService<ILoggerFactory>();
    var logger = loggerFactory.CreateLogger<Program>();
    logger.LogError(args.ExceptionObject as Exception, "An error happened");
};
The UnhandledException event is a built-in event in WPF that allows you to handle unhandled exceptions in applications. An unhandled exception is an error that occurs in the application but is not caught and handled by the application's code. The event can be used for various purposes like logging and/or showing an error dialog. The UnhandledExceptionEventArgs object that is passed to the event handler contains information about the unhandled exception, such as the exception object and a flag indicating whether the exception was fatal (meaning the application will terminate).
To use the UnhandledException event we first need to add an event handler for the event. This can be done in the code-behind file for the application's main window, or in a separate class that handles application-level events. In this case, we create a new logger and log the exception. When testing it, we see the new error logged through Microsoft.Extensions.Logging:
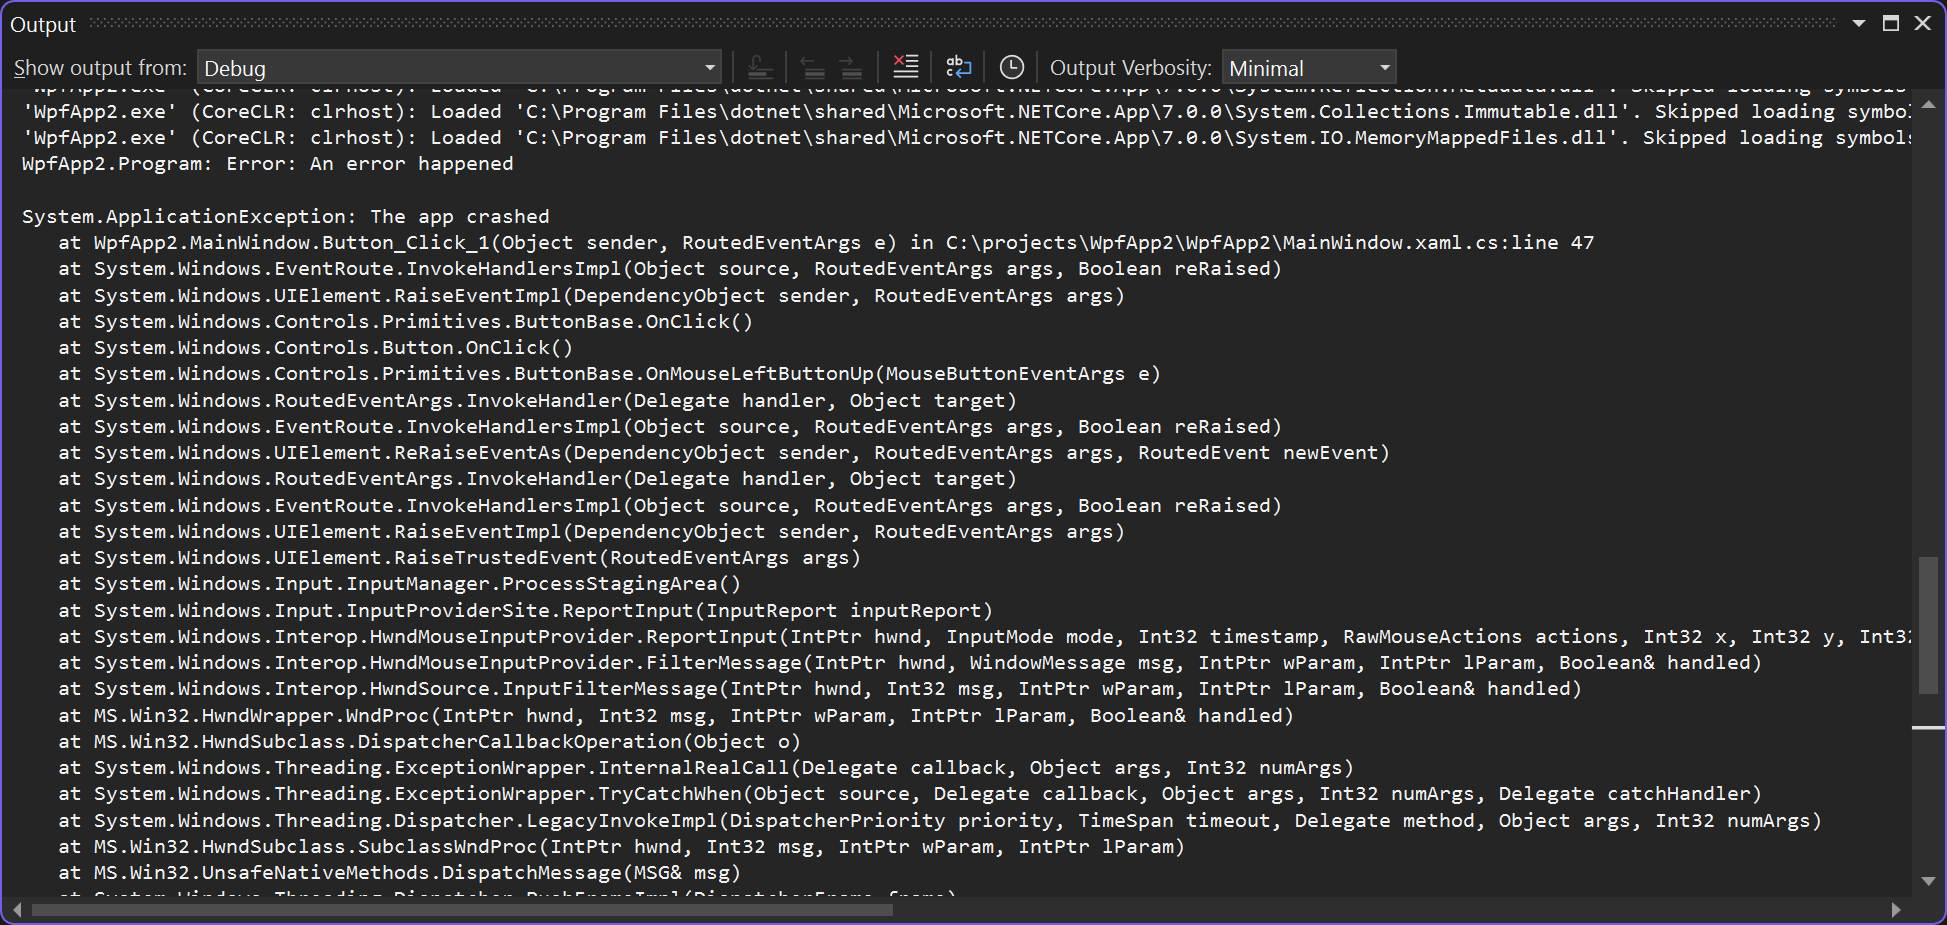
It is important to note that the UnhandledException event will only be raised for unhandled exceptions that occur on a thread other than the one that created the application's main window. Exceptions that occur on the main thread can be handled using the regular try-catch mechanism.
With just a few lines of code, we now have dependency injection, custom logging, and global error logging implemented in WPF. I love it.
If you are looking for automatic error logging from your WPF applications, check out elmah.io for WPF here: Logging to elmah.io from WPF.
elmah.io: Error logging and Uptime Monitoring for your web apps
This blog post is brought to you by elmah.io. elmah.io is error logging, uptime monitoring, deployment tracking, and service heartbeats for your .NET and JavaScript applications. Stop relying on your users to notify you when something is wrong or dig through hundreds of megabytes of log files spread across servers. With elmah.io, we store all of your log messages, notify you through popular channels like email, Slack, and Microsoft Teams, and help you fix errors fast.
See how we can help you monitor your website for crashes Monitor your website
