
How to implement two-factor authentication in ASP.NET Core 🔑
Supporting two-factor authentication (2FA) in your web app is important in most cases. You always keep some kind of data about users or provided by the users themselves that you want an extra layer of security around. Luckily, implementing 2FA in ASP.NET Core is straightforward. In this post, I'll show you how we did it on elmah.io.
For this demo, I will add 2FA to an existing application that already supports creating and signing in users. I'll publish all of the code needed to add the additional layer of authentication, but the requirements for how you want to implement users in your application won't change.
An easy way to add 2FA is to use the GoogleAuthenticator NuGet package by Brandon Potter. Don't let the name fool you. The users will be able to use whatever 2FA app they want like Authy. Install it from NuGet:
dotnet add package GoogleAuthenticator
Then you want to extend your user object with a flag indicating if two-factor is enabled or not. For this example, I have a simple user object looking like this:
public class User
{
    public string Email { get; set; }
    public bool TwoFactorEnabled { get; set; }
    // ...
}
The class has a password hash, salt, name, etc., but I have left that out since it doesn't really have relevance for this example.
On the user profile page, you want to show an Enable two-factor authentication button if User.TwoFactorEnabled is false or a Disable two-factor authentication button if User.TwoFactorEnabled is true. Let's start by creating a new page to enable 2FA. I'll add a new controller named TwoFactorAuthenticationController and add an Enable action to that:
public class TwoFactorAuthenticationController : ControllerBase
{
    [HttpGet]
    public ActionResult Enable()
    {
        User user = // TODO: fetch signed in user from a database
        TwoFactorAuthenticator twoFactor = new TwoFactorAuthenticator();
        var setupInfo =
            twoFactor.GenerateSetupCode("myapp", user.Email, TwoFactorKey(user), false, 3);
        ViewBag.SetupCode = setupInfo.ManualEntryKey;
        ViewBag.BarcodeImageUrl = setupInfo.QrCodeSetupImageUrl;
        return View();
    }

    private static string TwoFactorKey(UserDocument user)
    {
        return $"myverysecretkey+{user.Email}";
    }
}
In the first line, I fetch the currently logged in user from the database. How you will implement this depends on your system. Then create an instance of the TwoFactorAuthenticator class provided in the GoogleAuthenticator NuGet package. This class will help us throughout this example, every time we need 2FA. To create the QR code that we need the user to scan with their phone, I call the GenerateSetupCode method and provide a couple of parameters.
The myapp string is a string representing the name of your app when 2FA is configured on the user's phone. Pick your product name or similar.
Next, we need to provide what is called an account title. This will usually be the user's email or username. This value is also shown in the authenticator app and will make it possible to have multiple accounts configured for the same issuer.
The third parameter is a secret key for this combination of the issuer and account. We specified the secret in clear text in this example, why false is provided in the fourth parameter, indicating that the secret isn't base 32 encoded.
For this example we have used a hardcoded key. In real life, you probably want to look into generating a base 32 encoded secret and saving on your user object to avoid key-reuse. When doing so, use
truefor the fourth parameter instead.
The final parameter tells GoogleAuthenticator the size of the QR code to generate.
The GenerateSetupCode method returns both a URL to a generated QR code image as well as a manual setup code for the user to input. I'm forwarding both values to the view through the ViewBag.
Let's take a look at the view:
<html>
<body>
    <h1>Enable two-factor authentication</h1>
    <form method="post">
        <img src="@ViewBag.BarcodeImageUrl" /><br/>
        Setup code: @ViewBag.SetupCode<br/>
        Input security code: <input name="inputCode" /><br/>
        <input type="submit" />
    </form>
</body>
</html>
Ok admitted, this probably won't win design of the year award. But it shows a nice little form:
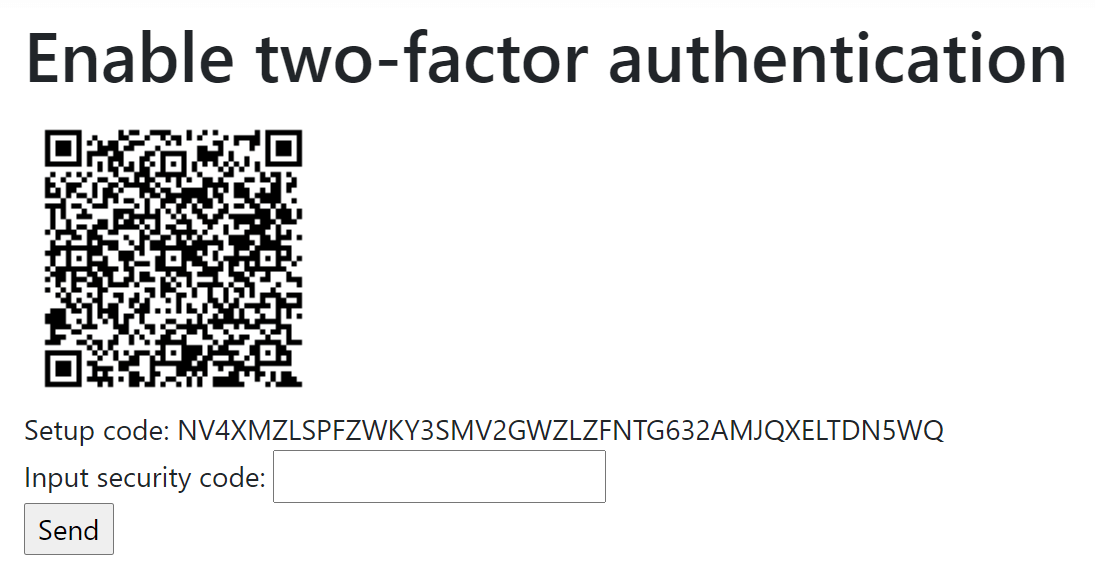
The user will scan the QR code or input the setup code in a 2FA app, and a security code will be generated. This code is pasted in the input field, and the user clicks the Send button. This will create an HTTP POST to the backend that we should implement:
[HttpPost]
public ActionResult Enable(string inputCode)
{
    User user = // TODO: fetch signed in user from a database
    TwoFactorAuthenticator twoFactor = new TwoFactorAuthenticator();
    bool isValid = twoFactor.ValidateTwoFactorPIN(TwoFactorKey(user), inputCode);
    if (!isValid)
    {
        return Redirect("/twofactorauthentication/enable");
    }

    user.TwoFactorEnabled = true;
    // TODO: store the updated user in database
    return Redirect("/");
}
To validate the inputted security code, we call the ValidateTwoFactorPIN method. If the code is invalid, we redirect to the enable page. In a real system, you want to show a validation error message to the user or something similar. When the code validates, we set a flag on the user that 2FA is enabled and redirect to the frontpage.
Users should be able to disable 2FA on their accounts too. They will need to input a security code from the app to do so. The controller actions for implementing this can be written like the following:
[HttpGet]
public IActionResult Disable()
{
    return View();
}

[HttpPost]
public IActionResult Disable(string inputCode)
{
    User user = // TODO: fetch signed in user from a database
    TwoFactorAuthenticator twoFactor = new TwoFactorAuthenticator();
    bool isValid = twoFactor.ValidateTwoFactorPIN(TwoFactorKey(user), inputCode);
    if (!isValid)
    {
        return Redirect("/twofactorauthentication/disable");
    }

    user.TwoFactorEnabled = false;
    // TODO: store the updated user in database
    return Redirect("/");
}
The GET action will show a page that I will share in a moment. The POST action will validate the inputted code and disable 2FA in the user's account.
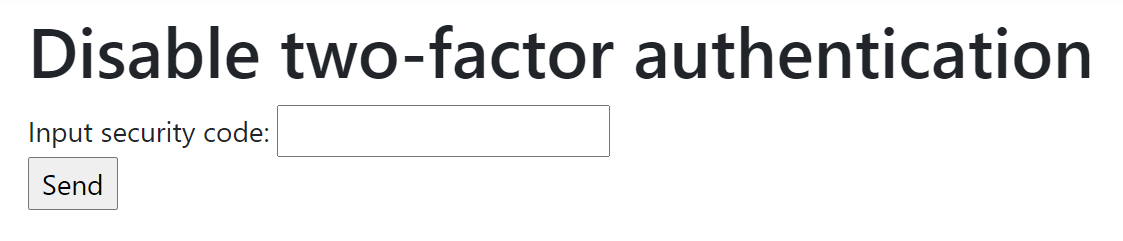
The view is very simple:
<html>
<body>
    <h1>Disable two-factor authentication</h1>
    <form method="post">
        Input security code: <input name="inputCode" /><br />
        <input type="submit" />
    </form>
</body>
</html>
The only thing missing now is to check the action requested when the user signs in, if 2FA is enabled. If it is, we need to redirect to a page requesting a security code (much like we do when the user wants to disable 2FA:
[HttpPost]
public IActionResult Login(string username, string password)
{
    User user = // TODO: fetch signed in user from a database
    // TODO: validate username and password

    if (user.TwoFactorEnabled)
    {
        return Redirect("/twofactorauthentication/authorize");
    }

    // TODO: Sign in the user
    return Redirect("/");
}
The authorize endpoints look very similar to the disable endpoints:
[HttpGet]
public IActionResult Authorize()
{
    return View();
}

[HttpPost]
public IActionResult Authorize(string inputCode)
{
    User user = // TODO: fetch signed in user from a database
    TwoFactorAuthenticator twoFactor = new TwoFactorAuthenticator();
    bool isValid = twoFactor.ValidateTwoFactorPIN(TwoFactorKey(user), inputCode);
    if (!isValid)
    {
        return Redirect("/twofactorauthentication/authorize");
    }

    // TODO: Sign in the user
    return Redirect("/");
}
And finally, the view looks very familiar as well:
<html>
<body>
    <h1>Authorize</h1>
    <form method="post">
        Input security code: <input name="inputCode" /><br />
        <input type="submit" />
    </form>
</body>
</html>

That's it. Your user can now enable/disable 2FA, and your login feature automatically asks for a security key when 2FA is enabled. As already mentioned, the approach presented in this post is simplified. If you want the most secure version, take a look at both unique secrets and storing either the latest or a list of the latest security keys already used.
The full source code example can be found here: https://github.com/elmahio-blog/TwoFactorAuthenticationExample.
elmah.io: Error logging and Uptime Monitoring for your web apps
This blog post is brought to you by elmah.io. elmah.io is error logging, uptime monitoring, deployment tracking, and service heartbeats for your .NET and JavaScript applications. Stop relying on your users to notify you when something is wrong or dig through hundreds of megabytes of log files spread across servers. With elmah.io, we store all of your log messages, notify you through popular channels like email, Slack, and Microsoft Teams, and help you fix errors fast.

See how we can help you monitor your website for crashes Monitor your website