
Deploy Access Restricted Azure website from DevOps Pipelines
We have a couple of internal websites hosted on Azure. Websites that require authentication and should only be accessed from our IP. This can easily be configured using Access Restrictions in Azure. But when doing so, you exclude the dynamic IP range for Microsoft-hosted Azure DevOps build agents. In this post, I'll show you how we set up deployment to the Access Restricted websites with a bit of PowerShell magic.
A bit of backstory. We had our own Azure DevOps build agent for years. Having full control of the virtual machine seemed like the best option at the time. Since then, energy prices skyrocketed and the available images on Microsoft-hosted build agents are now fully up to date and additional software can be easily installed as part of the build. That's why we decided to move to remote build agents. One downside of doing this is a couple of internal websites that are restricted by IP (as well as authentication). Since you don't know the IP of the build agent running a deployment at Azure DevOps Pipelines, being able to deploy new versions of the website can be tricky unless you want to constantly update allowed IP addresses.
Before we begin, I want to touch upon the two ways of deploying websites from Azure DevOps to Azure: Pipelines and Releases. While both are still supported, Microsoft seem to prefer the newer YAML-based Pipelines approach. For this post, I have decided to include instructions for both Releases, using the visual editor, as well as Pipelines, using YAML.
Deployments on Azure are made through the Kudu service. When looking at an Access Restricted Azure website, the configuration for this website looks similar to this:
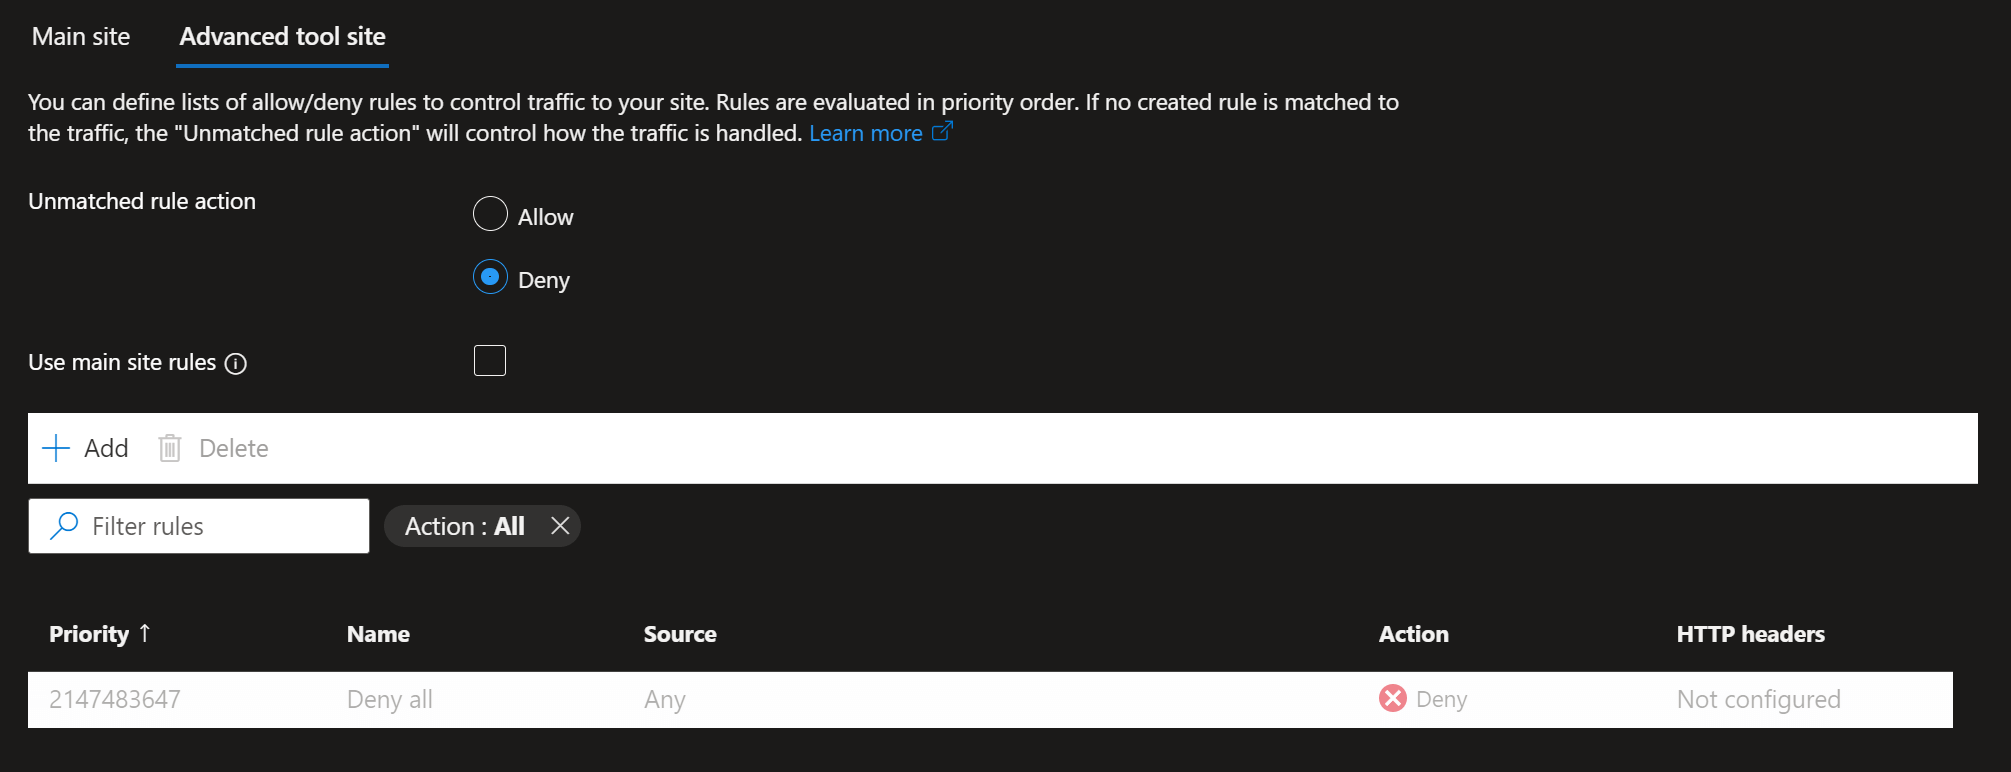
See the list at the bottom? All traffic to the site is denied. You can add your own IP range but that doesn't allow Azure DevOps to communicate with the website. To set this up, we need to expand the pipeline to add the IP of the current build agent to the allow list. The following will contain a list of steps to include before and after the deployment task.
The first thing needed is to get the current IP. There are a bunch of services out there but I found ifconfig.me to work very well. The service provides an endpoint named /ip that returns the IP of the requesting client as text. No JSON or other fancy format. Just plain text. Add a new PowerShell script task and include the following inline code:
$ip = Invoke-RestMethod ifconfig.me/ip
Write-Host "##vso[task.setvariable variable=CurrentIp;isSecret=false;isOutput=true;]$ip"
The code invokes the ifconfig.me/ip endpoint and saves the result in a variable named ip. Next, we need to tell Azure DevOps to save this variable for later steps in the pipeline. This is done by outputting vso[task.setvariable variable=CurrentIp;isSecret=false;isOutput=true;]$ip. The task.setvariable part to tell Pipelines that we want to set a variable value. The variable=CurrentIp part to name the variable. The isSecret=false part to make this available without needing anything but a variable name. And finally, the inOutput=true part to tell Pipelines that this should be available outside of this build step. For Releases, you need to assign a reference name beneath the Output Variables section as well:

For YAML-based Pipelines, you need to declare a step name:
- powershell: |
    $ip = Invoke-RestMethod ifconfig.me/ip
    Write-Host "##vso[task.setvariable variable=CurrentIp;isSecret=false;isOutput=true;]$ip"
  name: TheOuts
The current IP will now be available as TheOuts.CurrentIp.
The next step is to add the IP to the allow list beneath Access Restrictions on the Azure Website. There's a task type in Azure DevOps named Azure PowerShell that will enable you to run PowerShell within an Azure environment. To add this task in Pipelines, select an existing or authenticate a new Azure subscription, and add the following inline PowerShell code:
Add-AzWebAppAccessRestrictionRule -ResourceGroupName "resource-group-name" -WebAppName "web-app-name" -Name "Azure DevOps" -Priority 1000 -Action Allow -IpAddress "$(TheOuts.CurrentIp)/32" -TargetScmSite
For YAML-based Pipelines, include the AzurePowerShell task:
- task: AzurePowerShell@5
  inputs:
    azureSubscription: 'azure-subscription-name'
    ScriptType: 'InlineScript'
    Inline: |
      Add-AzWebAppAccessRestrictionRule -ResourceGroupName "resource-group-name" -WebAppName "web-app-name" -Name "Azure DevOps" -Priority 1000 -Action Allow -IpAddress "$(TheOuts.CurrentIp)/32" -TargetScmSite
    azurePowerShellVersion: 'LatestVersion'
The Add-AzWebAppAccessRestrictionRule Cmdlet will add an IP or IP range through a CIDR. In this case, we want to allow a single IP, why we add the value of the TheOuts.CurrentIp variable followed by /32. The -TargetScmSite parameter is used to add this rule to the Advanced tool site and not the website itself. Remember to change resource-group-name and web-app-name with the values from your web app.
The next step is the deployment itself. I won't go into much detail here since the step to choose depends on your toolchain and preferences. Either use the Azure App Service deploy task for Releases or AzureWebApp task for Pipelines to deploy all web apps to Azure. If you want more details, I wrote a post named Continuous deployment to Azure from Azure DevOps. The important part here is to configure Continue on error beneath Control options for Release:

Or continueOnError in YAML-based Pipelines:
- task: AzureWebApp@1
  ...
  continueOnError: true
If this is not added and the deployment fails, no additional steps will be run. And speaking of additional steps, let's add the final step. You guessed it, removing the IP from the allow list. For Releases, add another Azure PowerShell task and include the following code:
Remove-AzWebAppAccessRestrictionRule -ResourceGroupName "resource-group-name" -WebAppName "web-app-name" -Name "Azure DevOps" -TargetScmSite
And YAML-based Pipeline:
- task: AzurePowerShell@5
  inputs:
    azureSubscription: 'azure-subscription-name'
    ScriptType: 'InlineScript'
    Inline: |
      Remove-AzWebAppAccessRestrictionRule -ResourceGroupName "resource-group-name" -WebAppName "web-app-name" -Name "Azure DevOps" -TargetScmSite
    azurePowerShellVersion: 'LatestVersion'
Again, remember to replace the resource group and web app names. This Cmdlet removes the allow rule that we just created.
That's it. Running the pipeline will now fetch the current IP, add it as an allowed IP on Azure, deploy the website, and remove the IP from Azure. Full credit goes to ErikEJ for providing me with a solution to this problem.
elmah.io: Error logging and Uptime Monitoring for your web apps
This blog post is brought to you by elmah.io. elmah.io is error logging, uptime monitoring, deployment tracking, and service heartbeats for your .NET and JavaScript applications. Stop relying on your users to notify you when something is wrong or dig through hundreds of megabytes of log files spread across servers. With elmah.io, we store all of your log messages, notify you through popular channels like email, Slack, and Microsoft Teams, and help you fix errors fast.

See how we can help you monitor your website for crashes Monitor your website