Adding Cloudflare Turnstile to an ASP.NET Core website
We have been using Captchas for several years on elmah.io. Not to annoy users (they ARE annoying, I know) but to avoid bots trying to automate password reset requests and similar. We have been using reCAPTCHA from Google but after they announced moving this feature to Google Cloud, we had a chance to stop and consider alternatives. Since it is working well and consolidates used technologies, we ended up picking Turnstile from Cloudflare. In this post, I will share some thoughts about why we moved and how you can implement it on your ASP.NET Core website.
Before jumping into code mode, let's talk about captchas and challenges. You have probably already interacted with captchas when visiting other websites. Captchas is a way for a browser to try and detect if the current user is a human or a machine. I blogged about captchas already here, so feel free to go back and read that post for more information.
Until now, we have used Google's reCAPTCHA service. It has served us very well and Google provided a nice and simple dashboard to help monitoring usage. In a recent announcement, reCAPTCHA is being moved to Google Cloud. The move makes sense and I can understand why they are looking to do that. But since we don't have any other dependencies on Google Cloud, we decided to move to Cloudflare Turnstile. We already make heavy use of Cloudflare's services, why picking Turnstile helps us reduce the number of external dependencies. Another advantage of Turnstile is that the process to get validated is much simpler for the user. No more needing to click on traffic lights 😂
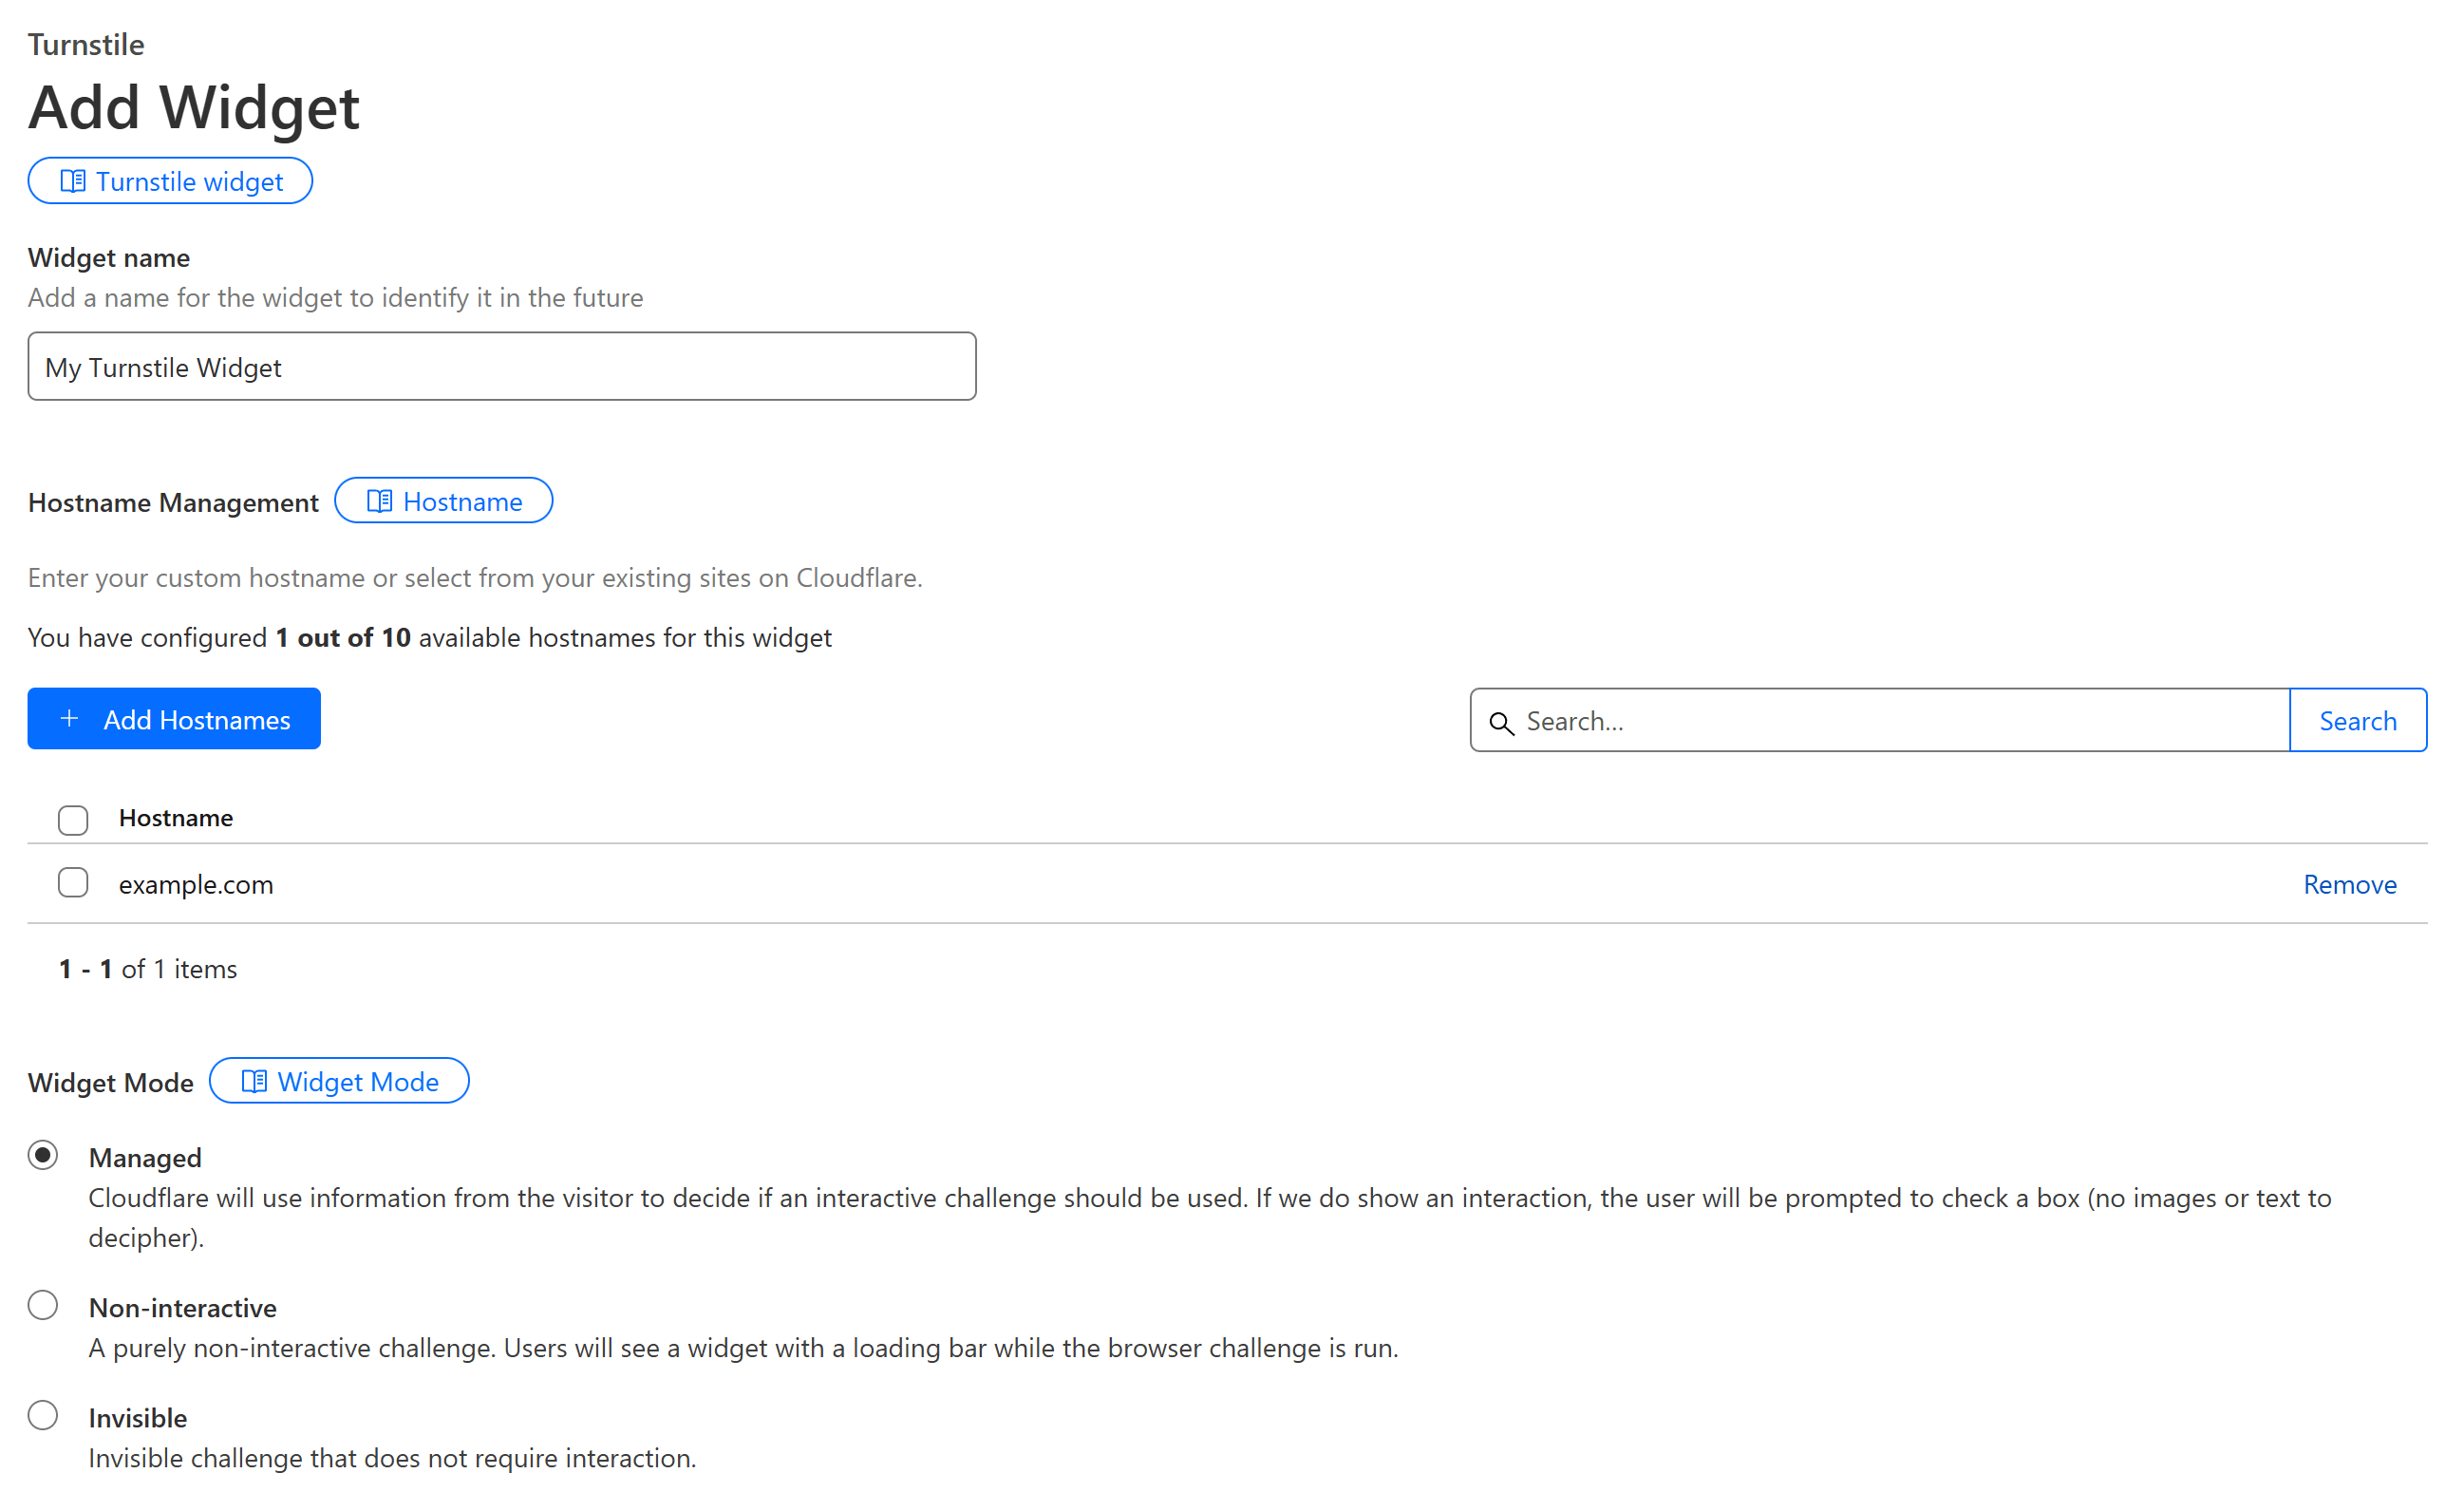
To get started with using Turnstile in ASP.NET Core, you will need a Cloudflare account. When signed in, follow these steps to create a Turnstil widget:
- On the Cloudflare dashboard, click Turnstile in the left menu.
- Click the Add widget button.
- Give the widget a name of your choice and add your domain's hostname.
- In Widget Mode pick Managed and leave the rest of the choices in default values.
- Click the Save button and copy the site key and secret for later.
Now let's head over to some code. For the rest of this post, I'll use an ASP.NET Core website, but this could be other frameworks as well as ASP.NET as well.
On the page that you need the Turnstile widget to show, start by including the following script reference:
<script src="https://challenges.cloudflare.com/turnstile/v0/api.js?render=explicit&onload=onloadTurnstileCallback" async defer></script>
Inside a form element, include a container for showing the widget:
<form ...>
  <!-- ... -->
  <div id="turnstile-container"></div>
</form>
Either create a new JavaScript file with the following code and reference that file from the page or include the code in an already referenced file:
const captchaSolved = ref(false);

window.onloadTurnstileCallback = function () {
  turnstile.render("#turnstile-container", {
    sitekey: "SITE_KEY",
    callback: function (token) {
        captchaSolved.value = true;
    },
    'expired-callback': function () {
        captchaSolved.value = false;
    }
  });
};
The onloadTurnstileCallback function will be called by the Turnstile script when it needs to load the widget. This function named is specified to the onload parameter when in the Turnstile script reference. When the user successfully solves the challenge, the callback function is called. This also produces a token that we will need on the server to validate the challenge in just a moment. Remember to replace SITE_KEY with the Turnstile key you copied in a previous step.
When submitting the form, you will need to pass along the token from the Turnstile widget. How you implement the submit request, depends on if you are using Angular, React, Vanilla JS, etc. Here's an example of using data binding on the form element to a method named onSubmit:
const onSubmit = handleSubmit(() => {
    const token = turnstile.getResponse();
    if (token === "" || token == undefined || token == null) {
        return;
    }

    captchaSolved.value = false;
    axios
        .post('/myendpoint', Qs.stringify({ captcha: token }))
        .then(response => {
            turnstile.reset("#turnstile-container");
            captchaSolved.value = false;

            // Success
        })
        .catch(error => {
            turnstile.reset("#turnstile-container");
            captchaSolved.value = false;

            // Failure
        });
});
The code gets the token from the Turnstile widget and passes it as a query parameter to the backend. The request will typically include more query parameters that have been left out for simplicity. Let's implement the /myendpoint method in ASP.NET Core.
In the website, implement the form post endpoint:
public class MyController(Captcha captcha) : ControllerBase
{
    [HttpPost]
    [Route("myendpoint")]
    public async Task<ActionResult> MyEndpoint(string token)
    {
        if (!await captcha.IsValid(token)) return BadRequest();

        // Business logic goes here

        return Ok();
    }
}
I have used an MVC controller in this example, but the code can easily be implemented with Minimal API as well. Notice how the POST endpoint accepts the token generated on the client as a parameter named token. And that this token is sent to a class named Captcha for validation.
To implement the token validation, I'll implement the Captcha class as a simple HTTP client. There are a couple of NuGet packages that wrap this code already, but it is so simple to implement, that I'll do it manually rather than taking a new dependency:
public class Captcha(HttpClient captchaClient)
{
    public async Task<bool> IsValid(string token)
    {
        try
        {
            var formData = new Dictionary<string, string>
            {
                { "secret", "SITE_SECRET" },
                { "response", token }
            };

            var content = new FormUrlEncodedContent(formData);
            var postTask = await captchaClient.PostAsync("/turnstile/v0/siteverify", content);

            var result = await postTask.Content.ReadAsStringAsync();
            var resultObject = JsonSerializer.Deserialize<JsonElement>(result);
            return resultObject.GetProperty("success").GetBoolean();
        }
        catch
        {
            return false;
        }
    }
}
The Captcha class implements token validation using a HttpClient provided in the constructor. The IsValid method will make an HTTP POST to the /turnstile/v0/siteverify endpoint with the Turnstile secret and the generated token. Cloudflare's API will return a success boolean indicating if the token is valid or not. Remember to replace SITE_SECRET with the Turnstile secret you copied in a previous step.
The only missing part now is setting up the Captcha class for dependency injection in Program.cs:
builder.Services.AddHttpClient<Captcha>(x =>
{
    x.BaseAddress = new Uri("https://challenges.cloudflare.com");
});
This code adds the Captcha class with a provided HttpClient that communicates with Cloudflare's API.
That's it! With just a few steps, Turnstile is now implemented in ASP.NET Core, making it harder for bots to mess with us while keeping things smooth for real users. If you are already on Cloudflare's stack, Turnstile is a great option to implement captchas in ASP.NET Core.
elmah.io: Error logging and Uptime Monitoring for your web apps
This blog post is brought to you by elmah.io. elmah.io is error logging, uptime monitoring, deployment tracking, and service heartbeats for your .NET and JavaScript applications. Stop relying on your users to notify you when something is wrong or dig through hundreds of megabytes of log files spread across servers. With elmah.io, we store all of your log messages, notify you through popular channels like email, Slack, and Microsoft Teams, and help you fix errors fast.

See how we can help you monitor your website for crashes Monitor your website